20
EN
INSTALLATION
Precautions
1. Unpack all parts and remove protective material.
2. Do not connect the unit to the mains before checking the mains
voltage and before all other connections have been made.
3.
Do not cover any vents and make sure that there is a space of several
centimeters around the unit for ventilation.
Installation of counter weight
1.
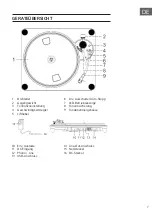
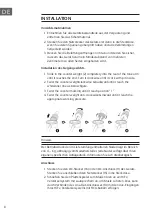
Slide in the counter weight (2) completely into the rear of the tone arm
until it reaches the end. Turn it clockwise until it click with pit inside.
2. Twist the counter weightclockwise & backwarduntil it reach the
whiteinner line as below figure.
3. Twist the counter marking until it reach position“ 1 “
4. Twist the counter weight anti-clockwise & inward until it reach the
appropriate working pressure.
Remark : the working pressure of the provided stylus is from the range
4 - 6 grams. According to the cartridge manufacturer. All stylus has its own
working pressure and please refer to the specification respectively.
Connection
1.
Insert the DC plug (16) to the DC jack (11) of the main unit, then connect
the AC/DC adaptor (15) to AC outlet.
2.
Please connect your turntable unit to your Hi-Fi / Amplifier system with
speaker for music listening. It can be done by connecting the Line out
socket (14) to the auxiliary input jacks on your Hi-Fi / Amplifier system
with RCA cables.
3.
You may select the Phono Thru (Phono Direct) / EQ ON (via Pre-
amplifier) button (12).
If set the Phono Thru / EQ ON selector (12) at EQ ON position, the
output signal will pass through the system’s built-in pre-amplifier


