background image

20

Encoding/Copying LPs and CDs to Digital Audio (MP3)

CD -> MP3

Encoding 1 track

• 

Perform normal playback of the CD track you want to encode & record,

• 

Press REC button (15) during the playback of the desire track, unit will display

 & 

 flashing. 

Encoding is performing now.

• 

After completing of encoding, unit will stop playback automatically.

Encoding whole disc

• 

Place a CD with the printed side facing up inside the tray & then close the CD door

• 

Press REC button (15) after focus search completed. Unit will display 

 & 

  flashing. Encoding 

is performing now.

• 

After completing of encoding, unit will stop playback automatically.

Encoding by playlist

• 

Place a CD with the printed side facing up inside the tray & then close the CD door

• 

Select the desire tracks by following “

CD disc programming

“ procedures. Then press PLAY/PAU

-

SE (12) to start playback.

• 

During CD playback, press and hold the “ CD play/pause/stop “ button (12) for 2 seconds to enter

the stop mode.

• 

Press the “ RECORD “ button (15) and the unit will display 

 & 

- Encoding is performing 

now.

• 

After completion of encoding, the unit will stop playback automatically

Remarks:

• 

The recording speed is 1:1 and according to the actual plying time of the CD track

• 

The system will create a “ Audio “ folder and then store the encoding track in it.

• 

The recording format is preset at – MP3 bit rate : 128 kbps, sampling rate : 44.1khz

• 

No song title will be recorded during encoding mode

• 

To interrupt the recording, press the “ record “ button again during record mode

• 

Recording will be completed only if an entire song is being encoded. If you terminate the encoding 

process intermediately, there is no track being recorded nor stored to the USB storage.

Copying MP3 files

If you insert an MP3 disc instead of an audio CD, the system will copy the files to an inserted USB drive when 

you press the REC button. The operation procedure is the same as CD encoding (see above), and the system 

will switch to copy mode only if MP3 file being read.

Phono -> MP3

• 

Set the function button to “ Phono “ mode and then press the “ Record “ button (15) directly.

• 

The LCD display with show the word “

USB

“ and then flashing, and then display 

 & 

 and flashing 

after few seconds. Now the system is starting the encoding mode.

Summary of Contents for RTT 1922

Page 1: ...www auna multimedia com 10027864 10027865 10027866 Retro Stereoanlage MP3 CD USB FM AUX Aufnahmefunktion RTT 1922 ...

Page 2: ...2 Bedienungsanleitung 3 User Manual 13 Mode d emploie 23 Istruzioni per l uso 33 Manual de instrucciones 43 ...

Page 3: ...igt werden Halten Sie das Produkt fern von Feuchtigkeit und Hitze Lassen Sie keine Gegenstände aus Metall in dieses Gerät fallen Stellen Sie keine schweren Gegenstände auf dieses Gerät Reinigen Sie das Gerät nur mit einem trockenen Tuch Blockieren Sie nicht die Belüftungsöffnungen Verwenden Sie ausschließlich vom Hersteller oder vom qualifizierten Fachhandel empfohlenes Zube hör Die Gewährleistung...

Page 4: ...y Mode 4 15 Aufnahme starten Source 5 16 CD Lade öffnen schließen Power Off Funktionen 6 17 Stummschalten X bass Ein Aus 7 18 Frequenzband Regler Lautstärkeregler 8 19 Kopfhörer Anschluss USB Anschluss 9 20 Aux In Anschluss CD Lade 10 21 IR Sensor Radio Band 11 22 FM Stereo LED Anzeige ...

Page 5: ...5 Puck für 45rpm Singles 23 25 Auto Stop Schalter Schallplatten Drehzahl Regler 24 26 Tonarm Halterung Line Out Anschluss 27 29 Netzkabel FM Antenne 28 Plattenspieler Rückseite ...

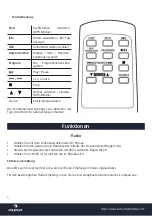
Page 6: ...Batterien des Typs AAA Nicht im Lieferumfang enthalten Fernbedienung Funktionen Radio Wählen Sie mit dem Funktionswahlschalter 6 FM aus Wählen Sie den gewünschten Radiosender mithilfe des Frequenzband Reglers 18 Stellen Sie die gewünschte Lautstärke mit dem Lautstärke Regler 8 ein Wählen Sie X BASS 7 für mehr Druck im Bassbereich FM Stereo Empfang Die LED Leuchte 22 leuchtet auf wenn der Radio Emp...

Page 7: ...P DOWN um eine alphabetisch geordnete Liste aller auf der CD vorhandenen Tracks zu durchsuchen Drücken Sie PLAY um den jeweils gewählten Song abzuspielen Betätigen Sie FIND zweimal hintereinander zeigt sich die Ordnerstruktur auch wiederum im alpha betisch geordneten Format Drücken Sie PLAY um den angewählten Ordner komplett abzuspielen Bitte beachten Sie Für den Fall dass einem Track kein Titel z...

Page 8: ...Abspielen Drücken Sie PROGRAM Auf dem Display wird PROG angezeigt Weiterhin wird die Programmnummer angezeigt sowie Ziffern für den Musik Track den Sie ans erstes einfügen möchten Wählen Sie den gewünschten Titel mit den Pfeiltasten 2 13 Drücken Sie nochmals PROGRAM um den gewählten Track zu speichern Wiederholen Sie die vorigen zwei Schritte um weitere Tracks einzufügen Drücken Sie schließlich PL...

Page 9: ...mers vor der Inbetriebnahme ab Stellen Sie weiterhin sicher dass der Tonarm nicht zu Transportzwecken festgebunden ist Stellen Sie den Funktions Wahlschalter 6 auf PHONO Stellen Sie die Drehgeschwindigkeit mit dem Schalter ein 24 Legen Sie eine Schallplatte auf die Spindel Heben Sie den Tonarm an und bewegen Sie ihn sachte in Richtung Schallplatte diese beginnt auto matisch sich zu drehen Am Ende ...

Page 10: ...nd an Bei Aufnahmeende stoppt die CD Kopieren von MP3 Dateien Natürlich können Sie auch MP3 Daten von MP3 CDs auf USB Sticks kopieren Die Vorgehensweise entspricht derjenigen im Abschnitt Kopieren eines einzelnen Titels beschriebenen Schallplatte MP3 Kopieren einer Schallplatte Bewegen Sie den Funktions Wahlschalter in die Stellung PHONO um den Plattenspieler anzu wählen und drücken Sie danach REC...

Page 11: ...neut INFO um Ihre Wahl zu bestätigen Löschen von Dateien USB Modus Fernbedienung Löschen einzelner Dateien Halten Sie INFO für mindestens 3 Sekunden gedrückt bis das Display zeigt del 001 Suchen Sie die zu löschen gewünschte Datei mit den Pfeiltasten Drücken Sie RECORD zum löschen und bestätigen Sie yes no mit Hilfe der Pfeiltasten Drücken Sie nochmals RECORD zum Bestätigen Alle Dateien löschen Ha...

Page 12: ...d elektronischer Gerätschaften Richten Sie sich nach den örtlichen Regelungen und entsorgen Sie Altgeräte nicht über den Hausmüll Durch die regelkonforme Entsorgung der Altgeräte werden Umwelt und die Gesundheit ihrer Mitmenschen vor möglichen negativen Konsequenzen geschützt Materialrecycling hilft den Verbrauch von Rohstoffen zu verringern Konformitätserklärung Hersteller CHAL TECGmbH Wallstraße...

Page 13: ...rsons may perform technical work on the product The product may not be ope ned or changed The components cannot be serviced by the user The manufacturer is not responsible for any radio or TV interference caused by unauthorized modifications The appliance is not a toy Do not let children play with it Never let children insert foreign objects into the appliance Never clean the surface of the device...

Page 14: ...4 MP3 folder up Play Mode 4 15 REC Source 5 16 CD open close Power Off Functions 6 17 Mute X Bass on off 7 18 Frequency knob radio Volume control 8 19 Headphone jack USB slot 9 20 Aux In jack CD tray 10 21 IR Sensor Radio band 11 22 FM Stereo LED ...

Page 15: ...15 Puck for 45rpm 7 singles 23 25 Auto Stop Speed control 24 26 Pickup arm clasp Line Out jack 27 29 Power cable FM Antenna 28 Record deck Rückseite ...

Page 16: ...he RC needs two type AAA batteries not sup plied Remote control Operation Radio Press the MODE button to select FM Tune to the required station by turning the tuning knob 18 FM stereo reception The FM stereo LED indicator 22 will light up to show FM stereo program is receiving Hints for best reception The receiver has a built in FM wire antenna hanging at the rear cabinet This wire should be total...

Page 17: ...r skip down button to can search the title of each song one by one under alphabet order on LCD display then press 12 to start the playback of the selected track Press FIND agein the folder name is being displayed Then press the skip up or skip down to select the desired folder and press the CD Play pause stop button 12 to start the playback of all tracks inside that selected folder Remarks In the ...

Page 18: ...m is at stop mode before programming Set in CD USB mode stop the CD playback Press the Program button PROG will appear on LCD display 1 Moreover it will indicate program no and digits for track no to be programmed Select a desired track by pressing skip or buttons 2 13 Press the Program button to store the trace into memory Repeat steps 3 and 4 to enter additional tracks into the memory if necessa...

Page 19: ...tone arm is being detached from the tone arm rest before operating and is re secured again afterwards Set the function selector 6 to PHONO Set the speed selector to the proper position depending on the record to be played Place the record on the platter use the spindle adaptor if required Lift the tone arm from the rest and slowly move it to the record side The platter will start to rotate Place t...

Page 20: ...ing is performing now After completion of encoding the unit will stop playback automatically Remarks The recording speed is 1 1 and according to the actual plying time of the CD track The system will create a Audio folder and then store the encoding track in it The recording format is preset at MP3 bit rate 128 kbps sampling rate 44 1khz No song title will be recorded during encoding mode To inter...

Page 21: ...ate for encoding Press INFO to confirm the setting and the LCD display 1 resume to phono mode Delete files USB Mode Remote Control Delete single files Press and hold the Info button for 3 seconds and the LCD display 1 will show del 001 Press NEXT BACK 13 2 button to select the file going to delete Press REC to enter yes no mode and then skip forward or skip backward 13 2 to select Press REC button...

Page 22: ...his product is disposed of correctly you will hep prevent potential negative consequences for the environment and human health which could otherwise be caused by inappropriate waste handling of this product For more detailled information about recycling of this product please contact your local council or your household waste disposial service Declaration of Conformity Producer CHAL TEC GmbH Walls...

Page 23: ...n est nécessaire si l appareil a été endommagé d une quelconque manière par exemple si des liquides ont été renversés dessus si l appareil a été exposé à la pluie ou à l humidité si des objets sont tombés dessus s il a subi une chute ou s il ne fonctionne pas correctement Ne pas réparer l appareil soi même Une ouverture du boîtier représente un risque d électrocution ou de blessure Afin d éviter l...

Page 24: ...l enregistrement Source 5 16 Ouvrir fermer le compartiment CD Power Off fonctions 6 17 Couper le son Activer désactiver X Bass 7 18 Bouton de réglage de la fréquence Réglage du volume 8 19 Prise casque Port USB 9 20 Entrée audio AUX Compartiment CD 10 21 Capteur IR Bande radio 11 22 Témoin lumineux Stéréo FM ...

Page 25: ...25 Puck pour 45 tours 23 25 Interrupteur arrêt automatique Régulateur numéroté du vinyle 24 26 Base du bras Branchement Line Out 27 29 Câble électrique Antenne FM 28 Rückseite ...

Page 26: ... désirée Insérer deux piles de tipes AAA dans la télécom mande non fournies Éloigné Fonctions Radio Sélectionner le mode FM à l aide du bouton du choix de fonction 6 Sélectionner la station de radio de votre choix à l aide du bouton de réglage de la fréquence 18 Ajuster le niveau du volume à l aide du bouton de réglage du volume 8 Activer le X BASS 7 pour plus de pression au niveau des basses Réce...

Page 27: ...OWN pour par courir la liste organisée par ordre alphabétique de toutes les pistes disponibles sur le CD Appuyer sur la touche PLAY pour lire le titre de votre choix Appuyer deux fois de suite sur la touche FIND pour afficher les dossiers par ordre alphabétique Appuy er sur la touche PLAY pour lire entièrement un dossier Attention Si la piste ne possède pas de nom NONE ou UNKNOWN s affiche sur l é...

Page 28: ...que vous écoutez et suivre les indications suivantes Appuyer sur la touche PROGRAM PROG s affiche sur l écran Le numéro du programme s affiche ainsi que le numéro de l emplacement où peux être ajoutée la première chanson de votre choix Sélectionner la piste de votre choix à l aide des touches fléchées 2 13 Appuyer une nouvelle fois sur la touche PROGRAM pour sauvegarder votre choix Répéter les deu...

Page 29: ...ête de lecture avant d utiliser le tourne disque Veiller à ce que le bras de lecture ne soit pas attaché à son support Placer le bouton du choix des fonctions 6 sur la position PHONO Ajuster la vitesse de rotation à l aide du régulateur 24 Placer le disque sur le plateau Soulever le bras de lecture et le bouger avec précaution vers le vinyle Celui ci commence automati quement à tourner Une fois qu...

Page 30: ...à clignoter Une fois l enregistrement terminé le CD s arrête automatiquement Copier des données au format MP3 Il est également possible de copier des données au format MP3 sur une clé USB depuis un CD au format MP3 La procédure est la même que celle décrite dans la section Copier une seule piste Vinyle MP3 Copier un vinyle Placer le bouton des choix des fonctions sur la position PHONO pour sélecti...

Page 31: ...rs en mode USB télécommande Éliminer un seul fichier Maintenir la touche INFO enfoncée pendant au moins 3 secondes jusqu à ce que l écran affiche del 001 Rechercher le fichier à éliminer à l aide des touches fléchées Appuyer sur la touche RECORD pour éliminer le fichier de votre choix puis confirmer yes no à l aide des touches fléchées Appuyer une nouvelle fois sur la touche RECORD pour confirmer ...

Page 32: ...nt la coll ecte séparée des appareils électriques et électroniques Respectez les et ne jetez pas les appareils usagés avec les ordures ménagères La mise en rebut correcte du produit usagé permet de préserver l environnement et la santé Le recyclage des matériaux contribue à la préservation des ressources naturelles Déclaration de conformité Fabricant CHAL TECGmbH Wallstraße16 10179Berlin Allemagne...

Page 33: ...del dispositivo è necessaria quando questo è stato danneggiato in qualche modo ov vero se sono stati rovesciati dei liquidi o se sono caduti oggetti sopra di esso se è stato esposto alla pioggia o all umidità se non funziona correttamente o è caduto Non tentare di riparare il dispositivo autonomamente Non tentare di aprire il dispositivo per evitare scosse elettriche e altre lesioni Per prevenire ...

Page 34: ...Registrazione Source 5 16 Aprire chiudere lo scomparto CD Power Off Funzioni 6 17 Muto Accensione spegnimento x bass 7 18 Manopola banda di frequenza Manopola volume 8 19 Attacco cuffie Porta USB 9 20 Attacco Aux In Scomparto CD 10 21 Sensore IR Banda Radio 11 22 Spia a LED FM stereo ...

Page 35: ...ttatore puck per singoli 45 giri 23 25 Interruttore Auto Stop Selezione velocità del giradischi 24 26 Supporto braccio del giradischi 27 Attacco Line Out 27 29 Cavo di rete Antenna FM 28 Giradischi Rückseite ...

Page 36: ...are la fonte musicale desiderata Il telecomando necessita di due batterie di tipo AAA non incluse nella consegna Telecomando Funzioni Radio Selezionare FM tramite il selettore di funzione 6 Selezionare il canale radio desiderato con la manopola della banda di frequenza 18 Selezionare il volume desiderato con la manopola volume 8 Selezionare X BASS 7 per potenziare i bassi Ricezione FM Stereo Le sp...

Page 37: ...FIND sul telecomando e poi SKIP UP oppure SKIP DOWN per sfogliare in ordine alfabetico la lista di tutte le tracce presenti sul CD Premere PLAY per riprodurre il brano desiderato Premere FIND due volte consecutivamente ed appaiono in ordine alfabetico le cartelle presenti Pre mere PLAY per riprodurre per intero la cartella desiderata Attenzione Nel caso in cui al brano non sia stato assegnato alcu...

Page 38: ...derata Per prima cosa stop pare la riproduzione dei brani Premere PROGRAM Sul display compaiono PROG il numero del programma e le cifre del brano mu sicale da programmare Selezionare il brano desiderato con i tasti freccia 2 13 Premere di nuovo PROGRAM per memorizzare il brano selezionato Ripetere i due passi precedenti per aggiungere altri brani Premere infine PLAY PAUSE STOP 12 per riprodurre il...

Page 39: ...i funzione 6 su PHONO Impostare la velocità con l interruttore 24 Inserire il vinile Sollevare il braccio del giradischi e spostarlo verso il vinile questo comincia automaticamente a girare e alla fine si arresta automaticamente Per arrestare la riproduzione manualmente sollevare con cautela il braccio del giradischi Nota In alcuni tipi di vinili può accadere che il vinile si arresti prima che l u...

Page 40: ...vo si trova in modalità registrazione Riprodurre il brano che si desidera registrare Per terminare la registrazione tenere premuto RECORD fino a che il display non lampeggia più e compare PHONO MODE Separare le tracce Se si copiano brani da vinile in formato Mp3 aggiungere manualmente le pause ogni volta che si preme track separation durante la copia il dispositivo crea un nuovo brano e la registr...

Page 41: ...ermare Cancellare tutti i file Tenere premuto INFO per 3 secondi fino a che sul display compare del 001 Tenere INFO premuto ancora una volta per almeno 3 secondi per accedere alla modalità FOR MAT 7N Infine selezionare con i tasti direzionali Yes oppure No e confermare premendo RECORD Confermare l impostazione premendo ancora una volta RECORD ATTENZIONE con questa procedura tutti i dati contenuti ...

Page 42: ...i dispositivi elettri ci e elettronici Non smaltire i vecchi dispositivi con i rifiuti domestici Grazie al corretto smaltimento dei vecchi dispositivi si proteggono il pianeta e la salute delle persone da possibili conseguenze negative Il riciclo di materiali aiuta a diminuire il consumo di ma terie prime Dichiarazione di conformità Produttore CHAL TECGmbH Wallstraße16 10179Berlino Germania Questo...

Page 43: ...iertas se expone a una descarga eléctrica y a otras lesiones Para evitar el riesgo de una descarga eléctrica evite una sobrecarga del circuito eléctrico del cable y de las conexiones establecidas Conecte el aparato solamente a tomas de corrientes que se adecuen a los valores de tensión especi ficados en el mismo Si quiere utilizar el enchufe para apagar el aparato asegúrese de que este siempre est...

Page 44: ... grabación Fuente 5 16 Abrir cerrar el compartimento del CD Power OFF Funciones 6 17 Modo silencio X bass on off 7 18 Regulador de frecuencia de banda Regulador de volumen 8 19 Conexión de auriculares Conexión USB 9 20 Conexión Aux In Carga de CD 10 21 Sensor IR Banda de Radio 11 22 Indicador LED estéreo FM ...

Page 45: ...45 Puck para singles de 45 rmp 23 25 Interruptor Auto Stop Regulador de las revoluciones del vinilo 24 26 Soporte para el brazo Conexión Line Out 27 29 Cable Antena FM 28 Tocadisco ...

Page 46: ...SB Selec cionar el modo de la fuente musical deseada El mando a distancia necesita dos pilas tipo AAA no incluidas en el envío Mando a distancia Funciones Radio Seleccione FM con el interruptor de función 6 Seleccione la emisora deseada con el regulador de banda de frecuencia 18 Ajuste el volumen con el regulador 8 Seleccione X BASS 7 para unos bajos más potentes Recepción FM estéreo La luz LED 22...

Page 47: ...queda busque por el nombre de pista o carpeta mando a distancia Asegúrese de que el CD MP3 se ha detenido Stop Pulse FIND en el mando a distancia y a continuación SKIP UP o SKIP DOWN para buscar en una lista ordenada alfabéticamente todas las pistas que contiene el CD Pulse PLAY para reproducir la pista seleccionada Pulse FIND una segunda vez para que aparezcan todas las carpetas también ordenadas...

Page 48: ...istas en modo CD USB Para ello detenga la reproduc ción Pulse PROGRAM En el display aparecerá PROG A continuación se mostrará el número del programa y la cifra para la pista que quiere añadir en primer lugar Seleccione la pista deseada con los botones de dirección 2 13 Pulse de nuevo PROGRAM para guardar la pista deseada Repita los dos pasos anteriores para añadir más pistas Pulse PLAY PAUSE STOP ...

Page 49: ...tá atascado tras el transporte Seleccione la función PHONO en el interruptor de función Seleccione la velocidad de reproducción con el botón 24 Coloque un disco Suba el brazo del tocadiscos y desplácelo en dirección al tocadiscos este comenzará a girar au tomáticamente Al final del disco el aparato se detendrá automáticamente Para detener la reproducción manualmente retire el brazo con cuidado y v...

Page 50: ...a posición PHONO para reproducir el disco y a continua ción pulse RECORD 15 El display muestra USB parpadeando y luego y para indicar que el aparato está en proceso de grabación Reproduzca la pista del disco que quiere grabar Para finalizar con el proceso de grabación mantenga pulsado RECORD hasta que el display no parpadee y aparezca PHONO MODE Añadir pausas entre pistas Añada pausas manualmente ...

Page 51: ...ECORD para borrar y confirme los cambios Yes no por medio de los botones de direc ción Pulse de nuevo RECORD para confirmar Eliminar todos los archivos Mantenga pulsado INFO durante al menos 3 segundos hasta que el display muestre del 001 Mantenga pulsado INFO de nuevo durante otros 3 segundos hasta iniciar el modo FORMAT 7N Seleccione Yes o No con los botones de dirección y pulse RECORD para conf...

Page 52: ...os y electrónicos Respete las leyes ter ritoriales y no arroje aparatos viejos al cubo de la basura doméstica Una retirada de apa ratos conforme a las leyes contribuye a proteger el medio ambiente y a las personas a su alrededor frente a posibles consecuencias perjudiciales para la salud El reciclaje ayuda a reducir el consumo de materias primas Declaración de conformidad Fabricante CHAL TEC GmbH ...

Reviews: