Install the replacement cable
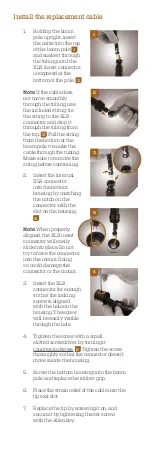
1. Holding the boom
pole upright, insert
the cable into the top
of the boom pole
1
and snake it through
the tubing until the
XLR insert connector
is exposed at the
bottom of the pole.
2
Note:
If the cable does
not move smoothly
through the tubing, use
the included string: tie
the string to the XLR
connector and drop it
through the tubing from
the top.
3
Pull the string
from the bottom of the
boom pole to snake the
cable through the tubing.
Make sure to remove the
string before continuing.
2. Insert the internal
XLR connector
into the bottom
housing by matching
the notch on the
connector with the
slot on the housing.
4
Note:
When properly
aligned, the XLR insert
connector will easily
slide into place. Do not
try to force the connector
into the mount. Doing
so could damage the
connector or the mount.
3. Insert the XLR
connector far enough
so that the locking
screw is aligned
with the hole on the
housing. The screw
will be easily visible
through the hole.
4. Tighten the screw with a small
slotted screwdriver by turning it
counterclockwise.
5
Tighten the screw
thoroughly so that the connector doesn’t
move inside the housing.
5. Screw the bottom housing onto the boom
pole and replace the rubber grip.
6. Place the strain relief of the cable into the
tip exit slot.
7. Replace the tip by screwing it on, and
secure it by tightening the set screw
with the Allen key.
2
5
4
1
3


