background image

Owner’s Manual

SMS-10CL

Assembly Instructions

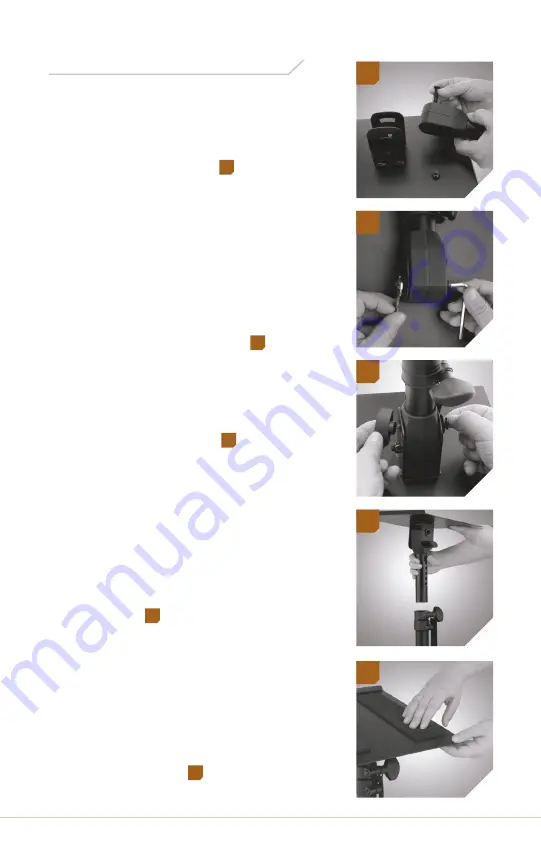
1.  Remove the bolt from the  

adjustable shaft. Lay the  

monitor plate upside down  

on a flat surface.  

1

2.  Slide the adjustable shaft’s 

plastic fitting into the monitor 

plate bracket. Push the bolt 

through the hole nearest the 

monitor plate. Hold the nut 

in place with the open-end 

wrench, and tighten the bolt 

with the hex wrench.  

2

3.  Unscrew the tilt locking knob, 

and slide the bolt through the 

bracket’s tilt slot. Replace the 

tilt locking knob.  

3

4.  Loosen the C-clamp lock so 

the clamp slides onto your 

desk or tabletop, and tighten 

the C-clamp until secure.

5.  Fit the monitor plate and 

adjustable shaft into the base 

shaft.  

4


6.  Attach the EVA pads to the 

monitor plate by removing the 

protective strip to expose the 

glue surface. Place the pads on 

the monitor plate either in  

vertical or horizontal  

orientation. 

5

4

5

3

2

1

Summary of Contents for Clamp-On Desktop Studio Monitor Stand

Page 1: ...Owner s Manual SMS 10CL Owner s Manual Clamp On Desktop Studio Monitor Stand Pair SMS 10CL ...

Page 2: ...he height of each stand adjusts from 10 to 14 5 inches above the desk Height and tilt are easily adjusted with ergonomic knobs and a locking pin adds stability and security for your valuable monitors Precautions Please read and follow these instructions and keep this manual in a safe place Handle this product with care Keep this product away from water and any flammable gases or liquids Make sure ...

Page 3: ...0CL Overview 1 2 4 5 8 10 9 6 7 Monitor plate 1 EVA pads 2 Bracket 3 Tilt lock 4 Adjustable shaft 5 Safety holes 6 Safety pin and lanyard 7 Locking knob 8 Base shaft 9 C clamp 10 Also Included Open end wrench Hex wrench 3 ...

Page 4: ...nd tighten the bolt with the hex wrench 2 3 Unscrew the tilt locking knob and slide the bolt through the bracket s tilt slot Replace the tilt locking knob 3 4 Loosen the C clamp lock so the clamp slides onto your desk or tabletop and tighten the C clamp until secure 5 Fit the monitor plate and adjustable shaft into the base shaft 4 6 Attach the EVA pads to the monitor plate by removing the protect...

Page 5: ...in horizontal or vertical orientation 3 2 Loosen the tilt lock and adjust the monitor s angle Make sure the mounting plate s lip is on the lower side of plate s angle to prevent slipping 4 3 Adjusting the Height 1 Loosen the locking knob 2 Raise or lower the monitor plate and insert the locking pin through the holes 1 3 Lower the shaft until it rests on the locking pin Tighten the locking knob unt...

Page 6: ...HEREIN THE WARRANTY PROVIDER MAKES NEITHER ANY EXPRESS WARRANTIES NOR ANY IMPLIED WARRANTIES INCLUDING BUT NOT LIMITED TO ANY IMPLIED WARRANTY OF MERCHANTABILITYORFITNESSFORAPARTICULARPURPOSE Thiswarrantyprovidesyou with specific legal rights and you may also have additional rights that vary from state to state To obtain warranty coverage contact the Auray Customer Service Department to obtain a r...

Reviews: