background image


Installation Steps 

1


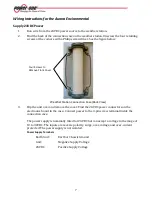
Select Location for the AE Weather Station 

2


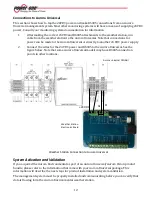
Make Connections to 24VDC Power 
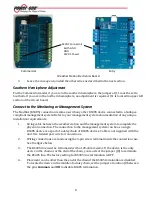
3


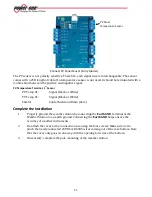
Make Connections to Management System through RS485 

4


Install PV Panel Temperature Sensor; 

For Commercial Version, Install Secondary Pyranometer and PV Panel Sensor 

5


Complete Mounting of the AE Weather Station 

6


Verify and validate the Installation via the Management System 


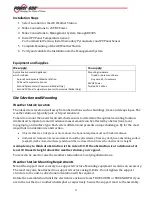
Equipment and Supplies 

We supply: 

You supply: 

Aurora Environmental Appliance,  

which includes: 
      Aurora Environmental Weather Station 
      PV Panel Temperature Sensor 
      Second Pyranometer (Commercial Model Only) 
      Second PV Panel Temperature Sensor (Commercial Model Only) 

Mounting Hardware 
      Tripod or pole mount base 
      Guy wire kit, if necessary 
24VDC Power 
Twisted Pair Wires 
 

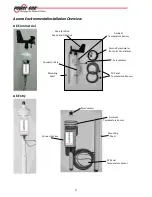
Site Selection and Mounting 

Weather Station Location 

The ideal site is level and well away from obstructions such as buildings, tress, and steep slopes. The 

weather station is typically pole or tripod mounted.  
Take into account the needs for all attached sensors to determine the optimal mounting location. 

Ambient air temperature and irradiance measurements can be affected by obstructions, local 

topography, and surface type. Each site is different and presents unique challenges. By far the most 

important consideration is obstruction.  


Objects that are 10 degrees or more above the horizontal plane must not block irradiance.   


Ambient air temperature measurement should be placed away from any dark, heat-absorbing surface 

(asphalt, dark-colored surfaces) and should be no closer than 4 times the obstruction’s height.  

A simple way to think of obstruction is the rule of 10. If the obstruction is at a distance of at 

least 10 times its height above the weather station, you’re good. 

Towers can be used to raise the weather station above low-lying obstructions.  

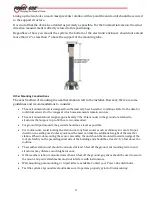
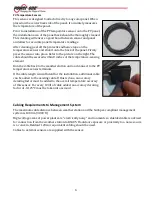
Weather Station Mounting Requirements 

Mount the support mast securely to a support structure. Mounting equipment is sold as an accessory. 

The mast may also be attached to a support structure using U-Bolts. Do not tighten the support 

structure to the unit, as directional orientation will be required.    
Rotate the assembled unit until the electronics enclosure faces TRUE SOUTH or TRUE NORTH if you 

are in the northern or southern hemisphere, respectively. Secure the support mast to the assembly. 

Summary of Contents for VSN-ENVIRO-CMML

Page 1: ...THE MANUAL AURORA ENVIRONMENTAL Model Number VSN ENVIRO ENTRY VSN ENVIRO CMML...

Page 2: ...omparison to predicted environmental data and actual inverter solar panel output The RS485 port of the Aurora Environmental Appliance is attached via low voltage wires to the monitoring or management...

Page 3: ...Pyranometer Ambient Temperature Sensor Connector Case PV Panel Temperature Sensors Second Pyranometer For Solar Panel Plane Vane for Wind Speed and Direction Mounting Mast Pyranometer Mounting Mast Co...

Page 4: ...n Ambient air temperature and irradiance measurements can be affected by obstructions local topography and surface type Each site is different and presents unique challenges By far the most important...

Page 5: ...mounts in the ground or attached to structures that support up to 50 lbs are recommended For ground tripod mounts the ground should be as level as possible For roof mounts avoid locating the station n...

Page 6: ...array pyranometer is mounted on the side of the solar array The sensor should be at the same zenith and azimuth angle as solar array to correctly measure the plane of array irradiance Anemometer Comm...

Page 7: ...g element Run the cable back to the weather station unit and connect to the PV temperature sensor terminals If the cable length is insufficient for the installation additional cable can be added to th...

Page 8: ...lip the unit over and remove the cover Find the 24VDC power connectors on the electronics board in the case Connect power to the 3 pin screw terminal inside the connection case The power supply is nom...

Page 9: ...tion and the management system to complete the physical connection The connection to the management system can be as a single RS485 device or as part of a daisy chain of RS485 devices Cable is not sup...

Page 10: ...5 Attach the second Pyranometer to your array The sensor should be attached so top of the sensor is in the same plane as the PV panels The sensor comes pre attached to a bracket for easy installation...

Page 11: ...rminal 1st Sensor PV Temp 1 Signal Black or White PV Temp 1 Signal Black or White Shield Cable Shield and Drain bare PV Temperature Terminals 2nd Sensor PV Temp 2 Signal Black or White PV Temp 2 Signa...

Page 12: ...Shield Cable Shield and Drain bare Complete the Installation 1 Properly ground the weather station by connecting the Earth GND terminal at the Weather Station to an earth ground Connecting the Earth...

Page 13: ...ires for the 24VDC power and RS485 to the Aurora Universal See the figure below Note that some Aurora Universal models may have RS485 connection points in other locations Weather Station Connection to...

Page 14: ...in Hardware Stainless Steel and Nylon Locknut Foam Gasket Vinyl and Acrylic Enclosure RoHS Compliant IP65 Rated Outdoor Enclosures UL 94 V 2 Polycarbonate Body Pyranometer Sensor RoHS Compliant Body A...

Page 15: ...Time Constant 30 sec PV Panel Temperature Sensors Range 40 to 80C 40 to 176 F Accuracy 0 3 C 0 54 F Thermal Time Constant 270 sec Cable Length 7 62m 25 ft Anemometer Operational Temperature 40 to 60 C...

Page 16: ...omer Support E mail service us power one com www power one com 2011 2012 Power One Corporation Power One is a registered trademark and Aurora Vision is a trademark of Power One Corporation All rights...

Page 17: ...800 00 28 76 72 Aurora Power Service Germany 0800 2200211 Aurora Power Service Italy 00 800 00 28 76 72 Aurora Power Service Spain 00 800 00 28 76 72 Aurora Power Service Middle East 00 800 00 28 76...

Reviews: