Section 03
ENGINE
Subsection 09
(CYLINDER AND HEAD)
03-09-18
VMR2004_132_03_09A.FM
Installation
For installation, reverse the removal procedure.
Pay attention to the following details.
CAUTION:
Make sure the thrust washer
no. 39
is installed before installing valve stem seal
no. 38
.
Apply engine oil on valve stem and install it.
CAUTION:
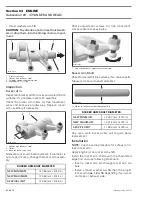
Be careful when valve stem is passed
through sealing lips of valve stem seal.
1. Thrust washer
2. Sealing lips of valve stem seal
To ease installation of cotters, apply oil or grease
on them so that they remain in place while releas-
ing the spring.
After spring is installed, ensure it is properly
locked by tapping on valve stem end with a soft
hammer so that valve opens and closes a few
times.
CAUTION:
An improperly locked valve spring
will cause engine damage.
VALVE GUIDE PROCEDURE
Removal
Remove:
– cylinder head (see CYLINDER HEAD
above)
– valve spring (see VALVE SPRING
above)
– valves (see VALVE
above).
NOTE:
Clean valve guide area from contamination
before removal.
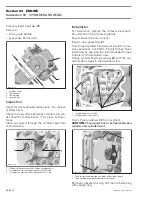
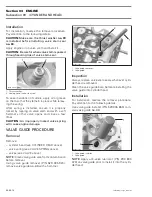
Using valve guide remover (P/N 529 035 924),
remove valve guide
no. 40
with a hammer.
1. Valve guide remover
2. Valve guide
Inspection
Always replace valve stem seals whenever cylin-
der head is removed.
Clean the valve guide bore before reinstalling the
valve guide into cylinder head.
Installation
For installation, reverse the removal procedure.
Pay attention to the following details.
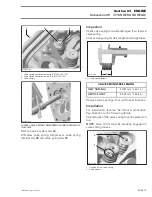
Use valve guide installer (P/N 529 035 853) to in-
stall valve guide
no. 40
.
1. Valve guide installer
2. Valve guide
NOTE:
Apply anti-seize lubricant (P/N 293 800
070) on valve guide prior to install it into the cylin-
der head.
1
R400motr85A
2
2
R400motr86A
1
1
R400motr87A
2


