background image

15

CARE AND MAINTENANCE

1) 

Charcoal Grate-

Remove and shake expended ashes into 

a safe receptacle or area. If any unburned charcoal, just 
leave it until next time. (Optional) Scrape any residue from 
the grate. Wash with warm soapy water if you wish, or just 
spray with garden hose.

2) 

Drip Pan-

Remove and clean out excess grease and

drippings. Wash with soap and water or mild abrasive 
cleanser.

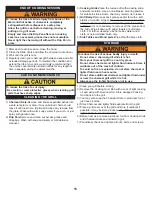
CLEANING THE GRILL

1) After each cooking session, close the hood. 
2) Close the Slide Vents and allow the charcoal to die down. 
3) Wait until the grill is cool.
4) Regularly clean your charcoal grill between uses and after 

extended storage periods. To maintain the condition and 
extend the life of your grill, we strongly recommend that 
the unit be covered when stored outside for any length of 
time, especially during the winter months. 

END OF COOKING SESSION

To reduce the risk of serious injury from burns or fire:

· Wait until hot ashes or charcoal is completely

extinguished before disposal in a safe place. 

· Allow the grill to cool before cleaning, moving or

putting on a grill cover.

· Empty and clean the Drip Pan after each cooking

session so excessive grease does not accumulate. 
Never light the charcoal grill without the Drip Pan in 
place.

To reduce the risk of serious bodily injury or death:

· Do not store a charcoal grill while it is hot. 
· Store your charcoal grill in a cool dry place. 
· Do not store charcoal and lighter fluid indoors. Store it 

outdoors out of the reach of children. 

· To avoid an fire or explosion, do not store charcoal or 

lighter fluid near a heat source. 

· Do not store additional charcoal and lighter fluid under 

or near the charcoal grill while it is hot.

· Always cap the lighter fluid when not in use.  

STORAGE

1) Clean your grill before storing.
2) Remove the Cooking Grid. Rub with a coat of light cooking 

oil and wrap with aluminum foil. Store wrapped Cooking 
Grid back into the grill.    

3) You may also wrap the Charcoal Grate in aluminum foil or 

just leave it alone. 

4) Store Charcoal and lighter fluid separate from the grill.
5) Place a grill cover over the grill and store it outdoors if

possible. It may be stored indoors only if the charcoal and 
lighter fluid are not stored with it.

6) Before next use, remove aluminum foil from Cooking Grids  

and Charcoal Grate and reinstall in grill.

7) Periodically check and tighten all nuts, bolts, and screws.

3) 

Cooking Grids-

Clean the residue off with a baking soda 

and water solution. Use a non-abrasive scouring powder. 
for stubborn stains. Some char may remain; ok to leave it.

4) 

Grill Body

-Remove excess grease and/or fat with a soft 

plastic or wooden scraper. Do not use steel wool or other 
abrasive cleansers that can scratch the porcelain coated 
surfaces. It is not necessary to remove all the grease from 
the body. Wipe it down with paper towels or soft damp 
cloth. For further cleaning, use hot soapy water and a 
cloth, or nylon-bristled brush only. 

5) 

Side Tables and Wood parts-

Wipe off with damp cloth. 

To reduce the risk of a cut injury:
· Be careful or wear protective gloves when cleaning grill 

parts that have sharp edges.

Summary of Contents for MONARO 7652K1

Page 1: ...esult in fire or explosion which could cause property damage personal injury or death Read and follow instructions carefully before assembly or use Do not use this product for any other purpose than which it is intended These instructions must be kept with the user SAVE THESE INSTRUCTIONS Assembly and Use Manual M Mo od de el l 7 76 65 52 2K K1 1 Aussie M Mo od de el l 7 76 65 52 2K K5 5 7 76 65 5...

Page 2: ...o not throw away any packaging until you have located all the parts Follow instructions of each step in the order they are written as you look at the diagrams This will allow little confusion and easier assembly If you have any questions which require help contact Customer Service and be sure to mention the model number of your grill I Assembly Instructions 2 Parts Illustrations 3 Parts List 4 Ste...

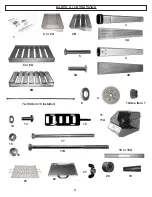
Page 3: ...3 PARTS ILLUSTRATIONS 1 7 with Item 10 installed 9 6 or 6A 5 4 3 2 or 2A 10 See Item 7 23 22 20 21 19 17 16 15 14 13 12 11 2B 3A 4A 5A 11A 17A 18 or 18A 6B 8 ...

Page 4: ...Axle Nut Assembled on Item 7 Axle 03 4073 00 2 2 2 11 Body Assembly See 25 25A 26 for Replacement 1 1 1 12 Slide Vent 03 6072 00 2 2 2 13 Bolt 6mm x 16mm 03 6070 00 8 8 8 14 Washer 6mm 03 6501 00 18 18 18 15 Spacer Sleeve 03 6071 00 8 8 8 16 Locknut 6mm 03 4070 00 10 10 10 17 Bolt 6mm x 90mm 03 6020 00 2 10 10 17A Bolt 6mm x 110mm 03 4066 00 8 18 Handle Hood Models 7652K1 7652K5 03 6036 00 1 1 18A...

Page 5: ...aded holes in the Side Table Do not tighten bolts completely NOTE For easier alignment and further assembly final tightening of all bolts will be completed in Step 6 Attach the two Wheel Legs to the second Side Table the same way Wheel Leg is the short leg with a large axle hole at one end ITEM 5 1 4 20 x 1 3 8 Bolt STEP 1 Leg Side Table Assembly TOOLS ITEM 3 or 3A Fixed Leg ITEM 2 or 2A Side Tabl...

Page 6: ...tom Shelf holes with holes of Wheel Legs and attach with four 1 4 20 Bolts Item 5 or 5A Do not tighten Bolts completely Secure Fixed Legs to Bottom Shelf with 1 4 20 Bolts Go ahead and tighten Wheel Leg bolts securely This will not be possible after the Wheel is assembled Fixed Legs Wheel Legs ITEM 5A 1 4 20 x 1 Bolt Fixed Legs Wheel Legs All Wood Bottom Shelf Leg Assembly ITEM 6B Bottom Shelf ...

Page 7: ...xle through both sides of Wheel Legs Place Axle Washers onto each end of Axle Position Wheel hub recess to the outside and slide a Wheel onto each end of Axle Attach Axle Nut onto each end of Axle Tighten each side with wrench or pliers Wheel hub recess this side Axle Washer Axle Nut 7 with Item 10 installed ...

Page 8: ...the Sleeve Spacer inside the Slide Vent slotted hole Attach 6mm Steel Washer and Locknut to Bolt from inside of Grill Body to secure the Slide Vent Repeat for each slotted hole on both Slide Vents Make sure the Vents slide back and forth freely over the Sleeve Spacers If not loosen the bolts slightly and reset the Spacers inside the Slide Vent slotted holes and retighten ITEM 14 Washer 6mm ITEM 12...

Page 9: ... it on on its backside Insert 6 mm x 90 mm Bolt through recessed hole of Hood Handle through Handle Spacer through a hole in Hood Note Wide end of Handle Spacer goes against the Hood Attach a 6mm Washer and Locknut to the Bolt from inside Hood Do not over tighten it may crack the Hood finish Repeat for other end of Handle Assembly of Grill Body will require two people ITEM 14 Washer 6 mm ITEM 11 o...

Page 10: ... away from the body since all the bolts are loose Insert two 6mm x 90mm Body Bolts through Leg Spacers and slotted holes in Grill Body Attach a 6mm Wing Nut to the Bolts but do not tighten Repeat this assembly for remaining three Cart Legs With help from a second person turn full Grill and Cart Assembly upright The Grill Body should slide down to seat itself within the slotted holes If not loosen ...

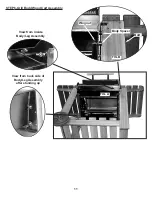
Page 11: ...FIG A FIG B View from inside Body Leg Assembly Bolt Body Spacer Wingnut View from back side of Body Leg Assembly after standing up STEP 6 Grill Body Wood Cart Assembly 11 ...

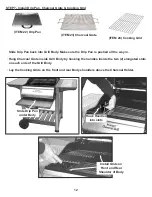
Page 12: ... Pan is pushed all the way in Hang Charcoal Grate inside Grill Body by hooking the handles inside the two 2 elongated slots on each side of the Grill Body Lay the Cooking Grids on the front and rear Body shoulders above the Charcoal Holder ITEM 22 Drip Pan Install Grids on Front and Rear Shoulder of Body Slide Drip Pan under Body Hook Handles into slots ...

Page 13: ...easant odors Once the barbecue grill has been lit do not touch the charcoal briquettes wood chunks to see if they are hot Never add lighter fluid to already hot or warm coals Do not close Hood on flaming charcoal If closed and re opened the flames could leap out and burn Do not wear loose clothing example hanging shirt tails clothing with frills etc around a charcoal grill while in use or hot Do n...

Page 14: ...ated by the burning charcoal underneath The natural food juices from the juices fall onto the hot Charcoal and vaporize Rising smoke bastes the food giving it that unique barbecued flavor Leave the Slide Vents open for the most heat Close the vents partially to lower the heat It takes a few minutes for the charcoal to react to the vent adjustment Leave the hood open for Texas Style open air barbec...

Page 15: ...utdoors out of the reach of children To avoid an fire or explosion do not store charcoal or lighter fluid near a heat source Do not store additional charcoal and lighter fluid under or near the charcoal grill while it is hot Always cap the lighter fluid when not in use STORAGE 1 Clean your grill before storing 2 Remove the Cooking Grid Rub with a coat of light cooking oil and wrap with aluminum fo...

Page 16: ...P N 03 6077 01 REV C 12 06 16 Aussie ...

Reviews: