10
INSTALLATION SERIES
Australian Monitor
5. INTERNAL ADJUSTMENT
NOTE:
The following adjustments involve access to the inside of the ZM3 and should
only be attempted by a qualified technician. All internal adjustments are
accessible by removing the lid of the ZM3. Always turn off the AC power and
remove the power cord before accessing the inside of the ZM3.
Sum Gain
Adjust
P/P
ON
OFF
X1/1
X2/1
X3/1
MIC 1
MIC 2
X4/1
HP-160Hz
HP-160Hz
ON
OFF
ON
OFF
ON
OFF
P/P
RELEASE TIME
1sec
25sec
Chime Level
Adjust
R137
SW7
SW8
SW9
MONO
MONO
MONO
STEREO
STEREO
STEREO
EN
EN
EN
EN
EN
EN
X8/1
X9/1
X10/1
MIC1
MIC1
MIC1
MIC2
MIC2
MIC2
PRIORITY
PRIORITY
PRIORITY
secs
secs
secs
0.5
0.5
0.5
5
5
5
15
15
15
MUTE
RELAESE
MUTE
RELAESE
MUTE
RELAESE
PROG 4
PRIORITY
PROG 4
PRIORITY
PROG 4
PRIORITY
EN
EN
EN
X5/1
ZONE 1
ZONE 2
ZONE 3
X1
1/1
X12/1
X13/1
X6/1
X7/1
X14/1
X15/1
X16/1
X19/1
X20/1
LINK
-
MASTER
LINK
-
SLA
VE
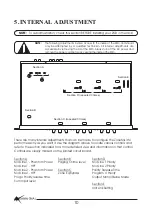
There are many internal adjustments that can be made to configure the ZoneMix3 to
perform exactly as you want it. Use the diagram above to locate various controls and
refer to the section indicated for a more detailed view and information on that control.
Controls are clearly marked on the printed circuit board.
Section A
Section D (repeated 3 times)
Section E
Section B
Section C (repeated 3 times)
NOTE:
To avoid frustration, check this section BEFORE installing your ZM3 in the rack!
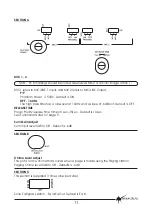
Section A
Section B
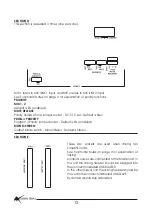
Section C
Section D
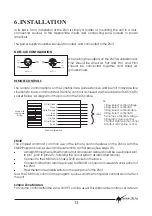
Section E
Mic/Line 1 - Phantom Power
Mic/Line 1 - HPF
Mic/Line 2 - Phantom Power
Mic/Line 2 - HPF
Prog 4 Priority release time
Sum Input level
Paging Chime level
Zone Eq Bypass
Mic/Line 1 Priority
Mic/Line 2 Priority
Priority Release Time
Program 4 Priority
Output Mono/Steroe Mode
Unit Link Setting


