background image

7. STEP BY STEP SETUP

The inputs of the ZM3 can accommodate a wide range of sources including active paging
stations, dynamic microphones, DVD, CD players & DJ mixers. The zone outputs may be used
to drive stereo power amplifiers, mixers, or mixer amplifiers.

Each installation will require setting the appropriate relative mix of levels between paging,
program sources and mic/line inputs for each zone and balancing between the zones.

Because of the variation in levels between the possible sources, ZM3 offers a number of gain
stage adjustments so you can set the correct levels for your application.

Also consider what the outputs are driving….

Setting up correct gain structure through the whole system is important to achieve optimal
results.

The following step by step procedure has been devised to assist during the setup process.

Ensure all gain adjustments on the ZM3 are at minimum.
Choose a zone that is conveniently located near to the ZM3 or further away if you feel
you need the exercise.

This will be the referred to as the “TEST ZONE”.

Ensure that all amplifiers connected to the ZM3 are set to provide required sound levels
with a line level input signal.

1. Select PROG1 in the TEST ZONE. Adjust the PROG TRIM until sufficient level is achieved in the

TEST ZONE.

2. Repeat this process for Programs 2-4. The level of each program source should be of

similar volume so no great variation in level apparent when selecting between program
inputs

3. Check program level in the other 2 zones to confirm that the gain structure is appropriate

for all amplifiers.

4. Do a test page in the TEST ZONE and check the level relative to the program level.
5. Adjust the page level as desired [front panel PAGE MIC].
6. EQ the paging mic as required
7. Set the Mic/Line input levels remembering these inputs are selectable to each zone

from the front panel.

8. EQ the Mic/Line inputs.
9. Select the REMOTE ENABLE switch (rear panel) if the ZM3R is being used in each zone.

This will allow remote source selection & zone volume adjustment.

10. The ZM3 features 5 band equalization to achieve precise equalization of high quality

audio systems in demanding environments.

11.

Step by step setup

Repeat this process for the other 2 zones.

INSTALLATION SERIES

Australian Monitor

15

NOTE:

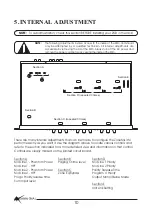
To avoid frustration, check the Internal Adjustments section BEFORE
beginning setup!

Summary of Contents for ZoneMix3

Page 1: ...L LEVEL LEVEL 100Hz 100Hz 100Hz 300Hz 300Hz 300Hz 1kHz 1kHz 1kHz 3kHz 3kHz 3kHz 10kHz 10kHz 10kHz Remote Remote Remote Status Status Status 0 0 0 1 1 1 2 2 2 3 3 3 4 4 4 5 5 5 6 6 6 7 7 7 8 8 8 9 9 9 10 10 10 0 0 0 1 1 1 2 2 2 3 3 3 4 4 4 5 5 5 6 6 6 7 7 7 8 8 8 9 9 9 10 10 10 Off Off Off 1 1 1 2 2 2 3 3 3 4 4 4 ZoneMix3 POWER PROG TRIM PAGE MIC MIC LINE 1 MIC LINE 2 TREBLE BASS GAIN PROG 1 PROG 2...

Page 2: ...f important operation and main tenance servicing instructions in the literature To prevent electric shock do not use this polarized plug with an extension cord receptacle or other outlet unless the blades can be fully inserted to prevent blade ex To prevent electric shock match wide blade of plug to shock to persons accompanying the appliance posure wide slot fully insert Caution WARNING TO REDUCE...

Page 3: ...k Panel 7 4 Functional Notes 9 5 Internal Adjustments 10 6 Installation 13 7 SetUp Step by Step 15 8 ZM3M Paging Station 16 9 ZM3R Remote Control Panel 18 10 Dimensions 21 11 Block Diagram 22 12 Specifications 23 INSTALLATION SERIES Australian Monitor 3 ...

Page 4: ...ve selectable priority per zone each stereo zone boasts 5 stage equalization The Zone Mix 3 also has the ability to route two independent mic or line signals to any zone or combination of zones Add to this remote volume controls in each zone the ZM3M 3 zone paging microphone both running via inexpensive CAT5 cabling and you have an extremely high quality Zone selecting mixer at a fraction of the c...

Page 5: ...AM SELECT SELECT SELECT MIC LINE MIC LINE MIC LINE LEVEL LEVEL LEVEL LEVEL LEVEL LEVEL 100Hz 100Hz 100Hz 300Hz 300Hz 300Hz 1kHz 1kHz 1kHz 3kHz 3kHz 3kHz 10kHz 10kHz 10kHz Remote Remote Remote Status Status Status 0 0 0 1 1 1 2 2 2 3 3 3 4 4 4 5 5 5 6 6 6 7 7 7 8 8 8 9 9 9 10 10 10 0 0 0 1 1 1 2 2 2 3 3 3 4 4 4 5 5 5 6 6 6 7 7 7 8 8 8 9 9 9 10 10 10 Off Off Off 1 1 1 2 2 2 3 3 3 4 4 4 ZoneMix3 POWE...

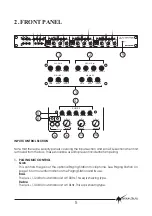
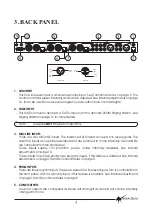
Page 6: ...s indicating system clip with pot at full on amplifier This LED indicates that the zone is in remote control mode The program select and volume on the front panel are disabled and are now controlled by the optional remote control panel ZM3R see Remote Control Panel on page 18 These two push button switches are used to select either or both of the two MIC LINE inputs to this zone This pot controls ...

Page 7: ... supply 15V phantom power unless internally disabled See Internal Adjustments on page 10 These inputs may have priority over program inputs if this feature is enabled See Internal Adjustments on page 10 and Functional Notes on page 9 There are four program inputs These are stereo RCA line level inputs Trim is controlled from the front panel LINE4 is a priority input if this feature is enabled See ...

Page 8: ...t panel program controls SELECT and LEVEL will be disable Control is handed over to the remote control panel If no remote control panel is connected the program inputs will be off This 15 pin high density connector is used to connect two ZoneMix3 units together When connected together the program sources and the mic line inputs are linked to the slave unit The unit needs to be internally configure...

Page 9: ...l mix with the program source All of the above priority inputs Sum Page Mic Line share a common priority level The release time for program to come back up may be selected on a per zone basis See Internal Adjustments on page 10 In venues with a Juke box the Jukebox should over ride mute any other background music sources that are selected The LINE4 input is used for this With this feature enabled ...

Page 10: ...RIORITY PROG 4 PRIORITY EN EN EN X5 1 ZONE 1 ZONE 2 ZONE 3 X11 1 X12 1 X13 1 X6 1 X7 1 X14 1 X15 1 X16 1 X19 1 X20 1 LINK MASTER LINK SLAVE There are many internal adjustments that can be made to configure the ZoneMix3 to perform exactly as you want it Use the diagram above to locate various controls and refer to the section indicated for a more detailed view and information on that control Contro...

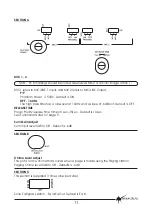
Page 11: ...0sec See Functional Notes on page 9 Sum Input level 0dB to Off Default is 6dB This pot is for the chime that sounds when a page is made using the Paging Station Paging Chime level 0dB to Off Defaults is 6dB This section is repeated 3 times one per zone Zone Eq Bypass switch Eq In Eq Out Default is Eq In Sum Gain Adjust Chime Level Adjust SECTION B SECTION C INSTALLATION SERIES Australian Monitor 1...

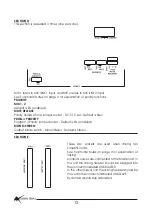
Page 12: ...Stereo Default is Stereo See Functional Notes on page 9 for explanation of priority functions PRIORITY MIC1 2 MUTE RELEASE PROG 4 PRIORITY MONO STEREO These two sockets are used when linking two ZoneMix3 units See Functional Notes on page 9 for explanation of linking All input sources are connected to the Master unit In this unit the linking header should be plugged into the connector labelled LIN...

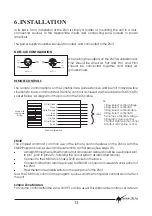
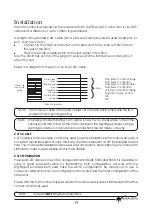
Page 13: ...ugh wired Cat5 cable not a crossover cable should be used wired pin1 to pin1 pin2 to pin2 etc following the colour system as indicated above Connect to the ZM3R which has a RJ45 socket on the back Connect cable from remote panel s to REMOTE connector in relevant zone section of the ZM3 Press the remote enable switch on the rear panel of the ZM3 Now the ZM3R has control of the program sources and t...

Page 14: ...n 5 and pin7 for Right sub zone send and another RC1between pin 5 and pin 8 for Left sub zone send The zone should be set to MONO see Internal Adjustments on page 10 See Paging Station on page 16 for more inforamtion Connect cable from ZM3M to PAGE MIC connector on the ZM3 There is no need to enable the rear panel remote switch unless an ZM3R is also being used PAGING STATION 14 INSTALLATION SERIE...

Page 15: ...connected to the ZM3 are set to provide required sound levels with a line level input signal 1 Select PROG1 in the TEST ZONE Adjust the PROG TRIM until sufficient level is achieved in the TEST ZONE 2 Repeat this process for Programs 2 4 The level of each program source should be of similar volume so no great variation in level apparent when selecting between program inputs 3 Check program level in...

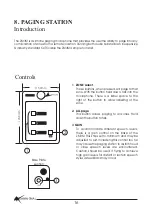
Page 16: ...his control too far may cause the paging station to distort if loud or close speech levels are encountered Caution should be used if trying to achieve high gain levels for distant or lectern speech styles as feedback may occur Controls Introduction The ZM3M is a slim line paging microphone that provides the user the ability to page into any combination of zones from a remote location Running both ...

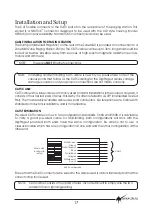
Page 17: ... like telephone wire Cable with stranded conductors is available and is more flexible Pre wired CAT5 cable comes in two configuration standards 568A and 568B It is advisable to carry a good pre wired cable for fault finding Both configurations will work with the DigiPageJr provided both ends have the same configuration Be careful not to use a crossover cable which has one configuration at one end ...

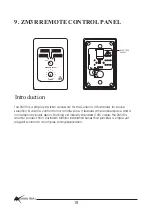
Page 18: ...R is a simple yet stylish accessory for the Zonemix 3 that allows for source selection volume control from a remote zone It features ample label space and a contemporary black decor Running via industry standard CAT5 cable the ZM3R is another product from Australian Monitor Installation Series that provides a simple yet elegant solution to a complex zoning application ...

Page 19: ...e comes in two configuration standards 568A and 568B It is advisable to carry a good pre wired cable for fault finding Both configurations will work with the DigiPageJr provided both ends have the same configuration Be careful not to use a crossover cable which has one configuration at one end and the other configuration at the other end Ensure that the RJ45 connectors are suited to the cable used...

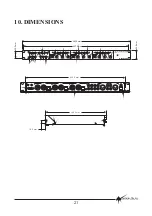
Page 20: ...84 mm 96 mm 100 mm 51 mm 75 mm 116 mm Dimensions 18 mm 88 mm 122 mm 44 mm 35 mm 80 mm Panel ZM3R Surface Mount Box 20 INSTALLATION SERIES Australian Monitor ...

Page 21: ... 8 8 9 9 9 10 10 10 0 0 0 1 1 1 2 2 2 3 3 3 4 4 4 5 5 5 6 6 6 7 7 7 8 8 8 9 9 9 10 10 10 Off Off Off 1 1 1 2 2 2 3 3 3 4 4 4 ZoneMix3 POWER PROG TRIM PAGE MIC MIC LINE 1 MIC LINE 2 TREBLE BASS GAIN PROG 1 PROG 2 PROG 3 PROG 4 1 1 1 2 2 2 ZONE 1 ZONE 2 ZONE 3 INSTALLATION SERIES Australian Monitor 467 0 mm 482 0 mm 32 0 mm 44 0 mm LEFT RIGHT REMOTE ENABLE ZONE 3 LINE 3 LINE 2 LINE 1 PROGRAM SOURCE ...

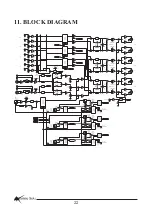
Page 22: ... 12dB 12dB 12dB 37dB 0dB 23dB 23dB 23dB 23dB 0dB 37dB 12dB 0dB Off 0dB 6dB 6dB 6dB 6dB 6dB 0dB STEREO MONO STEREO MONO STEREO MONO EQ IN OUT EQ IN OUT EQ IN OUT L R ZONE 1 L ZONE 2 R L ZONE 3 R SUM INPUT SUM LEVEL Z1 MIC LEVEL Z2 MIC LEVEL Z3 MIC LEVEL ZONE 1 PROG LEVEL ZONE 2 PROG LEVEL ZONE 3 PROG LEVEL ZONE 1 PROG SELECT OFF 1 2 3 4 ZONE 2 PROG SELECT OFF 1 2 3 4 ZONE 3 PROG SELECT OFF 1 2 3 4 ...

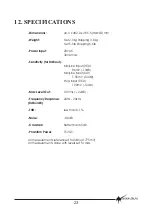
Page 23: ... 0kg Net 5 5lb Shipping 6 6lb 20VAC 30VA max Max Level Out Frequency Response THD Noise Crosstalk Phantom Power Mic Line Input RCA 86mV 19dB All measurements done with levels set to max Mic Line Input XLR 1 55mV 54dB Prog Input RCA 190mV 12dB 10Vrms 22dB 20Hz 20kHz less than 0 1 80dB Better than 65dB 15VDC All measurements referenced to 0dBu 0 775mV 0dB 3dB 23 ...

Page 24: ... Fitzgerald Street West Perth WA 6005 Ph 08 9228 4222 Fax 08 9228 4233 E mail wa audiotelex com au P O Box 512 Albany 1331 Unit B 11 Piermark Drive Albany 1331 Ph 09 415 9426 Fax 09 415 9894 E mail audiotlx nznet gen nz AUSTRALIA and NEW ZEALAND www australianmonitor com au EUROPE ASIA MIDDLE EAST www australianmonitor com au International Sales Private Bag 149 Silverwater NSW 1811 149 Beaconsfiel...

Reviews: