background image

english 

6


Pallas Back


Combustion air 

Being  the  user  of  the  stove  you  must  take  care  of  a 
sufficient  combustion  air  supply.  Sealed-up  windows  and 
doors  may  not  allow  a  sufficient  combustion  air  supply  or 
disturb  the  draught  behaviour  of  your  stove.  Please  ensure 
the  additional  supply  of  fresh  combustion  air  if  necessary. 
For details please consult your specialist retailer 
Make sure that the combustion air intakes are not blocked!


Stove pipe connection 

For your own safety stringent laws apply for connecting the 
stove  pipes  to  the  chimney.  Your  professional  dealer  or 
distributor  knows  these  laws.  Please  have  your  certified 
retailer carry out the connection of your stove. 


3. CORRECT OPERATION OF YOUR STOVE 


Approved fuels 

Dry,  well  cured  and  natural  wood  (hardwood  preferred), 
wood briquettes. 
 

Maximum amount of fuel


Maximum amount of fuel to be added: 2,7 kg wood. Larger 
amounts  of  fuel  can  lead  to  overheating  and  thus  damage 
the stove. 
 

Clean burning


The  wood  must  be  dry  (relative  wood  moisture  < 15%)  and 
untreated  and  the  right  amount  of  wood  must  be  burned  in 
order  to  ensure  a  clean  fire  that  releases  only  small 
amounts of emissions. 
 

Startup procedures 

During  the  first  3-4  operations  -  at  nominal  heat  output  - 
there may be some odour development and the varnish has 
not yet hardened. 
 

Making a fire 

For the correct and safe operation of your stove please pay 
attention  of  the  chimney  developing  the  necessary  feed 
pressure.  This  must  especially  be  considered  before  the 
initial operation (or e.g. after the summer heating break) and 
during the mid-season heating periods (e.g. at strong wind, 
etc.). 
If there is not enough feed pressure, please light only some 
paper or small kindling first, in order to “warm up” the stove 
and the chimney. 
 
The air inlet must not be covered or closed. 
 
Clean  grate,  empty  ash  drawer  if  necessary  (watch  out  for 
ambers!)! 


Position the lever for the combustion air to the open (“AUF”) 
position (

see fig. 2 and 4

). 

 
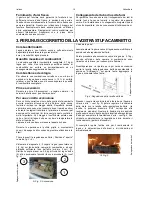
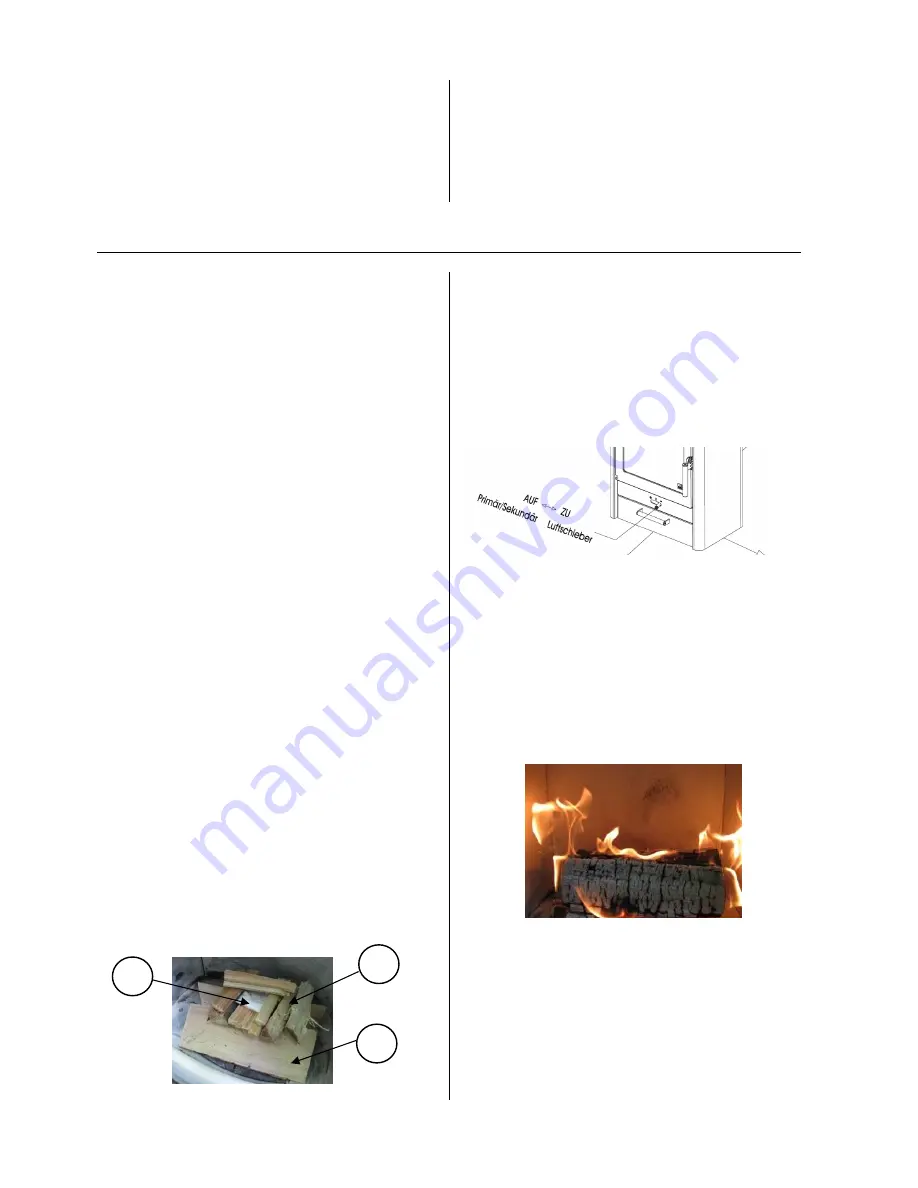
Place  2-3  logs  (approx.  1,8  kg  in  total)  crossways  in  the 
combustion  chamber  (1)  with  sufficient  distance  from  each 
other  (min.  2  cm),  on  top  of  that  place  some  softwood 
chippings  (0,9  kg)  (2)  and  some  ignition  aid  and  light  (3). 

(see fig. 3)  


Close the door!  


We  recommend  to  let  the  first  load  burn  down  without 
changing the air lever position. 
As  soon  as  no  visible  flames  are  left  (only  embers  in  the 
combustion  chamber),  you  can  put  another  load  of 
logs  (approx. 2,7 kg) in the combustion chamber if desired. 
 
When  reloading  the  stove  please  repeat  the  procedure  as 
mentioned  under  “first  lighting”:  air  lever  position  on  “AUF” 
(= open), open door carefully, place logs, close door. 


Fig. 4: air knob 

 
After  a  few  minutes,  when  the  logs  burn  well  on  all  sides 
(bright,  high  flames 

– 

see  fig.  5

),  you  can  adjust  the  heat 

output  with  the  air  lever  (lever  on  max.  position  “AUF”  = 
maximum  heat  output),  the  flames  should  be  yellow  and 
never  look  blueish  or  have  black  tips  (otherwise  add  more 
air) 

– 

see  fig.  4

.  Never  close  air  supply  completely  during 

operation. (danger of flash-fire!) 
 
The  stove  door  may  be  opened  only  for  refuelling  or 
disposing of ashes and is to be closed again afterwards. 


s

y

mb

o

fig

u

re

s


Figure 3:ignite the fire 

s

y

mbo

figu

re

s


Figure 5 

Summary of Contents for PALLAS BACK

Page 1: ...Fig 1 Benutzerhandbuch user instructions Istruzioni per l uso manuel d instructions PALLAS BACK...

Page 2: ...i 9 1 Caract ristiques 13 2 Wichtige Informationen 1 2 Important information 5 2 Informazioni importanti 9 2 Infos importantes 13 3 So bedienen Sie Ihren 3 Correct operation 3 Per un uso corretto dell...

Page 3: ...r auf diese Gefahren aufmerksam und halten Sie sie w hrend des Betriebes von der Feuerst tte fern Achtung Lack ist kein Rostschutz Verbrennen Sie ausschlie lich das im Kapitel saubere Verbrennung ange...

Page 4: ...m Wind kontrolliert werden Wenn nicht gen gend F rderdruck vorhanden ist dann k nnen zun chst Papier oder Weichholzsp ne verbrannt werden um Ofen und Kamin auf Temperatur zu bringen Die Lufteintritts...

Page 5: ...Seitenteil rechts 7 712763 Keramott Seitenteil links 6 712762 Keramott Umlenkplatte 8 712764 Keramott Holzf nger 9 712765 Sonstiges Bezeichnung Nr Skizze Artikelnr Pallas T rglas 10 712759 T rgriff 1...

Page 6: ...ngern Zugmessung falsche Bedienung des Luftreglers Unbedingt gem Bedienungsanleitung den Luftregler bedienen wenn Sekund rluft geschlossen ist verru t die Glasscheibe sehr schnell zu gro e Holzscheite...

Page 7: ...st prevention Make your children aware of this particular danger and keep them at a distance from the heating unit whenever it is in operation Only burn approved fuels and materials listed in the chap...

Page 8: ...ore the initial operation or e g after the summer heating break and during the mid season heating periods e g at strong wind etc If there is not enough feed pressure please light only some paper or sm...

Page 9: ...60 Rear Keramott 4 5 712761 lateral Keramott right 7 712763 lateral Kermott left 6 712762 Keramoot baffle plate 8 712764 Keramott wood retainer 9 712765 Other parts Description Nr drawing Part number...

Page 10: ...orrect use of the combustion air supply lever please operate air lever according to user s instructions if secondary air is closed the door glass soots rather fast wood logs are too large keep to the...

Page 11: ...ili od esplosive come bombolette spray vuote e simili E severamente vietato lasciare tali oggetti nelle immediate vicinanze della stufa pericolo di esplosione Mentre si ricarica legna nella stufa acce...

Page 12: ...rie di primavera e autunno per esempio sotto condizioni di forte vento questo controllo molto importante Se il tiraggio insufficiente potete usare carta o trucioli di legno dolce per portare a tempera...

Page 13: ...one tonda 6 mm 0 5 m 14 710696 Guarnizione tonda 14 mm 2 1 m 15 714223 Accessori Presso il vostro rivenditore potete acquistare basi di protezione in vetro o acciaio prodotti per la cura e pulizia ed...

Page 14: ...aria comburente la leva della presa d aria deve essere utilizzata come da manuale se la presa d aria secondaria chiusa il vetro si annerisce pi rapidamente i ceppi sono troppo grandi rispettate le qua...

Page 15: ...ndons d utiliser le gant de protection Attention la peinture n est pas une protection anti rouille Expliquez bien le risque de br lures vos enfants et tenez les loign s de l appareil lorsque celui ci...

Page 16: ...ersaisons en cas de vent fort par exemple Si le tirage dans le conduit n est pas assez important il suffit de br ler tout d abord du papier ou du petit bois pour amener le po le et le conduit temp rat...

Page 17: ...roit Pallas 7 712763 Keramott c t gauche Pallas 6 712762 Keramott d flecteur Pallas 8 712764 Keramott pare b che Pallas 9 712765 Autres Accessoires Vous trouverez chez votre revendeur sp cialis des pl...

Page 18: ...tilisation de la manette d arriv e d air V rifier absolument la notice d utilisation si l air secondaire est ferm la vitre noircit tr s vite B ches de bois trop grosses Respecter la quantit de bois re...

Page 19: ...the stove carcass for 6 years and all stove components made of steel or cast iron for a full two years from the date of purchase Steel and cast iron components which show defect in materials or workm...

Page 20: ...ntie Nous garantissons le fonctionnement irr prochable du corps de l appareil de votre po le AUSTROFLAMM pendant 6 ans toutes les autres pi ces en acier et en fonte tant garanties 2 ans Les pi ces en...

Reviews: