background image

1.  general information  


1.1.  Regulations to be observed 


(the below standards and regulations are not listed exhaustively) 


 DIN 

18896 

  DIN EN 12828 


  DIN EN 12831 


  DIN EN 13384 


 DIN 

18160-1 


  DIN EN 15287-1  part 1 

  Fire authority regulations 

  Local and federal building, trade and heating regulations 

  Federal laws on emissions 

 
The correct choice of the insert size regarding to the heat demand and the requirements of the insert owner is 
essential for a proper function and effective operation of the fireplace. Therefore the heat load (heat requirement) 
has to be calculated by the stove fitter. 
Please read the mounting instruction carefully BEFORE starting the installation. All liability and warranty claims 
lapse for damages caused because of the non-observance of this instruction.  
Please also consider the guidelines given in the user’s instruction. 

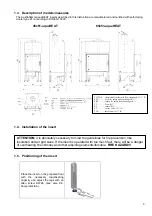
The installation of the insert and the chimney connection must be agreed upon with your local master 
chimney sweep. 
 

1.2.  Checklist before installation 


 Please 

check 

the 

consignment 

immediately upon receipt

 for completeness and damages, which may have 

occurred during transport. 

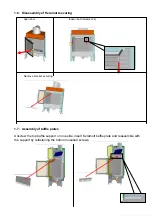
  Please check all moveable parts of the inserts before starting the installation. Generally all defects must be 

reported 

before installing/fitting

 the insert.  

 Remove 

this 

user instruction

 from the insert and personally hand it over to the proprietor of the fireplace, with 

a short briefing about the correct heating of the fireplace. 


Summary of Contents for 45x51-aquaHEAT

Page 1: ...Mounting instruction 45x 65x aquaHEAT Austroflamm Inserts Mounting instruction aquaHEAT insert...

Page 2: ...w lzpumpensteuerung 12 7 4 Thermische R cklaufanhebung 12 7 5 Entl fter 12 7 6 Ausdehnungsgef 12 7 7 Wassermangelsicherung 13 8 Hydraulische Einbindung in das Heizungssystem 13 9 Erstinbetriebnahme un...

Page 3: ...efully BEFORE starting the installation All liability and warranty claims lapse for damages caused because of the non observance of this instruction Please also consider the guidelines given in the us...

Page 4: ...bearing capacity and adjust the legs with an allen screw SW24 see also 9 6 floor protection ATTENTION it is absolutely necessary to mind the guidelines for fire prevention like insulation and air gri...

Page 5: ...ing open door loosen both screws 2x Remove bracket securing 1 7 Assembly of baffle plates Unscrew the top baffle support on one side insert Keramott baffle plate and reassemble with the support by ref...

Page 6: ...allation room automatically and reliably the simultaneous operation of the fireplace with the air exhausting device is being prevented by safety facilities the fumes conduct is being supervised by spe...

Page 7: ...to the regional building regulations combustion air pipes which are to be installed in buildings with more than two full floors and combustion air pipes which are bridging firewalls must be installed...

Page 8: ...N EN 13229 CE approval Power water air kW 6 3 9 2 3 3 Ratio water air 66 34 74 26 Rated power kW 9 12 5 max operation pressure bar 3 max boiler temperature C 98 max log length cm 33 Allowed fuel quant...

Page 9: ...s Institut f r Bautechnik Berlin e g Promat Calciumsilikat W rmed mmplatte Promasil 950 KS Wolfsh her W rmed mmplatte Prowolf Wolfsh her W rmed mmplatte Vermilite 2000 Thermax W rmed mmplatte Thermax...

Page 10: ...sions ffnungen Luftgitter usw vorzusehen Der Betreiber der Anlage ist ausdr cklich ber die Sicherheitseinrichtung zu informieren Er muss in deren Funktion und Wartung eingewiesen sein Besonderer Hinwe...

Page 11: ...entil 3 TAS Tauchh lse mit Temperaturf hler 4 TAS Kaltwasserzulauf 5 TAS Sicherheitsw rmetauscher 6 TAS Ablaufleitung 7 Sicherheitsventil SV 8 Abblasleitung SV 9 Ablauftrichter Trichtersifon 10 Entl f...

Page 12: ...uf unkritische Temperaturen schlie t die TAS wieder selbstt tig Der Sicherheitsw rmetauscher der TAS ist getrennt vom Kesselvolumen oder Heizkreis Beim Ausl sen der TAS erfolgt kein ffnen der Heizkrei...

Page 13: ...h den Einbau ei ner Kesselladeeinheit Die Kesselladeeinheit dient zur Hochhaltung der R cklauftemperatur von Fest brennstoffkessel 7 5 Entl fter Entl fter sind bei einer Wartung zu pr fen und gegebene...

Page 14: ...N EN 12828 sind geeignete Ma nahmen vorzusehen Diese Ma nahmen m ssen gegebenenfalls bau seits innerhalb der Installation vorgesehen werden Jede geschlossene Heizungsanlage ist mit einem Wasserstandsb...

Page 15: ...is zum Ansprechen des SVs Dabei sollte der Ausl sedruck des SV nicht wesentlich ber oder unter 2 5 bar liegen 4 Nach der Funktionspr fung ist der Systemdruck zu berpr fen und gegebenenfalls auf den no...

Page 16: ...kochendes Wasser nicht ausreichend Installation instruction 9 1 Installation in front of or next to a wall which does not need extra protection 1 wall 2 insulation layer flue pipe 3 flue pipe 4 insul...

Page 17: ...assage 22 additional safety wall minimum 10 cm 9 3 Convection space If no convection cladding accessory is used a separate space for convection air A of minimum 6 cm between the insert and the insulat...

Page 18: ...bodens Aufstellb den 8 mit brennbaren Baustoffen m ssen wie folgt gesch tzt werden durch eine mindestens 6 cm Ma E dicke Betonplatte 7 die ber Aufstellb den ohne ausrei chende Querverteilung bewehrt s...

Page 19: ...rn entsprechend der H he des Feuerraumbodens ber dem Fu boden zuz glich 30 cm mindestens je doch 50 cm Nach den Seiten entsprechend der H he des Feuerraumbodens ber dem Fu boden zuz glich 20 cm mindes...

Page 20: ...ere Ausnehmung hin eingleiten 4 Die Senkschraube samt Platte abnehmen 5 Zum Schluss spannt man die Feder bis sie hinter dem Scharnierla ger einrastet und mon tiert die Platte wieder mit der Senkschrau...

Page 21: ...ag des Bol zens spannen 9 mm berstand 6 T r kann nun um 180 gedreht einbauen Umbau der Strahlungsbleche auf Rechtsanschlag ACHTUNG Die Glasleiste muss bei Rechtsanschlag um 180 in der T r gedreht werd...

Page 22: ...21 Demontage aller Teile Alle Laschen mit Schlitzschraubendreher aufbiegen Die Glasleisten f r die linke Montage einbauen und die Laschen mit der Zange zum Rahmen biegen Alle Teile wieder montieren...

Page 23: ...Aschenkasten 10 3 Feuerraum Die Keramott Einzelteile lose ohne M rtel in der abgebildeten Reihenfolge einlegen 1 Zugplatte 2 Zugplattenauflage oben 3 Holzf nger 4 Boden vorne 5 Boden links 6 Boden re...

Page 24: ...23 NOTIZEN Ausgabe 06 2010 Hersteller Austroflamm GmbH Austroflamm Platz 1 A 4631 Krenglbach...

Reviews: