background image

Copyright (c) Fire4 Systems Inc, 2019. All rights reserved    

29 

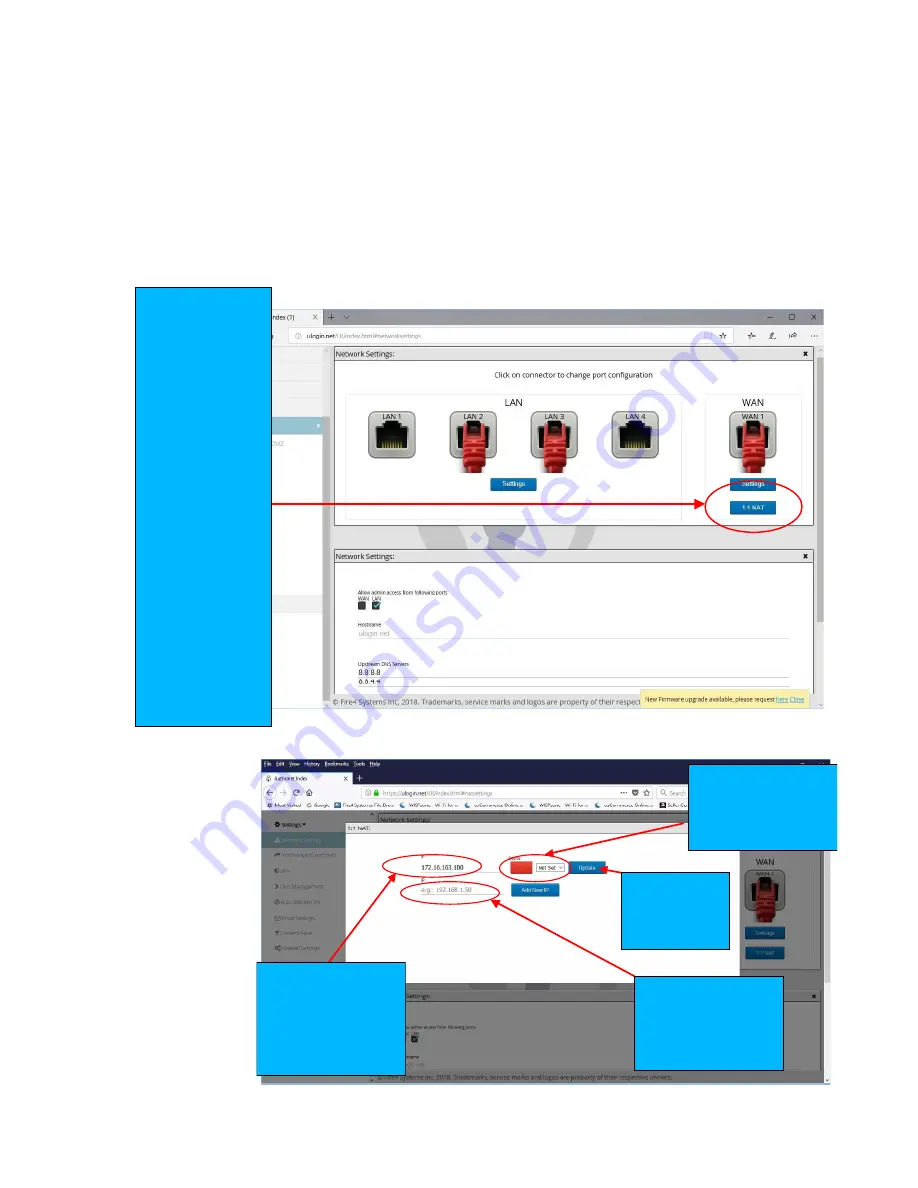
Settings: Network, 1:1 NAT 

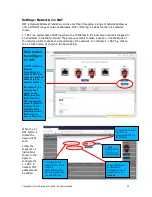
NAT is Network Address Translation, and is a method of mapping a range of network addresses 
onto a different range of network addresses. NAT or NAT'ing is a basic function of a network 
router. 

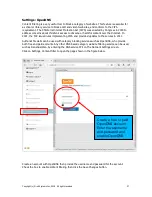
1:1 NAT is a special case of NAT'ing where one IP address in the local area network is mapped to 
an IP address in the WAN network. The purpose of this is to make a device on the WAN side of 
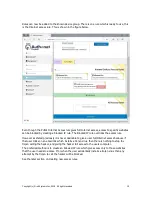
the network visible to devices on the LAN side of the network. To configure 1:1 NAT'ing, click on 
the 1:1 NAT button, as shown in the figure below. 


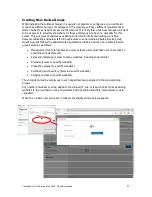
When the 1:1 
NAT button is 
clicked the 
figure will be 
seen.  

Follow the 
sequence of 
instructions 
shown in the 
figure to 
configure the 
1:1 NAT. A 
number of IP 
addresses can 
be added. 

Click button 
to configure 
1:1 NAT

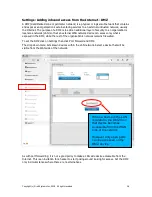
1:1 NAT (Network 
Address 
Translation) is a 
mode of NAT that 
maps one internal 
address to one 
external address 

For example, if a 
network has a 
server on the 
WAN side of the 
firewall then 1:1 
NAT can map the 
server IP (alias) to 
a device on the 
LAN side of the 
firewall to permit 
the device to 
access the server

4. Add additional 
WAN side IP 

addresses here to 
associate other 
devices

1. Enter a public 
alias IP here, the IP 

must be 
addressable within 
the same subnet as 
the F10 WAN IP

2. Select the device 
that will be 

associated with the 
WAN alias

3. Click 
update when 

the data has 
been entered

Summary of Contents for Firewall F-10

Page 1: ...Copyright c Fire4 Systems Inc 2019 All rights reserved 1 AUTHONET FIREWALL OVERVIEW AND OPERATION MANUAL Cyber Security for the Enterprise Revision 4 February 2019 ...

Page 2: ... an IP address What is a Rule it can be open access to the Internet or access to specific websites The Overview Tree graphic representation of the groups and associated devices and rules The importance of allowing access only to specific websites not to the whole Internet The two default groups unknown devices and known devices Simplest firewall configuration Adding device information Adding rules...

Page 3: ... Connected Devices Dashboard ARP Table Report Logs Current Connections Report Logs Auth History Report Logs DNS History Report Logs Admin History Report Logs IDS Events Report Logs IPS Events Report Logs Port Forward Events Admin controls Logout Admin controls Reboot Admin controls Factory Reset Admin controls Upgrade Firmware Backup Settings Tutorials Differences between the Authonet F1 and F10 f...

Page 4: ...y one of four reasons to hack into a government or private computer network 1 Bragging rights with their peers usually young people who are learning to hack 2 Destroy computer information databases etc for one of various motives The hacker maybe a disgruntled ex employee a person with radical political beliefs a competitor a foreign government conducting a type of underground warfare or a crime en...

Page 5: ...of a company with emails that duplicate the type of email that would be sent by a bank or a company such as Facebook or Ebay to trick the user Once the hacker has control of a users computer then that computer can be used to hack into the data servers The computer user has no idea that a hacker is also sharing the computer but may notice that the computer is running more slowly than usual Most suc...

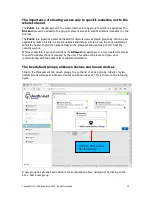
Page 6: ...will block the outbound call as computers can only communicate with permitted websites The diagram below illustrates a trojan virus installed on a users computer which is blocked by the firewall when trying to contact the hacker Most business and government departments will have difficulty with a one rule fits all regarding the websites that computers are allowed to access For this reason the Auth...

Page 7: ... than 100 support is free firmware upgrades are free and additional services are free The Authonet firewall was designed to solve the difficulty of use issue listed above The Authonet firewall has a radically new approach to installation and configuration A customer who understands how to use a computer will be able to install the Authonet firewall just as small business owners now install compute...

Page 8: ...mputers are connected to the four router LAN ports Move the network connection from each of the router LAN ports to the corresponding Authonet firewall LAN ports Connect an Ethernet cable from the Authonet firewall WAN port to the router LAN port Case 3 The Internet connection is a cable modem and a router is used to connect the cable modem to the network computers Replace the router with the Auth...

Page 9: ...e IP address will be in the range 172 16 xx xx Open the computer browser and type in the following domain ulogin net Wait a few seconds and then the login page will open The screen is shown below Internet Configuration computer Product Configuration Internet LAN port https ulogin net WAN port Internet Configuration computer Product Configuration Internet LAN port https ulogin net WAN port Default ...

Page 10: ... password If desired the firewall can be configured in Spanish by clicking on the flag shown When the login process has been completed the dashboard display is shown see the figure below First change the admin password click admin at the top of the left side menu The tab will open Enter a new admin password as shown below ...

Page 11: ...ttings are Reset frequency 0 a value 0 forces the password to be reset periodically Minimum password length 9 characters Minimum password lowercase letters 2 Minimum password uppercase letters 2 Minimum password symbols 1 Minimum password numbers 1 Inactive admin logout time 30 minutes Change any setting then click the save changes button at the bottom of the page The download settings button perm...

Page 12: ...The Authonet firewall simplifies the configuration process with the concept of groups where users devices and rules are assigned to each group Many groups can be created Device Group 2 Device D Device C Access rules Device Group 2 Device D Device C Access rules Device Group 1 Device B Device A Access rules Device Group 1 Device B Device A Access rules Manager Accounting Production Reception Exampl...

Page 13: ...d peripherals connected to the network as listed as unknown devices Each device can be given a name e g the name of the users and then it moves to the known devices group Subsequently new groups can be created and both unknown and known devices can be moved to the new group Groups are usually created to represent the departments of a business e g management sales accounting etc as it is usual that...

Page 14: ...This overrides all other Access Rules Allowed Allows access to a set of IPs and DNS entries for all users of the network Public This special Access Rule allows a Device Group to access the Public Internet however any IP or DNS entries contained within Blocked Access Rules will prevent access The default access rules can be added to one or to many groups New rules can be created and added to one or...

Page 15: ...call the hacker to give the hacker access to the computer and use it as a tool to hack the network servers Wherever possible a group should have the Allowed rule assigned or a rule created for access to specific websites that are required by the user This action will prevent a trojan virus communicating with the hacker after accidental installation The two default groups unknown devices and known ...

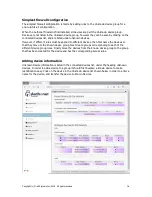
Page 16: ...st be applied to different devices then first name the devices so that they move to the known device group Next create groups corresponding to each of the different device group rules Finally move the devices from the Known device group to the group that has been created for the device and has the corresponding access rules Adding device information Unknown Device information is listed in the conn...

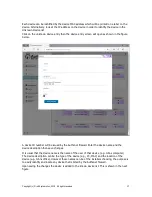
Page 17: ...evice ID number will be issued by the Authonet firewall Enter the device name and the device description then save changes It is usual that the device name is the name of the user of that device e g Johns computer The device description can be the type of the device e g PC MAC and the location of the device e g Johns office However these names can be of the installers choosing the purpose is to ea...

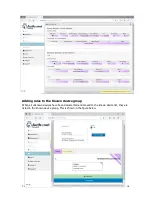
Page 18: ...Inc 2019 All rights reserved 18 Adding rules to the Known device group When all unknown devices have been documented and moved to the known device list they are listed in the Known device group This is shown in the figure below ...

Page 19: ...he access rule However as stated previously it is never desirable to give a user full Internet access because if that user clicks on an email link which installs a trojan virus then there is nothing to stop the trojan calling the hacker and giving the hacker full access to the users computer The preferred method is to create an Allowed IP rule which give access only to those websites that the user...

Page 20: ...ice group creation usually follows the departmental organization inside a business For example device groups could be as follows Management full Internet access however these users must take care not to click on email links or attachments Sales and marketing access to many websites including social media Financial access to specific websites Production access to specific websites Purchasing and in...

Page 21: ...permits the new group to be created by entering the group name and description In order to add devices and rules to the group the group box must be clicked after creation This is shown in the following figure First add devices to the group as shown in the figures below ...

Page 22: ...trated for a new group called Marketing It was decided by the business manager that staff belonging to the Marketing group should have access to social media websites but not have access to any other website This action will protect the network if any member of the Marketing group should accidentally install a Trojan virus that attempts to call the hacker in an attempt to pass control of the compu...

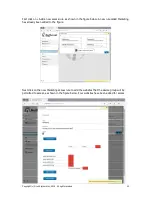
Page 23: ...cess rule as shown in the figure below A new rule called Marketing has already been added to the figure Next click on the new Marketing access rule to add the websites that the device group will be permitted to access as shown in the figure below Four websites have been added for access ...

Page 24: ...ed Marketing is created and added to the device group page as shown in the figure below The devices used by marketing department staff must be added to this group Finally the new rule called marketing is added to the new device group called marketing as shown in the figure below ...

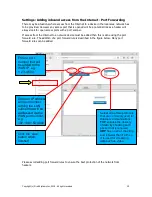
Page 25: ...e addition of a port forward rule is described in the figure below Many port forward rules can be added Please avoid adding port forward rules to ensure the best protection of the network from hackers Select one of two protocols that are commonly used for Internet communications TCP ensures the delivery of data by checking each packet that is received UDP has no error checking and is faster than T...

Page 26: ...ed in the DMZ while the rest of the organization s network remains firewalled To set the DMZ click on Settings then click Port Forward and DMZ The drop down menu lists known devices within the LAN network Select a device that will be visible from the WAN side of the network As with port forwarding it is not a good policy to make a LAN side device accessable from the Internet This is an invitation ...

Page 27: ...etwork settings The figure shown below will be displayed Click on the settings button to change settings When the settings button is clicked the screen shown here will be displayed Change the desired parameters then click save changes button and reboot WARNING an installer who is not familiar with IP calculations should not change these settings otherwise the Authonet firewall may become inaccessi...

Page 28: ...uter or firewall that is connected to the modem to have a static IP If the Authonet firewall is to be connected to a modem then click the WAN settings button as shown in the figure When the settings button is clicked the screen shown here will be displayed First change the STATIC DHCP selector to STATIC Next enter the IP information provided by the ISP this will be three parameters Gateway IP Cust...

Page 29: ...below When the 1 1 NAT button is clicked the figure will be seen Follow the sequence of instructions shown in the figure to configure the 1 1 NAT A number of IP addresses can be added Click button to configure 1 1 NAT 1 1 NAT Network Address Translation is a mode of NAT that maps one internal address to one external address For example if a network has a server on the WAN side of the firewall then...

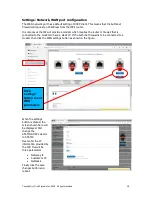
Page 30: ...AN and WAN ports Click on the network setting page to see the screen below Click on one or both of the admin port access buttons The LAN port default is shown checked The DNS IP that will be used to service DNS requests can be modified The default setting is the Google DNS servers the IP addresses are 8 8 8 8 8 8 4 4 These IP s can be changed to those provide by the ISP Note that if OpenDNS conten...

Page 31: ...d domain name and corresponding device IP for the device on the WAN side of the firewall Finally select the type of device Host permits access to the domain only while Wildcard permits access to the domain and sub domains Click the Add DNS button to add the entry Many entries can be added to the list if required Select Host or Wildcard Host permits access only to the domain Wildcard permits access...

Page 32: ...ed tunnel with a remote VPN server Click on Settings then VPN to see the page shown below Enter information provided by the remote VPN server the server name username password and domain When the data has been entered click Save Changes The PPTP Point to Point Tunneling Protocol operates on TCP port 1723 PPTP was developed by Microsoft to encapsulate PPP Point to Point Protocol Out of all the VPN ...
Page 33: ...counts as part of the Internet service The ISP will provide the following SMTP server parameters SMTP server name SMTP server port number SMTP server login username SMTP server login password Email address created for the SMTP server account usually created by the ISP Name of the sender usually the name and serial number of the Authonet firewall Email address where the message should be sent The a...

Page 34: ...Click on Settings Auto Blocked IP s to see the status of IDS auto blocking This is shown in the figure below Clicking on the link enable auto blocking will open the Firewall settings page The Intrusion Detection System is enabled by checking the box as shown in the figure below Click enable which will open the firewall settings page to enable auto blocking ...

Page 35: ...ging The default setting is logging enabled These entries also have buttons to enable or disable sending alerts and reports to the administrator via email The default setting is disabled The Auth history Admin history data are always logged and have buttons which enable or disable sending reports to the administrator The default setting is disabled When Firewall settings is clicked the page shown ...

Page 36: ...end email log to admin provide the admin email Email settings must be configured before log emailing can be selected Admin history record of admin log ins outs Select send email log to admin provide the admin email DNS domain name system Logging of DNS searches enabled by default Select send email log to admin provide the admin email Email settings must be configured before log emailing can be sel...

Page 37: ...d rules implementing CIPA and provided updates to those rules in 2011 Authonet firewalls can be used with category blocking services such as OpenDNS who provide both free and paid accounts Any other DNS based category website filtering service can be used such as DansGuardian by entering the DNS service IP s on the Network Settings screen Click on Settings Content filter to open the page shown in ...

Page 38: ...t the time and date are correct it is necessary to choose the time zone where the Authonet firewall is located Click Settings Timezone to display the page shown in the figure below Click the drop down menu to select the timezone where the Authonet firewall is located Click the Save Change button when the Timezone selection has been made ...

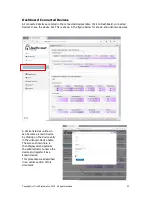
Page 39: ...oard Overview When the administrator first logs in to the Authonet firewall the Dashboard Overview screen is displayed This screen was shown previously at the beginning of Part 2 Click on the See Connected Device Details button to list the known and unknown devices ...

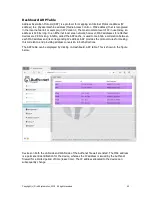
Page 40: ...ws MAC OS Linux etc will request a new IP lease for the same IP address Click on Dashboard IP leases to list all devices that are connected to the Authonet firewall Each entry shows the following information IP address assigned to the device by the DHCP service Network name of the device MAC address of the device Ethernet interface Expiration time of the IP lease Associated device name if the devi...

Page 41: ...o see the device list This is shown in the figure below for known and unknown devices A device listed as unknown can become a known device by clicking on the device entry in the unknown device table The screen shown here is then displayed and permits the administrator to name the device and register it as a known device This procedure was described in an earlier section of this document ...

Page 42: ...s are 48 bits long A table called the ARP cache is used to maintain a correlation between each MAC address and its corresponding IP address ARP provides the protocol rules for making this correlation and providing address conversion in both directions The ARP table can be displayed by clicking on Dashboard ARP table This is shown in the figure below Devices on both the LAN side and WAN side of the...

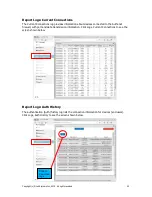
Page 43: ...ut devices connected to the Authonet firewall with port and data transmission information Click Logs Current Connections to see the screen shown below Report Logs Auth History The authentication Auth history log lists the connection information for devices and users Click Logs Auth History to see the screen shown below Click to download logs ...

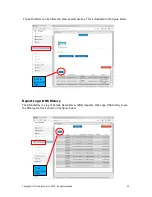
Page 44: ... filtered to show specific devices This is illustrated in the figure below Report Logs DNS History The DNS History is a log of Domain Name Server DNS requests Click Logs DNS History to see the DNS report this is shown in the figure below Click to download logs Click to download logs ...

Page 45: ...illustrated in the screen below Report Logs Admin History The Admin History log shows a record of all administrator logins to the Authonet firewall Each record shows the MAC address of the computer that was used to login Click on Logs Admin History to display the screen shown in the figure below Click to download logs Click to download logs ...

Page 46: ...ake additional precautions to protect the network from hackers To see the IDS report click on Logs IDS events the screen shown in the figure below will be displayed Report Logs IPS Events Intrusion prevention IPS events in both the LAN and WAN networks IPS events for the LAN and WAN are listed in two tables Click on the Logs IPS events to see the IPS Events log screen shown in the figure below Cli...

Page 47: ...in the Port Forward Events table Click on Logs Port Forward Events to see the events log shown in the figure below Admin controls Logout When the administrator has completed the configuration the final step is to logout After a specified time the administrator will be logged out automatically Click on Admin Controls Logout Admin to see the screen below Finally click on the Logout button Click to d...

Page 48: ...settings To reboot click on Admin Controls Reboot The screen shown below will be displayed click the Reboot button Admin controls Factory Reset The administrator can reset the Authonet firewall to factory defaults This will be necessary when moving the firewall to a different network Click on Admin Controls Factory Reset to see the screen shown below Click on the Delete Everything button to reset ...

Page 49: ...e firewall Click on Admin Controls Upgrade Backup to see the screen below It is advisable to save the firewall settings once configured The settings can be restored at any time and will save a lot of time if the firewall is accidentally reset to factory defaults Backup the F10 settings Reload the previous settings Download the upgrade firmware file to the computer using the link obtained from the ...

Page 50: ...ort Tutorials to access the tutorial pages This is shown in the figure below Tutorials are divided into six sections as follows Introduction Tutorial Changing Admin Password Creating a Device Creating a Device Group Creating an Access Rule Creating a Device with Internet Access In addition to the tutorials the customer can contact the Authonet support page to ask questions about configuring the un...

Page 51: ...usinesses with 25 or less employees Authonet will release a higher performance firewall product during 2019 for businesses with up to 100 employees Online Support Online support is available for any question that the customer may have regarding Authonet firewalls To send a question go to the Authonet support page https www authonet com support php Provide the following information Model number Fir...

Reviews: