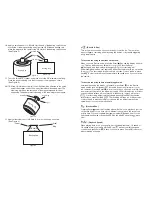
10. Apply a small amount of J-B Weld onto the end of the bearing cap. With the
south side of the magnet facing away from the J-B Weld and bearing cap,
place the magnet in the center of the J-B Weld on the bearing cap as shown.
(See Figure 2.)
South End
Figure 2
J-B Weld
Bearing Cap
Bearing Cap
Side View
Magnet
11. Tear off a thin piece of paper, and place it onto the 5⁄8" diameter steel slug.
Place the paper and slug onto the south end of the magnets as shown.
(See Figure 3.)
NOTE: Since J-B Weld has steel in it, the J-B Weld will be attracted to the south
end of the magnet, and will flow away from where its needed most. The
steel slug placed on the south end of the magnet prevents this from
happening. The paper prevents bonding of the steel slug to the magnet.
Figure 3
South End
Steel Slug
Paper
Bearing Cap
12. Apply a liberal amount of J-B Weld to form a cone shape as shown.
(See Figure 4.)
Figure 4
Paper
Steel
Slug
Bearing Cap
J-B Weld
(cone shape)
- (Record A Run)
This is the menu you use when you are ready to record a run. There are two
ways to trigger a recording, either by using the buttons or by remote triggering
along the blue wire.
To record a run using the buttons on the tach:
When you are in Record mode, press the Enter ( ) Key and the display will show
.This can be done at any time prior to your run. Press the Enter
( ) Key again, and the display will change to
. Your recording will
automatically begin when your engine RPM reaches the threshold you set earlier
(See ). The recording will then run for 60 seconds. You don’t need to press
anything to stop it and the run will automatically be saved, even if you shut down
the vehicle.
To record a run using the blue remote trigger wire.
Just like when using the buttons on the tach, press Enter ( ) on the Record
mode and the tach will display . This can be done at any time prior to your
run. Instead of Pressing Enter ( ) to “arm” the tach, you can use a normally open
momentary push button on the blue wire to apply 12V. Hold the button for at least
one second and release it. Once that 12V is taken away, the tach will move to
Armd
. . Your recording will automatically begin when engine RPM reaches the
threshold you set earlier (See
thrE
). The recording will then run for 60 seconds.
You don’t need to press anything to stop it and the run will automatically be
saved, even if you shut down the vehicle.
-
(Playback Run)
Pressing Enter ( ) under the Playback menu will allow you to play back your run
on the tach itself. You can have up to 4 different runs stored on the tach at one
point in time. You can move between them using the
run
menu item. You can
switch between Engine or Driveshaft RPM on the display using the
menu
item.
- (Playback Speed)
When playing back a run, you can play it at full speed (real time), 1/2 speed or
1/3 speed. Simply use the Up ( ) and Down ( ) Arrows to select the speed
you want and press Enter ( ) to save.You can also press Cancel (
X) to back out
without making a change.

