13. Allow the J-B Weld to cure for 24 hours before putting into use. J-B Weld
cures slower if used at temperatures below 60°F. After J-B Weld has
cured for 6 hours, a heat lamp or light bulb placed near the weld will
speed up curing time in cooler temperatures. Do not apply heat before
6 hours of room temperature curing, as this may cause the weld to
become brittle.
NOTE: In hot weather, let the J-B Weld set-up for about 15 to 20 minutes after
mixing, this lets it thicken and prevents running or sagging.
14. After J-B Weld has cured, remove the steel slugs and paper. Make sure
that no J-B Weld protrudes above the magnets, if so a file may be
carefully used to remove the excess. Also be sure that the J-B Weld does
not interfere with the bearing cap retainer tang on the end yoke.
15. Assemble the bearing caps. Use an approved grease to hold the needle
bearings in the bearing caps. Make sure there are no missing needle
bearings. Place the bearing caps onto universal joint cross.
16. Reassemble the driveshaft and universal joint to the end yoke. Replace
the U-boltsor straps, and torque to the manufacture specifications. When
magnets are mounted according to these instructions, the magnets will
withstand at least 10,000 RPM. A collar is recommended for cars 10
seconds and faster.
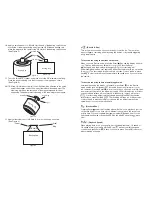
A bracket must be fabricated to hold the sensor near the magnets that were
installed on the universal joint bearing caps. The bracket must be very rigid,
as not to allow the sensor to come in contact with the magnets under extreme
vibration. If the sensor touches the magnets they will break off, and also possibly
damage the sensor. We recommend using rigid channel steel for the bracket.
The bracket should be bolted directly to the differential case. This insures a
constant sensor to magnet clearance with any suspension travel. Mount the
sensor through a 7⁄16" diameter hole in the bracket. Adjust the sensor to magnet
clearance to .200”+/-.030”, and lock down the jam nuts supplied on the sensor.
Verify the clearance is correct for all magnets. (See Figure 5.)
Sensor Mounting for Driveshaft RPM Pickup
Optional: Driveshaft collars are available direct from Auto Meter for many
performance applications. (See page 10 for details)
Rotate the driveshaft by hand to make sure there is adequate clearance between
the bracket and sensor assembly and the differential pinion end yoke. (See
Figure 6.) Tie the wires away from any moving objects and hot exhaust pipes.
- (Normal Tach Mode)
This is your normal operating mode. When Tach is selected, the pointer will
display the current engine RPM and the shift light will always come on when the
RPM reaches the first shift point (see section for more information). This
is the default setting for the Ultimate III and will always come up when the unit is
powered up.
- (Playback Display Channel)
This setting allows you to change which reading is shown on the tach’s digital
display during normal operation and during playback (when a run is played
back on the tach). Press Enter ( ) to begin. Using the Up ( ) and Down
( ) Arrows, you can select between Engine RPM or Driveshaft RPM. Press
( ) to confirm your selection or press (
X) to exit without saving changes.
Please note that due to NHRA rules, Driveshaft RPM cannot be viewed while
the tach is recording. The display will go blank during your run.
-
(Playback on Pointer)
When playing a run back on the tach itself, you can watch either the Engine
or Driveshaft RPM. This option allows you to select between the two. Please
note that the tach will always display Engine RPM under normal operation,
regardless of your setting here. Press Enter ( ) to start & use the Up ( )
and Down ( ) arrows to select between the two. Press Enter ( ) to save or
Cancel (
X) to exit without making a change.
- (Set Run)
The Ultimate DL can record 4 separate 60 second runs. Pressing Enter
( ) on this setting will allow you to select different runs using the Up ( )
and Down ( ) Arrows. Once you’ve selected the run you want to use, press
Enter ( ) to save or Cancel (
X) to back out without making a change. The
tach will always stay on the run you currently have selected and will simply
overwrite the existing run if you record a new one and there is one stored
in memory. As an example, Run 4 cannot be affected if you have Run 1
selected. Making two recordings on Run 1 will automatically erase/overwrite
the data from the earlier run.

