background image

1. Turn off the vehicle’s engine

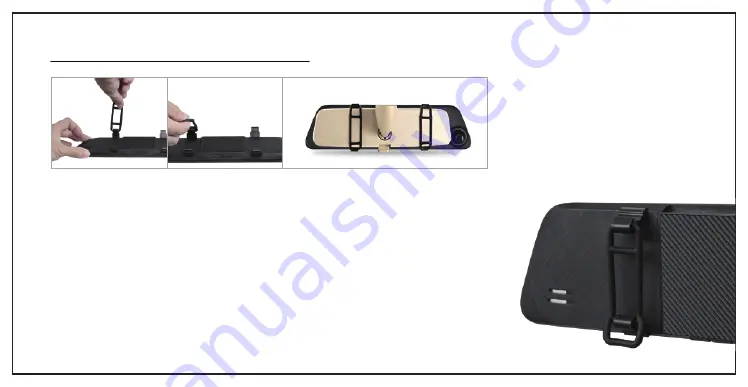
2. Attach M8 dash cam on the original rear view mirror

3. Plug the car adapter into the cigarette lighter of your vehicle 

4. Connect the car adapter’s ending to the mini-USB socket of M8mirror dash cam.

    Extra power cables can be tucked in the edges of windshield when you rote the wire.

Note:

1. M8 dash cam working voltage: 5V 1.5A ;  Please use standard car charger to supply 

    the power for M8, or it will cause damage to the device.

2. If M8 shakes slightly, you might try the next slot on the bands, mirror sizes vary a lot. 

INSTALLING M8 TOUCH SCREEN DASH CAM

16

Summary of Contents for M8

Page 1: ...Touch Screen Mirror Dash Camera AUTO VOX M8 ...

Page 2: ......

Page 3: ...ng Setting Format Card Firmware Update Installing and Removing SD card Menu Operations Backup Camera at a Glance 1 1 1 2 2 3 4 4 4 4 5 5 15 Chapter 3 Wiring at a Glance Installing Touch Screen Dash Cam Installing Backup Camera Wire Connection Steps Testing Wire Routing Chapter 4 Technical Specification Chapter 5 Trouble Shooting 15 16 17 18 19 19 20 23 TABLE OF CONTENTS ...

Page 4: ...nty period During the warranty period if the product was used under normal conditions you will be entitled to the repair of the product and replacement of parts free of charge arising from defects in the materials and workmanship AUTO VOX reserves the right to amend the warranty content without prior notice Note 1 AUTO VOX shall not be liable for any damages of any kind resulting from the purchase...

Page 5: ...t camera recording 180 horizontal super wide angle back up camera without recording With LDWS lane departure warning system Touch Screen and User s friendly menu interface 6 86 wide display view TOUCH SCREEN DASH CAM AT A GLANCE Lens LCD Screen Reset ...

Page 6: ...ttery but it can only last around 5 minutes without an external power supply Note Functions for those button Left Press to lock the video in Emergency folder Press and hold for 3 sec to capture O M button Press O M button LCD screen will be off meanwhile the dash cam still records Press O M button again LCD screen will show meanwhile the dash cam still records Press and hold for seconds to turn on...

Page 7: ...inutes After setting it the device will continue to record by overwriting the previously recorded video and replacing it with the new video FORMAT CARD 1 SD card will be formatted automatically when it is been inserted 2 When recording please stop by touch menu touch Format to select YES 3 Format the micro SD card on PC Take out the SD card and insert it to a car reader and then connect to the PC ...

Page 8: ...te Please select off when driving Setting Set up details INSTALLING AND REMOVING THE MICRO SD CARD Insert Micro SD class 10 or higher with FAT 32 in to the card slot making sure to follow correct orientation markings Push the card until it clicks into place Do not remove or insert the memory card when dual dash cam M8 is powered on since it may damage the card Memory card capacity should be at lea...

Page 9: ...6 Movie Mode Select resolution 1296P 1080P 720P 1 1 Movie Mode 1296P 1080P 720P Movie Quality Select Super Fine or Fine 1 1 Movie Quality Super Fine Fine ...

Page 10: ...minutes After setting it the device will continue to record by overwriting the previously recorded video and replacing it with the new video 1 2 Movie Off Time 0 min 5 sec 10 sec 30 sec 2 2 Movie Off Time 1 min 2 min Movie Off Time Select recording time after car shut off 0 5 10 30 sec and 1 3 min ...

Page 11: ...e OFF Note When play back video by dash cam sound can be played But couldn t play on PC please use video player VLC Beep on off Beep Select On or off ON means when touch selections you may hear audio cues that you touch it Off means when you touch selections couldn t hear audio cues ...

Page 12: ...wered by car battery the dash cam will power off automatically after stopping recording Note If parking monitoring function is on it will not power off automatically even set 1 or 5 min Clock Settings Clock Settings Set up year date and time for dash cam 2020 Y 03 M 11 D 21 42 OK 57 Back ...

Page 13: ...10 Stamp Date Logo Date Logo OFF Select Stamp format Set up the stamp format in your videos and pictures 1 1 Flicker 50 Hz 60 Hz Flicker Select the right frequency from 50Hz or 60Hz ...

Page 14: ...n LCD Power Save May select 15 30 sec and 1 min Default is 30 sec If you don t need the screen to display when driving please set it Though the screen is off the dash cam still records and the screen will be on automatically again when reversing ...

Page 15: ...vel Select with off Level 0 Level 1 Level 2 Level 3 Level 4 Note This function works when the road is bumpy and mirror is vibrating during recording the video file will be locked in Emergency folder In those conditions we recommend to set off Generally we recommend you to set Level 2 or Level 3 ...

Page 16: ...etup Reset Setup NO YES Reset Setup If all setting need to be deleted please touch Yes Back 1 1 Parking Monitoring Off High Middle Low Parking Monitoring Select Off High Middle Low When driving please select Off ...

Page 17: ... the image or video you want to view and then click the screen to play it 2 Click the Back icon in the upper right corner Note You can also choose to delete lock or unlock the file you select Format We suggest to Format SD Card every 3 6 months Ews LWDS If you select ON when driving the device will alert you if you suddenly depart from your lane It makes you be aware of danger in time especially f...

Page 18: ...Chapter 3 15 To ground iron part To reversing light 12V Car Cigarette Lighter Mini USB Port Micro SD Slot AV IN to connect rear view camera BACKUP CAMERA AT A GLANCE WIRING AT A GLANCE ...

Page 19: ...the mini USB socket of M8mirror dash cam Extra power cables can be tucked in the edges of windshield when you rote the wire Note 1 M8 dash cam working voltage 5V 1 5A Please use standard car charger to supply the power for M8 or it will cause damage to the device 2 If M8 shakes slightly you might try the next slot on the bands mirror sizes vary a lot INSTALLING M8 TOUCH SCREEN DASH CAM 16 ...

Page 20: ...ion Tear off the film B of the 3M adhesive then attach the license plate Then tighten the screws with wrench Step1 Take off the license plate with wrench Step2 Find a best location and make a mark Step3 Tear off the film A of the 3M adhesive and fix it to the marked location Tear off the film B of the 3 M adhesive then attach the license plate Then tighten the screws with wrench 17 1 2 ABC123 ABC1...

Page 21: ...usually attached on the tailgate by clips It may take a bit longer time to avoid clip damages Once the panel is removed the work will be done easily 3 Carefully peel the skin of the red and black wires and find the reverse light power wires fix the red wire of the video cable with the positive reverse wire while the black wire to the iron part of the car ground 4 Connect the 4 pin camera wire to t...

Page 22: ...nnect reversing light TESTING Before routing the video cable connect the monitor and put the car gear to reversing and see whether it is working WIRE ROUTING After Testing route the video cable as the picture below two ways of routing are available 19 ...

Page 23: ...eo Format Lane Departure Warning System Loop Recording Taking Photo Backup Camera G SENSOR 6 86 IPS Screen F2 05 mega pixel 140 wide angle SHD1296P FHD1080P HD720P JPG MOV Support Support with 1 2 3minutesng Support Support Support Mirror Specification 20 Section 4 TECHNICAL SPECIFICATION ...

Page 24: ...orking Temperature Storage Temperature Micro SD Working Voltage Battery Type Language Support Support Support 50Hz 60Hz 1 USB Disk 2 PC Camera 20 70 4 158 30 80 22 176 Support to 64G TF card with Class10and FAT32 DC5V 2A Polymer Lithium Battery English German Japanese etc ng ...

Page 25: ...al Angle Video Output Minimum illumination PAL NTSC 960 H X576 V 700 TV lines 175 5 1 0Vp p 75 ohm 0 1 Lux S N Ratio Working Current Power supply Water proof Display Mode Operating Temperature More than 40dB 100mA 10mA DC 12V 10 IP 67 175 130 L R Top View 20 70 4 to 158 Backup Camera Specification ...

Page 26: ...vices Ensure to format the card every week And you can also reset the device If the p roblem doesn t be solved please use a new SD card with suitable class speed The SD card is full or Error or make noise Ding Ding Please insert SD card shows on screen after insert one TROUBLE SHOOTING Check whether the device is in Video Output Mode If it s not check whether the device is in Screen Saver status I...

Page 27: ...Ver 2 0 ...

Page 28: ...www autovoxclub com Email service auto vox com ...

Reviews: