background image

Home Owner’s Manual

Doc #: 160058_01

Part #: 13433

Released: 28/10/2015

GDO-11V3 Ero

Overhead Garage Door Opener

Summary of Contents for GDO-11V3 Ero

Page 1: ...Home Owner s Manual Doc 160058_01 Part 13433 Released 28 10 2015 GDO 11V3 Ero Overhead Garage Door Opener ...

Page 2: ...chnology Australia Pty Ltd Garage Door Opener Automatic Technolofy Australia Pty Ltd hereby further expressly excludes all or any liability for any injury damage cost expense or claim whatsoever suffered by any person as a result whether directly or indirectly from failure to install the Automatic Technology Australia Pty Ltd Garage Door Opener in accordance with the installation instructions DIY ...

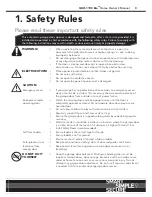
Page 3: ...s manual operation of the garage door from outside in case of power failure Entrapment under operating door Watch the moving door and keep people away until the door is completely opened or closed Do not operate door when persons are near the door Do not allow children to play with door controls or transmitters Regularly conduct Open and Close cycle testing Ensure the garage door is in good workin...

Page 4: ...ontrol system during the initial installation of the automatic door opener The door will also stop if restricted whilst opening The Safety Obstruction Force should be checked monthly Manual Release The manual release handle allows the door to be operated by hand in the event of a power failure Self Locking There is no need to manually lock your garage door as the opener positively locks the door w...

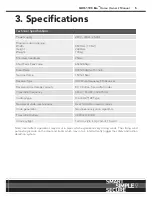
Page 5: ... code storage capacity 8 X 4 button Transmitter Codes Transmitter frequency 433 47 433 92 434 37MHz Coding type TrioCodeTM 128 Type Number of code combinations Over 100 billion random codes Code generation Non linear encryption algorithm Transmitter battery CR2032 3 Volts Courtesy light Festoon style lamp 24volts 15 watts Note Intermittent operations may occur in areas which experience very strong...

Page 6: ...er to Section 8 for full details Turn the courtesy light on and off without operating the door Put the garage door opener into Vacation Mode where it will not respond to any transmitters NOTE Additional transmitters may be purchased at any time CAUTION Activate the opener only when the door is in full view free of obstructions and with the opener properly adjusted No one should enter or leave the ...

Page 7: ...s stops closes the door 2 CODING LED Red Flashes when a code is being stored or when the transmitter button is pressed 3 DOOR CODE Blue Is used for storing or erasing transmitter buttons for door operation 4 DOOR STATUS LED Yellow Illuminates when Service is due 5 OPEN LED Green Illuminates and flashes as the door opens and remains on when the open limit position has been reached 6 CLOSE LED Red I...

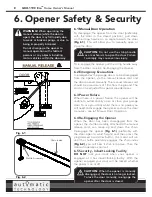
Page 8: ...gaged from the opener the shuttle assembly attached to the manual release cord can move up and down the chain Re engage the opener Fig 6 1 preferably with the door open to waist height and then press the programmed transmitter button the motor will run until the shuttle assembly engages the chain index Fig 6 2 you will hear it click into place Then the door will operate as normal CAUTION When the ...

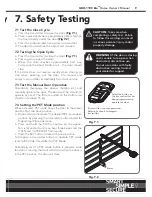
Page 9: ...hen activated PET mode drives the door to the preset position from the close position a Drive and stop the door at the deisred PET mode open position by pressing the transmitter button coded for Open Stop Close operation b Press and hold the PLUS button on the opener for six 6 seconds until you hear three beeps and the OPEN and CLOSE LED s flash rapidly c Press the SET button to record the new pos...

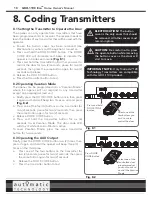
Page 10: ...1 c Press and hold the transmitter button that you want to control the door for two 2 seconds pause for two 2 seconds then press the same button again for two 2 seconds and release d Release the DOOR CODE button e Press the transmitter button to test 8 2 Operating Vacation Mode The opener can be programmed into a Vacation Mode where the opener will not respond to any transmitter except one preprog...

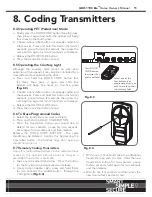
Page 11: ...d hold this button for two 2 seconds pause for two 2 seconds then press the same button again for two 2 seconds and release c Release the DOOR CODE button d Press the transmitter button to test 8 6 To Erase Programmed Codes a Select the transmitter you want to delete b Press and hold the DOOR CODE BUTTON c Press the transmitter button you would like to delete for two seconds pause for two seconds ...

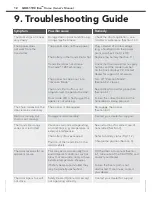
Page 12: ...ion 8 1 Ensure the correct button on the transmitter is being pressed The chain moves but the door remains stationary The opener is disengaged Re engage the opener Section 6 4 Motor is running but chain is not moving Damage motor assembly Contact your dealer for support The transmitter range varies or is restricted Variations are normal depending on conditions e g temperature or external interfere...

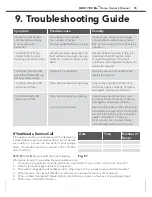
Page 13: ...d Discontinue use and contact your dealer for support The Open Green LED continues to flash Door obstructed when opening Clear away any obstructions and test door opens correctly If door is damaged contact your dealer The Close Red LED continues to flash Door obstructed when closing Limits may be cleared Clear away any obstructions and test door closes correctly If door is damaged contact your dea...

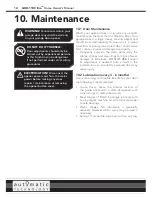
Page 14: ... trouble free life for your door the following is recommended Guide Tracks Clean the internal sections of the guide tracks with a cloth dampened with mineral turps or methylated spirits Steel Hinges if fitted Sparingly lubricate with an all purpose machine oil Also lubricate wheel to axle bearings Plastic Hinges No lubrication is generally required however silicon spray may be used if necessary Sp...

Page 15: ... signs of corrosion contact your dealer immeditately and discontinue use leaving door in the closed position Fasterners Check all screws nuts and bolts to ensure they are secure Spring Tension It is natural for springs to lose tension Should the door become hard to operate or completely inoperative contact your dealer 10 4 Opener Maintenance To ensure a long and trouble free life for your opener t...

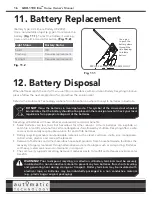
Page 16: ...e earth elements Removal of batteries and other hazardous household products from household waste facilitates the recovery of organic materials through alternative waste technologies such as composting Batteries and heavy metals are known contaminants in compost The community supports recycling because it reduces waste to landfill and achieves environmental benefits WARNING Prior to disposal recyc...

Page 17: ...o TM Home Owner s Manual 13 Service Schedule Year Approx Cycles Date Details 1 3 000 2 6 000 3 9 000 4 12 000 5 15 000 Automatic Technology Australia Pty Ltd Phone 1300 133 944 Website www automatictechnology com au ...

Page 18: ... particular any loss or damage caused to other equipment or accessories used with the product or any loss resulting from a delay in repair is excluded to extent permitted by law 5 Subject to all of the matters set out below ATA warrants in relation to the Product that a the Product s drive units will be free of any defects in material and workmanship for at least 24 months after the date of purcha...

Page 19: ...owing repairs the cost of which must be borne by you 13 This Warranty is limited to Return to Base RTB repair and does not cover labour for on site attendance the cost of which must be borne by you 14 Except as specified in this Warranty ATA will not charge you for any repairs or replacements conducted under the Warranty However ATA will charge you for any repairs which are not within the scope of...

Page 20: ...Dealer Is your door sticking and hard to operate It may be time for a service for more details see section 10 For a service contact your dealer using the details below ...

Reviews: