background image

Ital E-Bike user manual - Edition 01 - 2020

47

HOW DOES THE Ital E-Bike  BATTERY PERFORM DURING USE

It's

 important to remember


that the 

Ital E-Bike 

 battery reaches its best performance 

after the first 4

 or 

5 full charging and recharging cycles and when it is recharged for 

the first time for at least 7 hours. 

The  intelligent  electronic  management  system  of  the 

Ital  E-Bike

 battery  (BMS) 

protects  the  lithium-ion  battery.  The  BMS  controls  each  single  cell,  after  the  first 
few recharges it balances the cells and thereby prolongs the battery life. 

While  using  your 

Ital  E-Bike


it's

  important  to  understand  what  happens  with  the 

gradual  discharge  of  the  battery.  In  fact  the 

Ital  E-Bike 

is  a  fully  electronic  e-bike, 

including gear changes. The system has been designed so that the user is able to use 
the

  Ital  E-Bike

 as a normal 

bike 

even with the battery completely discharged

.  Even 

with a low battery, there will be a reserve of energy 

That will allow the rider to use the 

electronic gear change system and reach their destination.

During  use,  with  a  fully  charged  battery, 

the  Ital  E-Bike 

will  have  more  assistance 

power  available,  in  all 

four 

  assistance  modes.  As  the


energy  in  the  battery 

decreases, the power available to your 

Ital  E-Bike

 will gradually decrease. If we are 

using  the  bike  for  example  in  HIGH,  at  a  certain  point, 

The  bike

  will  change  to 

STANDARD mode, then change again to ECO mode until all of the available energy in 
the battery has been used before changing to NO ASSIST mode. 

Summary of Contents for Ital E-Bike CROSSER

Page 1: ...USER MANUAL Edition 01 2020 Designed Engineered and manufactured in Italy...

Page 2: ...ore each use 15 Checklist of controls to perform before each use 16 Checking the wheel units 16 Checking the seat and the seat post 17 Checking the handlebars and handlebar stem 17 Checking the brakes...

Page 3: ...ystem 41 Locking the rear wheel 41 The battery 42 Useful information about the battery 42 The Ital Ebike battery 43 Battery technical data 44 Removing and installing the battery 44 Lock for assembly a...

Page 4: ...ventilated area Do not attempt to repair the battery or battery charger Do not insert objects into the battery charger and do not expose the battery charger the battery or the electrical components t...

Page 5: ...e is stopped it is recommended to use the ECO assist mode when setting off in order to avoid accidental falls When the assisted pedaling is switched off the bicycle will require additional pedaling fo...

Page 6: ...if you detect omissions or oversights Use your Ital E Bike only after you have carefully read the following user manual inside you will find important information If you choose to sell or give away y...

Page 7: ...mpromise the safe operation of the e bike This can give rise to dangerous riding situations falls and accidents The user can only perform work on the e bike that is described in this instruction manua...

Page 8: ...ortant to note that the motor works at peak efficiency and will consume less battery power for the same torque output when the rider pedals with a smooth and consistent cadence of 70 80 rpm By optimiz...

Page 9: ...ons The modes can be selected any time the bike is turned on by pressing the on the left side of the handlebars physical and mental fitness If the rider wishes to ride a bicycle along public streets a...

Page 10: ...pack only use the battery charger supplied Keep the battery charger away from people and animals Do not allow the battery charger to come into contact with water or other liquids Do not charge the bat...

Page 11: ...tromechanical with movement deactivation via PIN code 50 60 m depending on the assistance and the type of route Maximum of 20 mph Gearbox Gear shifters Gears Motor Torque sensor Battery Display Anti t...

Page 12: ...Display 2 Battery closing 3 Battery 4 Battery charger socket 5 Electronic control unit box 6 Gears and motor 7 Single arm fork 8 Kickstand 9 Saddle 10 Seatpost 11 Saddle lock 12 Crank 13 Pedal 14 Whe...

Page 13: ...rposes some important components are not completely assembled Your dealer should perform the final assembly of your Ital E Bike making it safe Only use your e bike in a suitable sitting position Ask y...

Page 14: ...not move on the front fork or rear monoarm The quick release lever on the front wheel must be closed and the closing knob on the rear wheel must be fixed and with the security lock closed check the f...

Page 15: ...must be suitably fixed Checking the handlebars and handlebar stem If the handlebars and handlebar stem are not fitted properly or are damaged this can lead to dangerous riding conditions falls and acc...

Page 16: ...an reduce the braking power and lead to dangerous riding conditions falls and accidents Check that the brake disc is not damaged It must be free of nicks cracks deep scratches and any other mechanical...

Page 17: ...l not lower by itself Apply gentle force with your hands making sure that the extractable part does not shift Make sure the stand is firmly secured to the frame and does not move when you move it with...

Page 18: ...s the effectiveness of the brakes may be reduced and braking distance will increase When riding you should only wear suitable clothing that does not restrict riding and does not obstruct your view In...

Page 19: ...er public lands Ital E Bike speed limit Your Ital E Bike has a device fitted to limit the maximum assisted traveling speed It ensures that the maximum assisted speed eco standard high race is kept bel...

Page 20: ...he horizontal position of the saddle fig 01 The saddle is secured with two screws A which allow forward backward A1 adjust ments to be made and the inclination A2 to be adjusted You will need a 5mm Al...

Page 21: ...with a torque wrench The specified torque is indicated on the seatpost Adjusting the saddle height fig 02 previous page Loosen the lock clamp of the seat post B Move the saddle with the seat post to t...

Page 22: ...tion B 3 Check that the handlebars are centered 4 Tighten the 4 screws to the specified torque as marked on the handlebar stem Handlebar Stem Fig 02 1 Loosen the screws in area A until the sup port ro...

Page 23: ...2 Adjust the stem to the desired position by moving it vertically in the appropriate direc tion B Fig 1 3 Lock the screw A Fig 1 to the specified torque as marked on the handlebar stem adjusting the B...

Page 24: ...Ital E Bike user manual Edition 01 2020 26 CONTROLS ON THE RIGHT SIDE OF THE HANDLEBAR Selection of transmission gear Not used Selection of transmission gear...

Page 25: ...oltage warning Km miles Riding time TRIP TIME display Adjustable display backlighting 3 5 mph walk assist function Remaining mileage display requires BMS support Real time power consumption display Re...

Page 26: ...Assist mode Shows the level of assist ance OFF ECO LOW HIGH RACE Gear position Shows the current gearl 1 8 from low to high Battery indicator Shows percentage of the battery charge remaining 1 8 Powe...

Page 27: ...button Adjust Adjust OPERATION Turn on off Hold the on off button for 2 seconds the start screen will display and then the wait screen will display Holding the on off button again for 2 seconds will...

Page 28: ...ess to select PIN digit from left to right Press to select the PIN number of each digit Press after the PIN is entered The default PIN is 1234 The password function can be disabled and the PIN changed...

Page 29: ...or AVG SPEED MAX SPEED The three information screens are shown below TRIP TIME ODO MAX SPEED TRIP TIME DISTANCE RANGE AVG SPEED DISTANCE Walk assist mode 1st gear must be selected to operate walk mod...

Page 30: ...night mode and the headlight icon will appear Hold the button again for 2 seconds to turn off the headlight and return the display to daytime mode Battery level Battery level is shown on the home scre...

Page 31: ...ting SCREEN Within 10 seconds of turning on the display and the bike being stationary hold the button for 2 seconds The settings screen will display and users can set and view the parameters of the di...

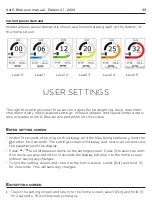
Page 32: ...xit unit setting screen and return to setting screen Back light setting Brightness adjust screen Press to choose the level of the backlight Level 5 is the brightest Press to select and return to setti...

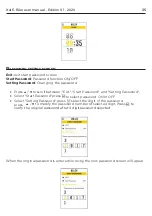
Page 33: ...to scroll between Exit Start Password and Setting Password Select Start Password press to select password ON or OFF Select Setting Password press select the digit of the password press to modify the p...

Page 34: ...Automatic shutdown if 30 minutes no operation and speed of the bike 40 minutes Automatic shutdown if 40 minutes no operation and speed of the bike 50 minutes Automatic shutdown if 50 minutes no opera...

Page 35: ...erial number of equipment FW version Firmware version number HW version Hardware version number Motor INFO Need support from controller BMSINFO Need support from controller Controller INFO Need suppor...

Page 36: ...o factory settings Short press to select Exit Yes select Yes then short press o return to factory settings unit backlight brightness turn on password auto shut off time and return to user setting inte...

Page 37: ...up the confirmation window short press again to clearance all listed items Display will return to riding interface without data clearance if no operation in 10 seconds Shown the data clearance interfa...

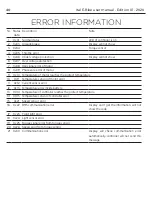
Page 38: ...rotect temperature 10 0x11 Temperature sensor of motor error 11 0x12 Current sensor error 12 0x13 Temperature error inside battery 13 0X14 Temperature of controller reaches the protect temperature 14...

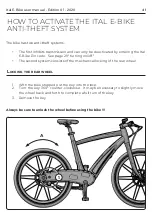
Page 39: ...Ital E Bike Pin code See page 29 turning on off The second system consists of the mechanical locking of the rear wheel locking the rear Wheel 1 With the bike stopped put the key into the lock 2 Turn...

Page 40: ...arge near flammable liquids Do not cover the battery and or charger in any way While charging the battery heats up slightly Only use the supplied power adapter If the battery is not used for a long pe...

Page 41: ...s lithium ion batteries have advantages in terms of savings up to 70 reduction in volume and weight while the number of charging cycles is three times higher Another important advantage of the Ital E...

Page 42: ...n the upper side of the battery to see the charge level of the battery 3 lights on fully charged battery 2 lights on battery charged 1 light on low battery 0 lights on low battery or faulty fuses Remo...

Page 43: ...CLOSE position the battery is inserted and locked in the correct position 2 OPEN position the battery is unlocked and can be removed from the bike removing the Battery Support the battery 2 with one...

Page 44: ...insert the bottom of the battery into the housing inside the main frame tube at a downward angle Fig 2 making sure that the coupling on the bottom of the battery box Part A fits properly on the lower...

Page 45: ...the battery In fact the Ital E Bike is a fully electronic e bike including gear changes The system has been designed so that the user is able to use the Ital E Bike as a normal bike even with the batt...

Page 46: ...pan Excessive use Storage at an ambient temperature greater than 90 F Long periods of storage with the battery fully discharged Exposing the battery to excessive heat Factors that have a positive effe...

Page 47: ...es 3 The main outlet must be near the equipment and be easily accessible 4 The charger must not be repaired and if faulty or damaged should no longer be used 5 If the charger is damaged or no longer c...

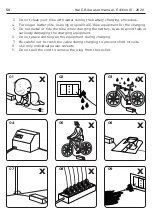
Page 48: ...g 5 Do not pedal or ride the bike while charging the battery so as to avoid falls or seriously damaging the charging equipment 6 Do not place clothing on the equipment during charging 7 Be careful not...

Page 49: ...charge the battery and then fully discharge it This will ensure the maximum performance of the battery pack Fully charge the battery before long term storage Do not store the e bike for long periods w...

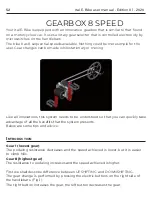
Page 50: ...ons this system needs to be understood so that you can quickly take advantage of all the benefits that the system presents Below are some tips and advice introduction Gear 1 lowest gear The pedaling r...

Page 51: ...ost seamless gear change DOWNSHIFT or decrease in gear This is the change from one gear to a lower gear i e from gear 8 to gear 1 As it is an extremely rapid change the climb must be performed while b...

Page 52: ...a certain level of noise during use this is normal and depends on the effort to which it is subjected In case of abnormal noises heat smoke performance loss etc contact your Author ized Ital E Bike S...

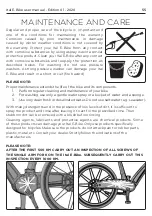
Page 53: ...ts 1 Perform regular cleaning and maintenance of your bike 2 For washing use only a gentle water spray or a bucket of water and a sponge 3 Use only clean fresh or desalinated water Do not use salt wat...

Page 54: ...the display with a bag and seal it 3 Remove the first layer of dirt with a gentle stream of water 4 Spray on a cleaning agent 5 Gently rub with the help of a cloth or sponge and after washing rinse w...

Page 55: ...represents a source of pollution in the long term The ability to reuse some parts of the bicycle as mechanical units or for raw materials for other purposes is carried out under the user s own respons...

Page 56: ...precautions are required apart from the advice in this manual Question Can I remain stationary on the bike when waiting at traffic lights Answer Yes The motor will remain inactive provided that no pre...

Page 57: ...Answer Yes extra batteries are available from Ital E Bike retailers If you need greater range and not do not have the possibility of recharging the battery between the two trips it is recommended to b...

Page 58: ...www tecladesign it...

Reviews: