Amplifier Tab
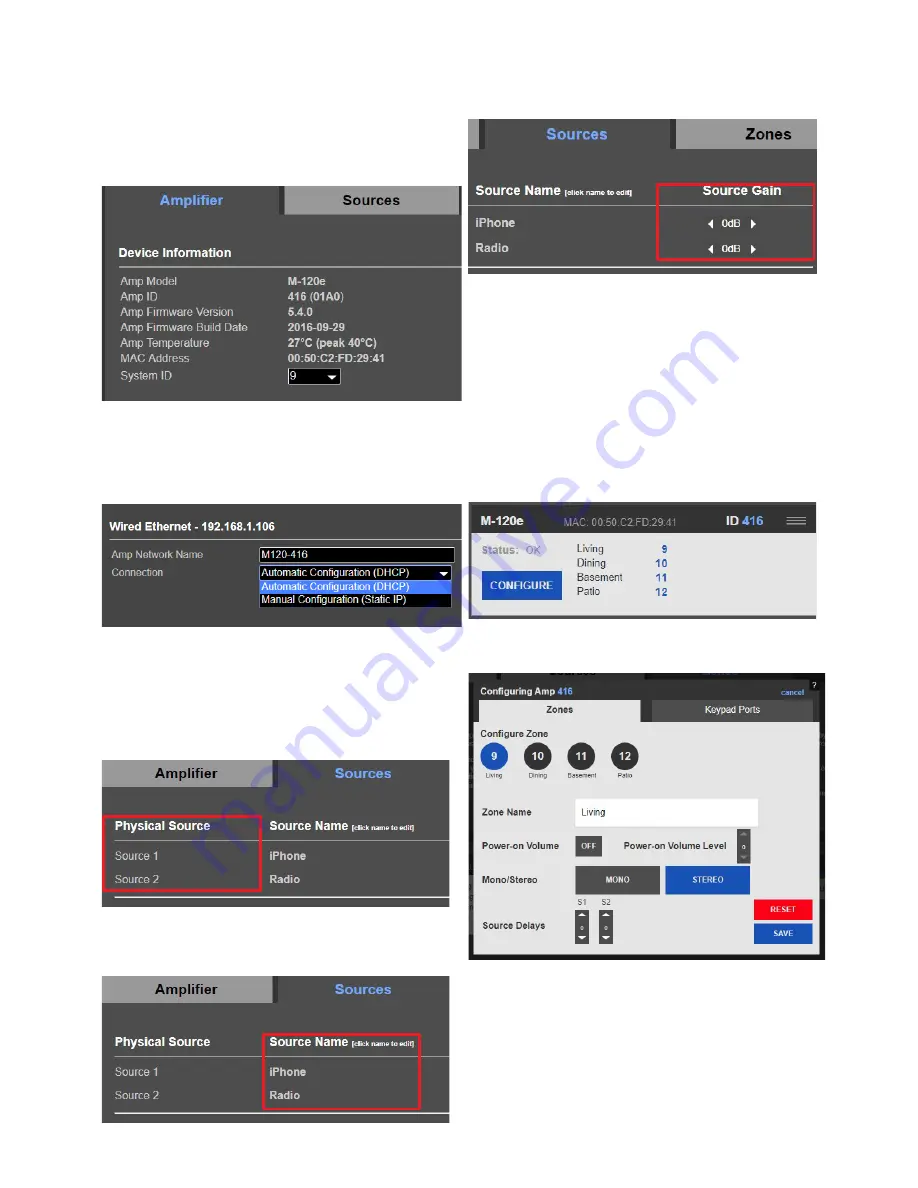
Device Information:
Displays the device information for the
connected amplifier. The System ID field notes the system ID which
is assigned to the amplifier. Changing the system ID will change the
system to which this amplifier is assigned. This is useful when there are
two or more streamer and amplifier systems set up in one residence.
Wired Ethernet:
Network to which the amp is assigned is displayed
here. Choose whether to configure the amplifier to use a static IP
or DHCP. Use a static IP to reserve the IP address for devices on the
network. This can help reduce opportunity for connectivity errors.
Improperly setting up IP settings can lead to connectivity issues.
Important:
Clicking “Save Changes” for each tab is necessary to save
all changes.
Sources Tab
Physical Source:
Displays the actual source of the connected
amplifier. The number of sources available for name assignments
depends on how many are available on the amplifier connected.
Source Name:
Displays the name assigned to each source connected
to the amplifier. The name chosen here will display on all keypads
connected. Keep device names to a maximum of 15 characters.
Source Gain:
Set the gain for sources connected to the amplifier via
analog inputs.
Zones Tab
Zone Settings:
Rename the zones for any linked amplifiers as they
appear on keypads. Names here also have a 15 character limit.
Zones appear grouped to the corresponding amplifier. Amps and their
zones are displayed in the order as discovered by the server on the network.
Note:
It is not necessary to connect all amplifiers in a chain (loopout
connected amps) to the network. Only connect the first amplifier
via Ethernet. The server will locate the zones from the connected
amplifier.
Click the configure button to configure each zone.
Amplifier Zone Configuration
Configure Zone:
Choose which zone to configure.
Zone Name:
The zone name can be changed here as well as on
the initial Amplifier configuration screen. Changing the zone name
here will also change the zone name where ever else it is displayed,
provided the save button is pressed.
14


