background image

34

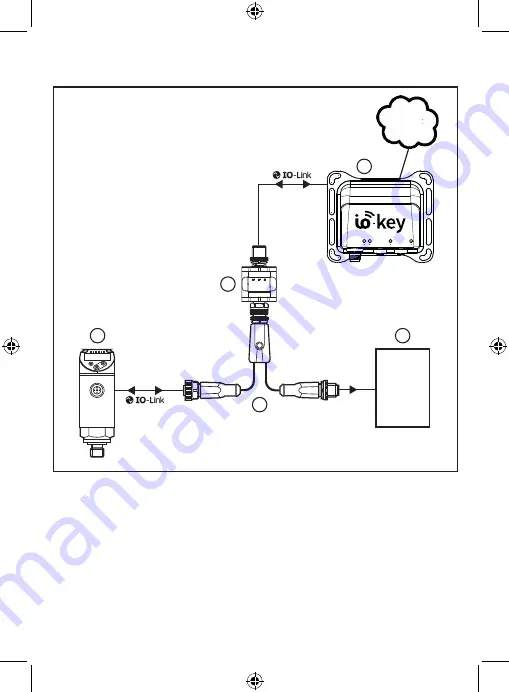
Le répartiteur de données est installé entre le capteur / actionneur et le système 

de commande à l'aide du câble en Y :

2

SIO

PLC

1

3

4

5

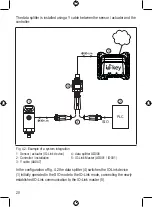
Fig� 4�2 : Exemple d'une intégration dans le système
1 : 

Capteur / actionneur (appareil IO-Link)

4 : Répartiteur de données AD008

2 : Système de commande / installation

5 :

Maître IO-Link (AD001 / IO001)

3 :

Câble en Y (AA047)

Dans la configuration selon fig. 4.2, le répartiteur de données (4) met l'appareil 

IO-Link (1), initialement opéré en mode SIO, dans le mode IO-Link et connecte la 

communication IO-Link ainsi créée avec le maître IO-Link (5).
En même temps, le répartiteur de données (4) remet tous les signaux SIO initiaux 

du capteur (1) à la disposition du système de commande / installation (2) de façon 

que la tâche de commande initiale reste inchangée�

Summary of Contents for AD008

Page 1: ...Bedienungsanleitung IO Link Datensplitter Operating instructions IO Link data splitter Notice d utilisation Répartiteur de données IO Link autosen AD008 80294678 00 05 2020 DE UK FR ...

Page 2: ...7 4 3 IO Link 7 5 Montage 7 5 1 Einbauort Einbau Umgebung 7 5 2 Montagevorgang 8 6 Elektrischer Anschluss 9 6 1 Elektrische Ausführung der Endstufe 11 7 Anzeige 11 8 Parametrierung 12 8 1 Parameter 13 9 Betrieb 14 9 1 Betriebs und Diagnoseanzeigen 14 9 2 Verzögerungszeiten 15 10 Technische Daten und Maßzeichnung 15 11 Wartung Instandsetzung Entsorgung 15 1 Vorbemerkung Technische Daten Zulassungen...

Page 3: ...eise für den Betreiber Benutzer und ggf vom Systemersteller autorisiertes Servicepersonal beinhalten Dieses Dokument vor Inbetriebnahme des Produktes lesen und während der Einsatzdauer aufbewahren Das Produkt muss sich uneingeschränkt für die betreffenden Applikationen und Umgebungsbedingungen eignen Das Produkt nur bestimmungsgemäß verwenden Bestimmungsgemäße Verwendung Die Missachtung von Anwend...

Page 4: ...r lesender Zugriff möglich 4 2 Für schreibenden Zugriff kann das Gerät parametriert werden 8 Sensoren mit Impuls oder Frequenzausgang auf OUT1 Pin 4 werden nicht unterstützt Prüfen ob das vom Sensor generierte Signal auch über IO Link zur Verfügung steht Prüfen ob die Übertragungsgeschwindigkeit von IO Link für die Applikation ausreicht z B bei sehr schnellen Schaltfrequenzen Technisches Datenblat...

Page 5: ... Aktorsystem ohne IO Link bestehend aus einem Sensor Aktor und einer entsprechenden Gegenstelle SIO 1 2 Abb 4 1 Beispiel konventionelles Sensorsystem vor Einbindung des Datensplitters SIO Standard Input Output Modus konventioneller Schaltbetrieb 1 Sensor Aktor 2 Gegenstelle DE DE ...

Page 6: ... 1 Sensor Aktor IO Link Device 4 Datensplitter AD008 2 Steuerung Anlage 5 IO Link Master AD001 IO001 3 Y Verbinder AA047 In der Konfiguration nach Abb 4 2 schaltet der Datensplitter 4 das ursprünglich im SIO Mode betriebene IO Link Device 1 in den IO Link Mode um und verbindet die damit neu entstandene IO Link Kommunikation mit dem IO Link Master 5 ...

Page 7: ...chreibschutzes möglich Zur Aufhebung des Schreibschutzes Gerät gemäß Abb 8 1 anschließen und parametrieren 8 4 3 IO Link Dieses Gerät verfügt über eine IO Link Kommunikationsschnittstelle die für den Betrieb eine IO Link fähige Baugruppe IO Link Master voraussetzt Die IO Link Schnittstelle ermöglicht den direkten Zugriff auf Prozess und Diagnosedaten 4 1 Desweiteren ist die Kommunikation über eine...

Page 8: ...en IO Link Komponenten beträgt 20 m Maximale Distanz zwischen 3 und 2 Abb 4 2 Technische Daten der verwendeten Anschlusskabel und der weiteren angeschlossenen Komponenten Maximal 30 m 5 2 Montagevorgang Anschluss Verbindungskabel vorbereiten ggf passend konfektionieren Gerät gemäß Abb 4 2 mit dem Y Verbinder AA047 an das IO Link Device Anlage und IO Link Master anschließen ...

Page 9: ...dermaßen anschließen Adernfarben 1 1 1 3 4 2 5 1 AD008 AA047 3 4 2 5 5 2 4 3 BN 2 WH 4 BK 3 BU 1 3 4 A 2 BK schwarz BN braun BU blau WH weiß GY grau Anschlüsse 1 zum Master 2 zum Y Kabel 3 zum IO Link Device 4 zur Anlage A Galvanische Trennung Belegung des Datensplitters AD008 4 3 2 1 zum Master 1 1 L vom Master 2 nicht belegt 3 L vom Master 4 C IO Link 3 1 2 4 5 zum Y Kabel 2 1 L von Anlage 2 C Q...

Page 10: ...k 3 L von Anlage 4 Schaltausgang OUT1 IO Link1 5 nicht belegt 3 1 2 4 5 zum IO Link Device 3 1 L von Anlage 2 Schaltausgang Analogausgang OUT2 wenn vorhanden 3 L von Anlage 4 C Q IO Link 5 nicht belegt 4 2 1 3 5 zur Anlage 4 1 L von Anlage 2 Schaltausgang Analogausgang OUT2 wenn vorhanden 3 L von Anlage 4 Schaltausgang OUT1 IO Link1 p schaltend 5 nicht belegt 1 Während der Parametrierung 8 ...

Page 11: ... zur Anlagenseite 4 durchverbunden Somit wird bei IO Link Devices mit einem Signal auf Pin 2 z B zweiter Schaltausgang oder Analogausgang dieses unverändert zur Anlage durchgereicht Anschlüsse 1 und 2 des Datensplitters sind galvanisch getrennt A 7 Anzeige 1 3 2 Abb 7 1 1 LED 1 gelb Signalisierung des Schaltzustands OUT1 falls verfügbar 2 LED 2 grün Betriebsanzeige Fehler 3 LED 3 gelb Signalisieru...

Page 12: ...gangskonfiguration nicht unterstützt 9 1 oder wenn z B der Schreibschutz aufgehoben werden soll muss das Gerät zuvor parametriert werden Dazu muss das Gerät gemäß Abb 8 1 angeschlossen werden 3 4 1 2 Abb 8 1 Anschluss für Parametrierung 1 Y Verbinder AA047 3 IO Link Master AD001 2 Datensplitter AD008 4 PC Notebook Während der Parametrierung darf kein IO Link Device am Y Verbinder 1 angeschlossen s...

Page 13: ...ng des Schreibschutzes kann die Integrität der Applikation gefährden Schreibschutz nur nach sorgfältiger Prüfung der möglichen Risiken und Auswirkungen aufheben SwitchingBit Bit im IO Link Prozessdatenstrom das den Schaltausgang OUT1 repräsentiert Der Parameter ist nur verfügbar wenn OutputConfiguration auf manual gesetzt ist 0 Die Position des entsprechenden Bits der IODD Beschreibung PDF des ang...

Page 14: ...ster verbunden X EIN EIN kein IO Link Master verbunden oder IO Link Master nicht erkannt X EIN 1 Hz Blinken kein IO Link Device verbunden oder nicht erkannt IO Link Device stellt keinen Schaltausgang auf Pin 4 zur Verfügung 1 Hz Blinken EIN X Kurzschluss auf OUT1 4 Hz Blinken EIN X Fehler bei automatischer Ausgangskonfiguration 8 1 1 Hz Blinken EIN X Schaltzustand OUT1 EIN AUS EIN X Parametrier Be...

Page 15: ...ykluszeit von z B 2 3 ms geräteabhängig Technische Daten der angeschlossenen IO Link Komponenten Somit ergibt sich eine Gesamt Reaktionszeit von ca 102 3 ms 10 Technische Daten und Maßzeichnung Technische Daten und Maßzeichung unter www autosen com 11 Wartung Instandsetzung Entsorgung Eine Instandsetzung des Geräts ist nicht möglich Gerät nach Gebrauch umweltgerecht gemäß den gültigen nationalen B...

Page 16: ...21 5 Installation 21 5 1 Installation location installation environment 21 5 2 Installation procedure 22 6 Electrical connection 23 6 1 Electrical design of the output stage 25 7 Display 25 8 Parameter setting 26 8 1 Parameters 27 9 Operation 28 9 1 Operation and diagnostics display 28 9 2 Delay times 29 10 Technical data and scale drawing 29 11 Maintenance repair and disposal 29 1 Preliminary not...

Page 17: ... if applicable for any service personnel authorised by the manufacturer of the system Read this document before setting up the product and keep it during the entire service life The product must be suitable for the corresponding applications and environmental conditions without any restrictions Only use the product for its intended purpose Functions and features If the operating instructions or th...

Page 18: ...ad access is possible 4 2 The device can be configured for write access 8 Sensors with pulse or frequency output on OUT1 pin 4 are not supported Check if the signal generated by the sensor is also provided via IO Link Check if the IO Link transmission speed is fast enough for the application for example in case of very rapid switching frequencies Technical data sheet 3 1 Application area The devic...

Page 19: ...ctuator system without IO Link that consists of a sensor actuator and a respective counterpart SIO 1 2 Fig 4 1 Example of a conventional sensor system before integrating the data splitter SIO standard input output mode conventional switching mode 1 Sensor actuator 2 Counterpart UK ...

Page 20: ...gration 1 Sensor actuator IO Link device 4 data splitter AD008 2 Controller installation 5 IO Link Master AD001 IO001 3 Y cable AA047 In the configuration of fig 4 2 the data splitter 4 switches the IO Link device 1 initially operated in the SIO mode to the IO Link mode connecting the newly established IO Link communication to the IO Link master 5 ...

Page 21: ... remove write protection Connect and configure the device according to fig 8 1 8 4 3 IO Link This device has an IO Link communication interface which requires an IO Link capable module IO Link master for operation The IO Link interface allows direct access to process and diagnostic data 4 1 Furthermore communication with a IO Link master is possible via a point to point connection 8 The IODDs nece...

Page 22: ...nce between the individual IO Link components is 20 m Maximum distance between 3 and 2 fig 4 2 Technical data of the connection cables used and of the other connected components Maximum 30 m 5 2 Installation procedure Connect the device with a suitable cable Connect the device to the IO Link device installation and IO Link master using the Y cable AA047 according to fig 4 2 ...

Page 23: ... 4 2 5 1 AD008 AA047 3 4 2 5 5 2 4 3 BN 2 WH 4 BK 3 BU 1 3 4 A 2 BK black BN brown BU blue WH white GY grey Connections 1 to the master 2 to the Y cable 3 to the IO Link device 4 to the installation A electrical separation Connection of the data splitter AD008 4 3 2 1 to the master 1 1 L from the master 2 not connected 3 L from the master 4 C IO Link 3 1 2 4 5 to the Y cable 2 1 L from the install...

Page 24: ... OUT1 IO Link1 5 not connected 3 1 2 4 5 to the IO Link device 3 1 L from the installation 2 switching output analogue output OUT2 if available 3 L from the installation 4 C Q IO Link 5 not connected 4 2 1 3 5 to the installation 4 1 L from the installation 2 switching output analogue output OUT2 if available 3 L from the installation 4 switching output OUT1 IO Link1 PNP 5 not connected 1 During p...

Page 25: ...tion side 4 in the Y cable AA047 So for IO Link devices with a signal on pin 2 e g second switching output or analogue output this signal is passed on unchanged to the installation Connections 1 and 2 of the data splitter are electrically isolated A 7 Display 1 3 2 Fig 7 1 1 LED 1 yellow indication of the switching status OUT1 if available 2 LED 2 green operation display fault 3 LED 3 yellow indic...

Page 26: ...omatic output configuration 9 1 or if for example write protection is to be removed the device must first be configured To do so the device has to be connected according to fig 8 1 3 4 1 2 Fig 8 1 Connection for parameter setting 1 Y cable AA047 3 IO Link master AD001 2 data splitter AD008 4 PC notebook During parameter setting no IO Link device must be connected to the Y cable 1 Connect the data ...

Page 27: ... protection may jeopardise the integrity of the application Remove write protection only after a thorough check of the possible risks and effects SwitchingBit Bit in the IO Link process data flow representing the switching output OUT1 The parameter is only available if OutputConfiguration is set to manual 0 For the position of the corresponding bit see the IODD description PDF of the connected IO ...

Page 28: ... master connected X ON ON No IO Link master connected or IO Link master not detected X ON flashes at 1 Hz No IO Link device connected or IO Link device not detected IO Link device provides no switching output on pin 4 flashes at 1 Hz ON X Short circuit on OUT1 flashes at 4 Hz ON X Error with automatic output configuration 8 1 flashes at 1 Hz ON X Switching status OUT1 ON OFF ON X Parameter setting...

Page 29: ...f e g 2 3 ms depends on the device Technical data of the connected IO Link components So the total response time is approx 102 3 ms 10 Technical data and scale drawing Technical data and scale drawing at www autosen com 11 Maintenance repair and disposal It is not possible to repair the unit After use dispose of the unit in an environmentally friendly way in accordance with the applicable national...

Page 30: ...5 4 3 IO Link 35 5 Montage 35 5 1 Lieu de montage environnement de montage 35 5 2 Montage 36 6 Raccordement électrique 37 6 1 Technologie de sortie 39 7 Affichage 39 8 Paramétrage 40 8 1 Paramètre 41 9 Fonctionnement 42 9 1 Affichage de fonctionnement et de diagnostic 42 9 2 Temporisations 43 10 Données techniques et schéma d encombrement 43 11 Entretien réparation et élimination 43 1 Remarque pré...

Page 31: ...s échéant à tout personnel de service autorisé par l installateur du système Lire ce document avant la mise en service du produit et le garder pendant le temps d utilisation du produit Le produit doit être approprié pour les applications et les conditions environnantes concernées sans aucune restriction d utilisation Utiliser le produit uniquement pour les applications pour lesquelles il a été pré...

Page 32: ... lecture est possible 4 2 L appareil peut être configuré pour l accès en écriture 8 Les capteurs avec sortie impulsions ou fréquence sur OUT1 broche 4 ne sont pas compatibles Vérifier si le signal généré par le capteur est aussi fourni via IO Link Vérifier si la vitesse de transmission d IO Link est assez élevée pour l application par ex en cas de fréquences de commutation très rapides Fiche techn...

Page 33: ...onventionnel sans IO Link composé d un capteur actionneur et une partie correspondante SIO 1 2 Fig 4 1 Exemple d un système de capteurs conventionnel avant l intégration du répartiteur de données SIO Standard Input Output mode de commutation conventionnel 1 Capteur actionneur 2 Partie correspondante FR ...

Page 34: ...installation 5 Maître IO Link AD001 IO001 3 Câble en Y AA047 Dans la configuration selon fig 4 2 le répartiteur de données 4 met l appareil IO Link 1 initialement opéré en mode SIO dans le mode IO Link et connecte la communication IO Link ainsi créée avec le maître IO Link 5 En même temps le répartiteur de données 4 remet tous les signaux SIO initiaux du capteur 1 à la disposition du système de co...

Page 35: ... dispose d une interface de communication IO Link Son fonctionnement nécessite l utilisation d un maître IO Link L interface IO Link permet l accès direct aux données de process et de diagnostic 4 1 De plus la communication est possible via un raccordement point à point avec un maître IO Link 8 Les IODD nécessaires pour la configuration du répartiteur ainsi que pour l appareil IO Link des informat...

Page 36: ...ximale entre les composants IO Link individuels est de 20 m Distance maximale entre 3 et 2 fig 4 2 Données techniques des câbles de raccordement et d autres composants raccordés Maximum 30 m 5 2 Montage Préparer le câble de raccordement et le couper à la longueur souhaitée si nécessaire Raccorder l appareil selon fig 4 2 avec le câble en Y AA047 à l appareil IO Link à l installation et au maître I...

Page 37: ...rs des fils conducteurs 1 1 1 3 4 2 5 1 AD008 AA047 3 4 2 5 5 2 4 3 BN 2 WH 4 BK 3 BU 1 3 4 A 2 BK noir BN brun BU bleu WH blanc GY gris Raccordements 1 au maître 2 au câble en Y 3 à l appareil IO Link 4 à l installation A séparation galvanique Raccordement du répartiteur de données AD008 4 3 2 1 au maître 1 1 L du maître 2 non raccordé 3 L du maître 4 C IO Link 3 1 2 4 5 au câble en Y 2 1 L de l ...

Page 38: ...e commutation OUT1 IO Link1 5 non raccordé 3 1 2 4 5 à l appareil IO Link 3 1 L de l installation 2 sortie de commutation analogique OUT2 si disponible 3 L de l installation 4 C Q IO Link 5 non raccordé 4 2 1 3 5 à l installation 4 1 L de l installation 2 sortie de commutation analogique OUT2 si disponible 3 L de l installation 4 Sortie de commutation OUT1 IO Link1 commutation positive 5 non racco...

Page 39: ...nstallation 4 Ainsi pour les appareils IO Link avec un signal sur la broche 2 par ex 2ème sortie de commutation ou sortie analogique celui ci est délivré inchangé au système Les raccordements 1 et 2 du répartiteur de données sont séparés galvaniquement A 7 Affichage 1 3 2 Fig 7 1 1 LED 1 jaune signalisation de l état de commutation OUT1 si disponible 2 LED 2 verte affichage de fonctionnement erreu...

Page 40: ...a configuration de sortie automatique 9 1 ou si par ex la protection en écriture doit être enlevée l appareil doit être paramétré auparavant A cette fin l appareil doit être raccordé selon fig 8 1 3 4 1 2 Fig 8 1 Raccordement pour le paramétrage 1 Câble en Y AA047 3 Maître IO Link AD001 2 Répartiteur de données AD008 4 PC PC portable Pendant le paramétrage aucun appareil IO Link ne doit être racco...

Page 41: ...e la protection en écriture peut mettre en danger l intégrité de l application N enlever la protection en écriture qu après examen approfondi des éventuels risques et conséquences SwitchingBit Le bit dans le flux de données process IO Link qui représente la sortie de commutation OUT1 Le paramètre n est disponible que si OutputConfiguration est mis à manual 0 Pour la position du bit correspondant r...

Page 42: ...raccordé X ALLUMEE ALLUMEE Aucun maître IO Link raccordé ou maître IO Link non détecté X ALLUMEE clignote à 1 Hz Aucun appareil IO Link raccordé ou appareil IO Link non détecté L appareil IO Link ne fournit aucune sortie de commutation sur broche 4 clignote à 1 Hz ALLUMEE X Court circuit à OUT1 clignote à 4 Hz ALLUMEE X Erreur lors de la configuration de sortie automatique 8 1 clignote à 1 Hz ALLU...

Page 43: ...ess IO Link de par ex 2 3 ms dépendant de l appareil Données techniques des composants IO Link raccordés Ainsi le temps de réponse total est d env 102 3 ms 10 Données techniques et schéma d encombrement Données techniques et schéma d encombrement sur www autosen com 11 Entretien réparation et élimination L appareil ne peut pas être réparé S assurer d une élimination écologique de l appareil après ...

Page 44: ...tions supplémentaires sur notre site web à Technical data and further information at Technische Änderungen behalten wir uns ohne vorherige Ankündigung vor We reserve the right to make technical alterations without prior notice Nous réservons le droit de modifier les données techniques sans préavis ...

Reviews: