HEDC–5xxx Series
Kit Encoders with a Connector Latch
Application Note 5554
Introduction
The HEDC-5xxx-xxx encoder with a connector latch on
the cover housing requires a different assembly method
than the HEDS-55xxx series. However, the internal encoder
module is exactly the same.
This application note provides step-by-step mounting
instructions on how to install the new Avago HEDC-5xxx
series encoders onto a motor.
Encoder Mounting and
A
ssembly Instruction
Step 1. Base plate centering
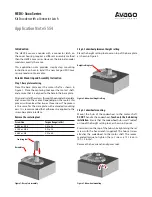
Place the base plate over the motor shaft as shown in
Figure 1. Place the centering tool over the motor’s shaft,
and ensure that it is aligned to the hole in the base plate.
Align and install the screws through the encoder base plate
and screw into the motor. Depending on the motor, this
process will involve either two or three screws. The process
is the same for the base plate with extended mounting
ears. It is recommended that adhesives be applied to the
screw-base plate interface.
Remove the centering tool.
Screw Size
Torque Range (in-lbs)
#0-80 or M1.6
0.4 to 0.8
#2-56 or M2.5
0.9 to 2.0
#4-40 or M3
3.5 to 4.5
Centering tool
Base plate
Figure 1. Base plate assembly
Figure 2. Codewheel height setting
Step 2. Codewheel placement height setting
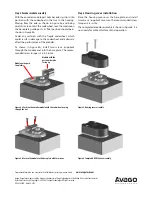
Place the height setting tool over on top of the base plate
as shown in Figure 2.
Height setting tool
Figure 3. Codewheel mounting
Step 3. Codewheel mounting
Mount the hub of the codewheel to the motor shaft.
DO NOT
handle the codewheel.
Touch only the hub during
installation.
Ensure that the codewheel hub is well ”seated”
on top of the height setting tool, as shown in Figure 3.
Press down on the top of the hub while tightening the set
screw with the hex wrench (supplied). The hub set screw
attaches the codewheel to the motor shaft. The recom-
mended torque to tighten the set screw is 15-18 oz-in
(0.9-1.2 in-lbs).
Remove the hex wrench and spacer tool.


