HEDR-5xxx High Resolution Series
Three Channel Quick Assembly Encoders
Application Note 5560
Introduction
This application note provides step by step instructions
for mounting the new Avago HEDR-5xxx series encoders
onto a motor.
The Avago HEDR-5xxx series encoders are designed to
cater for existing HEDS-5xxx series users who wish to up-
grade due to higher CPR requirements. Therefore the base
plate and outer diameter of these encoders are compat-
ible with the legacy HEDS-5xxx series.
The Avago HEDR-5xxx series have been specially designed
for easy installation while ensuring that the chance of fin-
ger contact with the internal code wheel is eliminated.
Encoder Mounting and Assembly Instruction
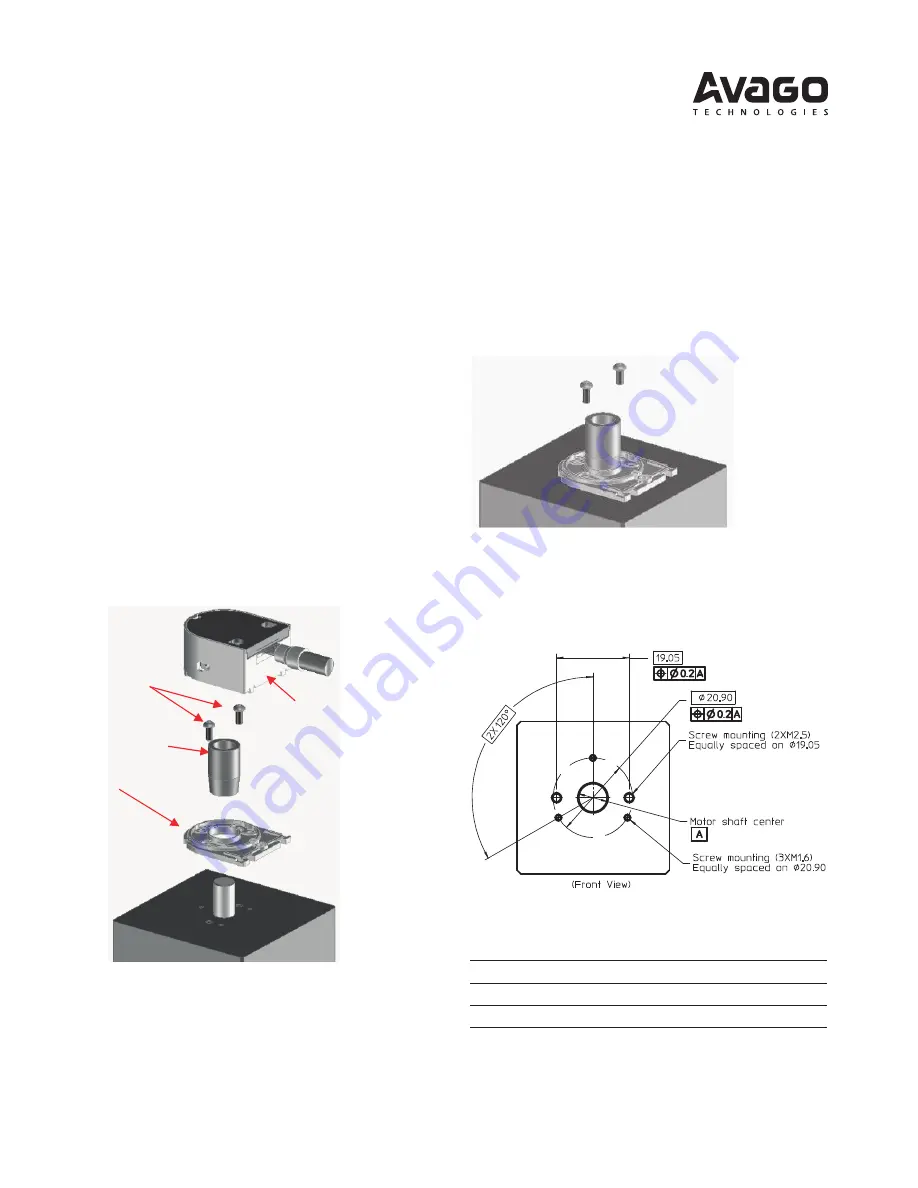
The HEDR-5xxx comes in the form of 3 parts; namely
the base plate, centering tool and encoder body unit.
See figure 1.
Figure 3. Recommended motor mounting dimension
Align and install the screws* through the encoder base
plate and into the motor. See figure 3. Refer to Table 1 for
recommended torque.
* Depending on the motor type, two or three screws will be required.
Figure 2. Base plate to motor shaft assembly
Step 1. Centering the base plate
Place the base plate over the motor shaft as shown in fig-
ure 2. Slide the centering tool over the motor shaft, and
ensure that it is aligned to the hole in the center of the
base plate.
Figure 1. HEDR-5xxx exploded assembly view
Centering tool
Base plate
Screws
Encoder
body unit
Table 1. Recommended screw torque settings
Screw Size
Torque Range (in-lbs)
#0-80 or M1.6
0.4 to 0.8
#2-56 or M2.5
0.9 to 2.0
NOTE: It is recommended that adhesives be applied to the screw-base
plate interface to prevent the screws loosening during operation.
Note: Screws are not included


