9
Operation
INSTALLATION
CHECK
LIST
BEFORE
OPERATION:
1.
Have
all
packing
materials
and
tape
been
removed
from
the
interior
and
exterior
of
the
refrigerator?
2.
Have
the
installation
instructions
been
followed,
including
connecting
the
machine
to
electricity?
3.
Has
proper
grounding
been
installed
for
the
refrigerator?
4.
Has
the
machine
been
leveled?
5.
Is
there
a
clearance
of
at
least
2
to
3”
at
the
rear
for
proper
air
circulation?
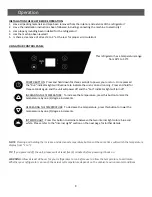
USING
YOUR
CONTROL
PANEL:
This
refrigerator
has
a
temperature
range
from
34°F
to
50°F.
POWER
BUTTON:
Press
and
hold
down
for
three
seconds
to
power
your
unit
on.
Once
pressed
the
“Run”
indicator
light
will
illuminate
to
indicate
the
unit
is
on
and
running.
Press
and
hold
for
three
seconds
again
and
the
unit
will
power
off
and
the
“Run”
Indicator
light
will
turn
off.
INCREASING
THE
TEMPERATURE:
To
increase
the
temperature,
press
this
button
to
raise
the
temperature
by
one
(1)
degree
increments.
DECREASING
THE
TEMPERATURE:
To
decrease
the
temperature,
press
this
button
to
lower
the
temperature
by
one
(1)
degree
increments.
INTERIOR
LIGHT:
Press
this
button
to
alternate
between
the
two
internal
light
colors:
blue
and
white.
Please
refer
to
the
“Internal
Light”
section
on
the
next
page
for
further
details.
NOTE
:
Pressing
and
holding
the
increase
and
decrease
temperature
buttons
at
the
same
time
will
switch
the
temperature
display
from
°F
to
°C.
TIP
:
If
you
powered
off
the
unit,
please
wait
at
least
five
(5)
minutes
before
powering
it
back
on.
WARNING
:
Allow
at
least
24
hours
for
your
refrigerator
to
run
before
use
to
allow
the
temperature
to
acclimate.
Whether
your
refrigerator
can
reach
the
actual
set
temperature
depends
on
the
ambient
environmental
conditions.


