background image

 Electrical 

Requirements

Before you move your wine refrigerator into its 

Į

 nal loca

Ɵ

 on, it is important to make sure you have the proper elec-

trical connec

Ɵ

 on:

A standard electrical supply (115 V, 60Hz), properly grounded in accordance with the Na

Ɵ

 onal Electrical Code and 

local codes and ordinances, is required.

It is recommended that a separate circuit, serving only your wine refrigerator, be provided. Use receptacles that can-
not be turned o

ī

  by a switch or pull chain.

The fuse (or circuit breaker) size should be 3 Amps.
Recommended grounding method
For your personal safety, this appliance must be grounded. It is equipped with a power supply cord having a 3-prong 
grounding plug. To minimize possible shock hazard, the cord must be plugged into a ma

Ɵ

 ng 3-pronged wall socket, 

and grounded in accordance with the Na

Ɵ

 onal Electrical Code and local codes and ordinances. If a ma

Ɵ

 ng wall socket 

is not available, it is the personal responsibility of the customer to have a properly grounded, 3-prong wall receptacle 
installed by a quali

Į

 ed electrician.

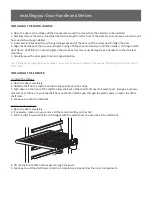
It is important for the wine refrigerator to be leveled in order to work properly. It can be raised or lowered by rota

Ɵ

 ng 

the plas

Ɵ

 c sheaths around each of the feet on the bo

Ʃ

 om of the machine. If you 

Į

 nd that the surface is not level, 

rotate the feet un

Ɵ

 l the wine refrigerator becomes level .You may need to make several adjustments to level it. We 

recommend using a carpenter’s level to check the machine. 

1. Place a carpenter’s level on top of the product to see if the wine refrigerator is level from front to back and side to 
side.
2. Adjust the height of the feet as follows:
Turn the leveling feet to the right to lower that side of the refrigerator.
Turn the leveling feet to the le

Ō

  to raise that side of the refrigerator.

IMPORTANT: 

Once you are ready to install it in a cabinet or directly on the 

Ň

 oor, you must adjust the feet to level the 

wine refrigerator.  


Leveling Your Wine Refrigerator

   ELECTRICAL SHOCK HAZARD!
• Plug into a grounded 3-prong outlet
• Never remove the grounding prong from the plug
• Never use an adapter to bypass the grounding prong
• DO NOT use an extension cord
• Failure to follow these instruc

Ɵ

 ons can result in 

Į

 re, electrical shock, or personal injury.

Summary of Contents for AWC540SZ

Page 1: ...Installa on Opera on and Maintenance for your wine cooler SINGLE ZONE WINE COOLER Model AWC540SZ www avallon com 1 866 471 7427 USER S GUIDE ...

Page 2: ... Never repair the unit while it is plugged in Immediately unplug the unit if it makes strange sounds emits smells or smoke comes out of it and contact customer service Do not remove any part of the casing unless instructed by an authorized technician You should never aƩempt to repair the unit yourself Contact customer service for service opƟons if the unit needs service To prevent back and other t...

Page 3: ... SpeciĮcaƟons 14 Warranty 15 First Time OperaƟng InstrucƟons Before use make sure all packaging labels and materials are all removed from the unit Be sure to keep track of all in cluded parts and pieces before discarding packaging materials It is advised that you keep the original box and packaging materials in case you are ever to move or ship the appliance in the future Allow the unit stand for ...

Page 4: ...f your unit and are needed to obtain warranty service You may also want to staple your receipt to this manual as it is the proof of your purchase and is also needed for service under your warranty Model Number Serial Number Date of Purchase To beƩer serve you please do the following before contacƟng customer service If you received a damaged product immediately contact the retailer or dealer that ...

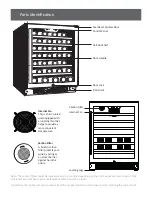
Page 5: ...umber from the product label and write down before installing the wine cooler Seamless Stainless Door Roll Out Shelf Control Panel Door Handle Door Lock Front Vent Internal Fan Carbon Filter Leveling Legs Carbon Filter Internal Fan This is an air cooled unit equipped with an internal fan that helps to provide a more consistent temperature A built in carbon Įlter protects your wine by acƟng as a na...

Page 6: ...gerator TYPES OF INSTALLATION This wine refrigerator has been designed for free standing or built in installaƟon In every case there must be adequate venƟlaƟon and access for service Free standing installaƟon A free standing installaƟon will allow you to install the wine refrigerator in almost any place you desire You must follow the stated instrucƟons for electrical requirements and leveling the ...

Page 7: ...for servicing if necessary The wine refrigerator should be installed on a Įrm and level surface that will be able to support the enƟre weight of a fully loaded unit It is important for the wine refrigerator to be level in order to work properly If needed you can adjust the height of the wine refrigerator by rotaƟng the feet See the Leveling the Wine refrigerator secƟon A standard electrical supply...

Page 8: ...nstalled by a qualiĮed electrician It is important for the wine refrigerator to be leveled in order to work properly It can be raised or lowered by rotaƟng the plasƟc sheaths around each of the feet on the boƩom of the machine If you Įnd that the surface is not level rotate the feet unƟl the wine refrigerator becomes level You may need to make several adjustments to level it We recommend using a c...

Page 9: ...asket make sure to open the door all the way before pulling the shelves out of their track INSTALLING THE SHELVES To install the shelves 1 Open the door completely 2 Slide the shelf on the shelf track and slowly push back unƟl it stops 3 Push down on the front of the shelf to allow the back of the shelf to liŌ over the plasƟc post Imagine a seesaw movement ConƟnue to push the shelf back unƟl both ...

Page 10: ...oī and the Run Indicator light will turn oī INCREASE TEMPERATURE Press to increase the temperature by 1 degree increments DECREASE TEMPERATURE Press to decrease the temperature by 1 degree increments INTERIOR LIGHT Press this buƩon to turn on the interior LED light Press again to turn the light oī SELECTOR BUTTONS INDICATOR LIGHTS DISPLAYS RUN F C Note Allow at least 24 hours for your wine cooler ...

Page 11: ...s some frost may build up AddiƟonally the more humid the ambient condiƟons the more frost may build up Keep the door closed as much as possible and avoid opening the door unnecessarily to minimize frost build up If frost is prevenƟng the door from closing properly you may need to power the unit oī unƟl the frost melts Use a soŌ absorbent towel to dry the unit WARNING Never aƩempt to remove frost w...

Page 12: ...ter spoƫng If the door panel is stainless steel it can discolor when exposed to chlorine gas and moisture Clean stainless steel with a cloth dampened with a mild detergent and warm water soluƟon Never use an abrasive or causƟc cleaning agent INTERIOR CLEANING The wine refrigerator s interior should be cleaned occasionally 1 Disconnect power to the unit 2 Open the door and remove the contents and s...

Page 13: ...s Read and follow the InstallaƟon Clearance Requirements secƟon Close the door Ɵghtly and do not open the door too frequently or for long periods of Ɵme The wine cooler is making strange noises Certain sounds are normal The unit is not level or is touching another appliance Read the Normal Sounds secƟon Check to make sure that the cooler is level and that it is not in contact with another applianc...

Page 14: ...BoƩles REFRIGERANT R134a 1 8 oz TEMPERATURE RANGE 40 to 65 F DIMENSIONS 33 8 x 23 4 x 22 4 HEIGHT X WIDTH X DEPTH WEIGHT 110 2 pounds NOTE Technical data and performance informaƟon is provided for reference only SpeciĮcaƟons are subject to change Check the raƟng label on the wine refrigerator for the most accurate informaƟon Note on wine storage capacity The wine refrigerator will store 54 standar...

Page 15: ...llation unauthorized service mainte nance negligence unauthorized installation or modification or commercial use Labor service transportation and ship ping charges for the removal and replacement of defective parts beyond the initial 12 month period Products that have been modified to perform outside of specifications without the prior written permission of Avallon Products lost in ship ment or th...

Page 16: ...736 Bee Cave Rd STE 1 188 West Lake Hills TX 78746 Toll Free 1 866 471 7427 Web http www avallon com E mail service avallon com Product contents and specifications may change without notice Copyright 2015 Avallon Gobal LLC ...

Reviews: