background image

6 (36) 


2.


Designed purpose of use 

This AVANT Collecting lawn mower 1200 is an attachment that is suitable for use with AVANT compact 

loaders that are shown in Table 1. The lawn mower is suitable for residential and professional use as well. It is 

intended to be used to mow lawns on level, tended areas free of rocks, tree stumps, large branches, or other 

similar obstacles. The Collecting lawn mower can also be used to shred and collect tree leaves and small 

branches during lawn mowing. The mover collects them for easy composting. The lawn mower is equipped 

with the OptiFloat® floating linkage system, which allows the mower to freely follow the ground, eliminating the 

need for the loader boom floating. In addition, the float system enables efficient side tilting of the lawn mower. 
The cutting deck has 2 blades. The collector unit has a hydraulic suction device, which moves the clippings to 

the spacious collector box. The collector box can be emptied from the driver's seat by using the loader boom 

to lift and tilt the mower. The collector fan can be switched off, in which case the mower acts as a mulching 

mower. 
The Collecting Lawn Mower 1200 is also available as a version without the clippings collector. Either a side 

cover, side discharge chute, mulching kit, or collector unit must be installed to the the mower. The use of the 

mower without any side guard in place is dangerous to both the operator and any person nearby, and 

therefore it is strictly prohibited. 
The Collecting lawn mower is not designed for any other use than what is specified in this manual and must 

not be used for any other purposes than what is intended for. The lawn mower is not intended for mowing long 

hay, shrub, or equivalent taller vegetation, for example. The lawn mower cannot be used in a hung position; it 

is meant to run on its own wheels. For mowing long hay, we recommend the AVANT Flail Mowers. 


The attachment has been designed to require as little maintenance as possible. The operator can perform 

regular maintenance tasks. All repair work can’t be performed by the operator, and demanding repair and 

maintenance operations are to be left for professional technicians. All maintenance work must be done using 

proper safety equipment. Spare parts must be identical with original specifications, which can be ensured by 

using only original spare parts. A separate spare parts catalogue may be available, consult your Avant dealer. 
Familiarise yourself with the manual's instructions regarding service and maintenance. Please contact your 

AVANT dealer if you have additional questions about the operation or maintenance of the equipment, or if you 

require spare parts or maintenance services. 


Table 1 - Collecting Lawn Mower 1200 - Compatibility with Avant loaders 

Avant 

220

 series 2


225 

225LPG 

313S 
320S 

320S+ 

419 
420 

520 

R20 

525LPG 

R28 

528 
630 

R35 

635 
640 

735 
745 
750 

755i 
760i 

850 

860i 

e5 
e6 

A35973 


(•)


(

•)


(

•)


(

•)


Various Avant mower models are available to best suite each task and loader model. The compatibility 

recommendations are based on the mass, width, and auxiliary hydraulic flow of the loader. Normally the 

mower should be as wide as or wider than the loader. Depending on the tyres of the loader, the mower may 

be narrower than the loader, making it difficult to have good, even cut. When using with models marked with 

(

•)

, care must be taken to avoid running the mower at too high speed, which can damage the mower. See the 

operator's manual of the loader for the correct engine rpm setting for correct auxiliary hydraulics oil flow. 
Additional counterweights may also be required. For compatibility with a model not shown in table, contact 

your Avant dealer. 


Summary of Contents for A35973

Page 1: ...Collecting Lawn Mower 1200 2020 2 Operator s Manual for Attachment Collecting Lawn Mower 1200 Product number A35973 English A439004 2020 2 EN 2018 www avanttecno com ...

Page 2: ...Collecting Lawn Mower 1200 2020 2 ...

Page 3: ...8 6 2 Using the mower 19 6 3 Working on uneven ground 20 6 4 OptiFloat 21 6 4 1 Safety valve 22 6 5 Adjusting the cutting height 23 6 6 Handling of the clippings 24 6 7 Emptying the collector box 25 6 8 Removing a blockage 26 6 9 Transport position 26 6 10 Storage 27 7 MAINTENANCE AND SERVICE 28 7 1 Inspection of hydraulic components 28 7 2 Cleaning and lubricating the mower 29 7 3 Sharpening and ...

Page 4: ...quipment for other purposes or use in any other way than described in this manual is prohibited Keep this manual at hand throughout the service life of the equipment If you sell or transfer the equipment be sure to hand over this manual to the new owner If the manual is lost or damaged you can request a new one from your Avant dealer or from the manufacturer In addition to the safety instructions ...

Page 5: ...ention to instructions involving your personal safety or the safety of others When you see this symbol be alert your safety is involved carefully read the message that follows and inform other operators DANGER This signal word indicates a hazardous situation which if not avoided will cause death or serious injury WARNING This signal word indicates a potentially hazardous situation which if not avo...

Page 6: ...ler vegetation for example The lawn mower cannot be used in a hung position it is meant to run on its own wheels For mowing long hay we recommend the AVANT Flail Mowers The attachment has been designed to require as little maintenance as possible The operator can perform regular maintenance tasks All repair work can t be performed by the operator and demanding repair and maintenance operations are...

Page 7: ... seat when the attachment is running or if the auxiliary hydraulics control lever is locked on The blades move for a short period after the hydraulic supply has been shut off Wait until the blades have stopped completely before going near the attachment Hazard of entanglement Rotating parts Never leave the driver s seat when the attachment is running or if the auxiliary hydraulics control is locke...

Page 8: ...e of gravity low On slippery surfaces drive slowly and deliberately Operate the controls of the loader slowly and calmly especially on inclined terrain Shut down the loader and place the attachment to a safe position as shown in Safe stopping procedure before any cleaning maintenance or adjustments Pay attention to the surroundings and any other persons and machines moving in the vicinity Pay atte...

Page 9: ...ting serious danger to the operator and any person also at a distance of up to 30 m from the mower The Lawn mower is intended to be used with the full collector unit and all related parts fitted WARNING Risk of crushing Never allow anyone to get under a lifted attachment or loader boom Keep in mind that the loader boom can be lowered or tilted even if the engine has been shut down crushing hazard ...

Page 10: ... movements of the attachment Note that the loader boom can move down even if the engine of the loader is turned off Safe stopping procedure Lower the boom and the attachment on the ground Shut down the loader engine and lock the parking brake Release residual pressure from the hydraulic system move all hydraulic control levers to their extreme positions a couple of times Prevent starting of the ma...

Page 11: ...mode Side discharge mode Weight empty 230 kg Maximum load 100 kg Support wheel air pressure 1 5 2 bar Recommended hydraulic flow 28 l min 20 MPa 200 bar Maximum input of hydraulic energy 33 l min 22 5 MPa 225 bar Compatible Avant loaders See Table 1 Using the mower in side discharge mode is not possible without full conversion of the mower to side discharge model by authorised service Choose a mow...

Page 12: ...ake sure all warning decals are readable The warning labels contain important safety information and they help to identify and remember the hazards related to the equipment Replace damaged or missing warning labels with new ones A46771 A46772 A46803 A46802 Attachment identification plate A420231 To apply a new label Clean the surface thoroughly to remove all grease Allow it to dry completely Peel ...

Page 13: ...arp blades never reach to the rotating components and do not use the equipment without all covers in place 5 A420231 Attachment identification plate Table 4 Collecting Lawn Mower 1200 Main components 1 Avant quick coupling plate and OptiFloat floating linkage 2 OptiFloat floating system indicator brackets red 3 Collector box hatch 4 Collector box locking screw unlock for maintenance 5 Collector no...

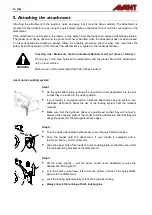
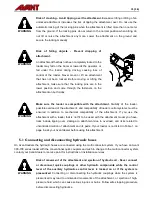
Page 14: ... Step 1 Lift the quick attach plate locking pins up and turn them backwards into the slot so that they are locked in the upper position If your loader is equipped with a hydraulic attachment locking system see additional instructions about the use of the locking system from the relevant manuals Make sure that the hydraulic hoses are positioned so that they will not get in between the coupling plat...

Page 15: ...l systems must be ensured in addition to mechanical compatibility of the attachment If you use the attachment with a loader that is not fit to be used with the attachment model you have risks include tipping over damage to attachment due to overload and risks related to uncontrolled motion of attachment and its parts If your loader is not listed in Table 1 on page 6 ask your Avant dealer before us...

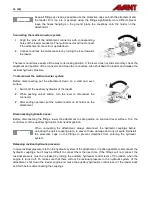
Page 16: ... the lever to disconnect the connector 3 After ending operation put the multiconnector on its holder on the attachment Disconnecting hydraulic hoses Before disconnecting the fittings lower the attachment to safe position on solid and level surface Turn the control lever of the auxiliary hydraulics to its neutral position When uncoupling the attachment always disconnect the hydraulic couplings befo...

Page 17: ... safety distance of at least 2 metres to other persons Note that the attachment may throw stones gravel or other objects found in the area at high speed Do not allow others to get near a running attachment Whenever possible avoid mowing on areas with loose objects WARNING Risk of tipping over Avoid overload Loader can tip over when handling too heavy loads or because of dynamic movements caused by...

Page 18: ...w children to operate the equipment Never operate the loader or attachments while under the influence of alcohol drugs medication that may impair judgement or cause drowsiness or if not otherwise medically fit to operate the equipment Remember correct working methods and avoid leaving the driver s seat unnecessarily Before each use check the operation of the mower and ensure that the blades and th...

Page 19: ...se direction of the auxiliary hydraulics control has no effect DANGER Risk of serious personal injuries Never leave the equipment running unattended Start the attachment only when it is ready to be used Do not go near the equipment when another person operates the controls of the loader Operate the controls of the loader and its attachment in a careful and smooth manner and avoid sharp turns and s...

Page 20: ...s manual Otherwise the blades may not turn or the mower will not follow the ground properly Stop the mower immediately if it makes abnormal noise vibrates or if the blades or the collector are blocked Find out the cause before continuing use CAUTION Risk of thrown parts Avoid running the attachment at very high speed Operating the attachment at too high speed may cause high vibrations noise or thr...

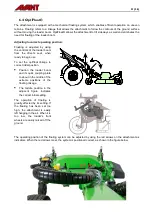
Page 21: ...eady to begin use To set the optifloat linkage to correct initial position Position the loader boom and its quick coupling plate to about in the middle of the extreme positions of the floating linkage The middle position in the adjacent figure indicates the correct initial setting The operation of floating is greatly affected by its setting If the floating has been set too high the attachment is e...

Page 22: ...t when the attachment is raised or when the floating has been set too low On uneven ground the safety valve may act too frequently therefore setting the correct floating position is important for the correct operation of the attachment When the linkage is set to the position indicated in the figure the motor will not turn because the safety valve is activated The quick coupling plate of the loader...

Page 23: ...ll the wheel off its holder 3 Move some plastic sleeves from above the bracket to below it or vice versa depending on whether you wish to raise or lower the mower 4 Push the axle back in through the bracket and reinstall the cotter pin 5 Repeat steps 2 4 for each wheel Ensure that all wheels are adjusted to the same height There are two thicknesses of plastic sleeves 10 20 mm for more accurate adj...

Page 24: ...ngs on the ground when the lawn is mown often enough The mulching mode works the best with dry grass and when not too much grass is cut at once The quick setting for the mulching mode is practical for occasional use when the collector is not needed To set the mower to mulching mode turn the control lever completely to the off position If the collector is switched off the mower will require less hy...

Page 25: ... often packed into a compact package during mowing and the box is easy to empty in dry conditions If any clippings are left in the mower lower the mower shut down the loader engine and manually remove any clippings left in the collector box Do not drive the loader with the door open or shake the mower rapidly WARNING Crushing hazard Unexpected moving Do not reach into the collector box of a raised...

Page 26: ...s before going near the attachment Keeping the rotating speed sufficiently high and drive speed low on demanding conditions are essential to avoid blockages Keep the equipment clean so that material will not stick on it Wet thick or long grass can get coiled around the blades if drive speed is too high When mowing high or wet hay more than one run may be needed for even results Also adjusting the ...

Page 27: ... or on a pallet for example Place the multiconnector on to its holder as indicated with an arrow in the figure below Never leave the hydraulic connector on the ground Make sure that the attachment is secured against all movements during storage Never climb on the attachment Before winter storage carefully clean the cutting deck and the mower components removing all remaining clippings Touch up the...

Page 28: ...r detecting them a small leak can quickly grow into a big one Operate the attachment only with type of hydraulic oil that is accepted for use in Avant loaders DANGER Risk of high pressure fluid injection through skin Release residual pressure before maintenance Never handle hydraulic components when the hydraulic system is pressurised since a fitting may break or become loose and the released oil ...

Page 29: ...ng normal use and the condition of the blades should be checked after every few uses If the mowing deck is clean signs that point to dull or damaged blades include the following Decreased quality of cut resulting in uneven cutting torn grass or yellowish grass after mowing Decreased performance increased power requirement Increased vibration or noise Evenly worn blades can be sharpened but if ther...

Page 30: ... new ones when replacing blades 7 4 Collector unit Cleaning of the collector nozzle and the collector fan is important for their smooth operation If the nozzle is dirty grass starts to stick to it and will eventually block the fan Also a fan rotor that is dirty loses its balance The rotor that is out of balance may damage the fan s hydraulic motor so clean the rotor carefully and regularly To clea...

Page 31: ... 1 Remove the hand operated nut from rear side of the collector box Make sure the collector is emptied beforehand 2 Unfasten the upper collector tube from the collector box 3 Tilt the collector box forward in controlled manner 1 To access the belt unfasten the 5 screws holding the cover in place 2 Lift the cover away ...

Page 32: ... worn or material has come off the belt must be replaced If necessary the belt is adjusted by moving the belt pulley 1 Loosen the four bolts holding the pulley base at the other end of the belt 2 Tighten bolts 2 until the belt is correctly tightened 3 Tighten the four retaining bolts Recheck the belt tightness 4 Refit the protective cover Check the synchronization of the blades after tightening th...

Page 33: ... stopping procedure 2 Rotate the blades manually Set one of the blades to its vertical position The other blade should be perpendicular to it as shown in adjacent figure 3 If the blades are not perpendicular to each other the synchronization must be adjusted by loosening the toothed belt as described in previous chapter ...

Page 34: ...y reimburse the price of components purchased by the customer in special cases that have been agreed in advance The warranty does not cover Normal maintenance work or parts and consumables required for it Damages caused by unusual operating conditions or ways of use negligence structural changes made without the consent of Avant Tecno Oy use of non original parts or lack of maintenance Consequence...

Page 35: ...med att nedan beskrivna produkter överensstämmer med hälso och säkerhetskrav i EG maskindirektiv EG direktiv 2006 42 EG som ändrat Följande harmoniserade standarder har tillämpats We hereby declare that the products listed below are in conformity with the provisions of the Machinery Directive directive 2006 42 EC as amended The following harmonized standards have been applied SFS EN ISO 12100 SFS ...

Page 36: ......

Reviews: