background image

6(14)

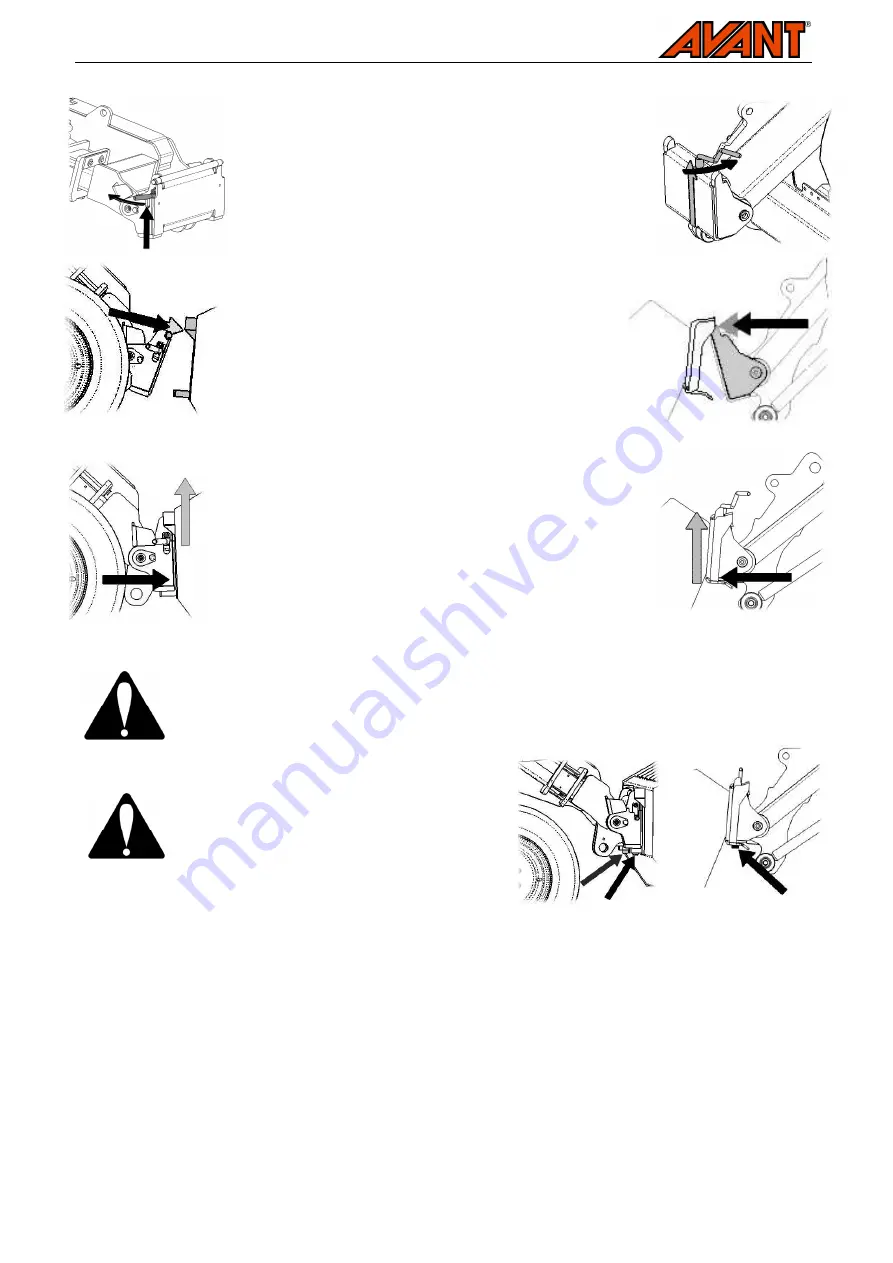
Step 1:

  Lift  the  quick  attach  plate  locking  pin  /  locking  pins

up  and  turn  them  backwards  into  the  slot  so  that
they are locked in the upper position.

  Ensure  that  the  hydraulic  hoses  are  not  in  the  way

during installation.

Step 2:

  Turn  the  quick  attach  plate  hydraulically  to  an

obliquely forward position.

  Drive the  loader  onto  the  attachment.  If  your  loader

is  equipped  with  a  telescopic  boom,  you  can  utilise
this.

Step 3:

  Lift  the  boom  slightly  –  pull  the  boom  control  lever

backward to raise the attachment off the ground.

  Turn  the  boom  control  lever  left  to  turn  the  bottom

section  of  the  quick  attach  plate  onto  the
attachment.

  Lock  the locking  pins manually  as  you  connect

the hydraulic fittings.

Do not use the automatic return of the locking pins with the log splitter. Because the

attachment  plate  of  the  log  splitter  is  at  relatively  high  level,  tilting  of  an  unlocked

splitter  increases  the  risk  of  toppling  over.  We  recommend  that  you  lower  the  log

splitter onto the ground and secure the locking manually.

 Before  moving  or  raising  the  attachment,

ensure that the locking pins are in the lower

position and come through  the fasteners  on

both sides.

5.2.


Connecting and disconnecting the hydraulic fittings

The log splitter has two hydraulic fittings, which must be connected to the corresponding fittings on the loader.
When  connecting  or  disconnecting  fittings,  shut  down  the  loader  engine  and  move  the  auxiliary  hydraulics
lever  of  the  loader  to  its  extreme  positions  a  few  times.  This  way,  there  will  be  no  residual  pressure  in  the
system and the fittings are easy to connect.

To connect and disconnect the fittings, move the collar at the end of the female fitting. For correct operation of
the  splitter,  connect  the  fittings  with  the  coloured  caps  first,  and  the  remaining  fittings  will  then  be  fitted
correctly.

In  a  200-series  equipment,  the  hose  can  be  connected  by  pushing  the  fitting  in  the  counterpart.  When
connecting  and  disconnecting  the  200-series  hydraulics  quick  couplings,  you  should  pay  attention  to  their

Summary of Contents for A413181

Page 1: ...follow all instructions Keep this manual for later reference Operator s Operator s Operator s Operator s manual for Attachment manual for Attachment manual for Attachment manual for Attachment Log splitter Product number 300 700 series loaders A413181 A413195 200 series loaders A413194 ...

Page 2: ...ty information in this manual It warns of an immediate hazard that could cause serious personal injury or property damage Read the warning text accompanying the symbol carefully and ensure that other operators are also familiar with the warnings since personal safety is at stake Note This notice symbol indicates information about the correct operation and maintenance of the equipment Failure to ob...

Page 3: ...n the operator s hands are kept on the two hand control system of the splitter The attachments have been designed to require as little maintenance as possible Regular maintenance tasks can be performed by the operator Demanding repair and maintenance operations such as hydraulic repairs are to be left for professional maintenance Familiarise yourself with the manual s instructions regarding servic...

Page 4: ...thing Never wear loose clothing long scarves jewellery or other items that might become entangled with the moving or rotating parts of the splitter or the wood being split If needed also wear a hat to prevent long hair from coming into contact with the splitter The noise level in the driver s seat and the operating area may exceed 85 dB A Wear hearing protection while working with the loader Wear ...

Page 5: ...cked Keep the log splitter that has not been attached at even and firm ground Mounting the attachment to the loader is quick and easy but it must be done carefully If the attachment is not locked to the loader it may detach from the loader and cause hazardous situations In the worst case the attachment may slide onto the driver along a raised boom For this reason the attachment must under no circu...

Page 6: ...pling over We recommend that you lower the log splitter onto the ground and secure the locking manually Before moving or raising the attachment ensure that the locking pins are in the lower position and come through the fasteners on both sides 5 2 Connecting and disconnecting the hydraulic fittings The log splitter has two hydraulic fittings which must be connected to the corresponding fittings on...

Page 7: ...the protective caps on the loader and the attachment can be fastened to each other during operation to reduce the accumulation of dirt Never leave the hoses hanging on the ground place them on top of the equipment 6 Operation Once the log splitter has been mounted according to the instructions and the hydraulic hoses are connected it is ready for work Read the following instructions about work sit...

Page 8: ... controls of the log splitter before using it Pay special attention to stopping the equipment Check before use that the controls work as intended Never reach into the splitting area or the moving components of the equipment while it is in use severe injuries may occur Turn the auxiliary hydraulics control lever on the loader to its locked position The control device is a lever on the loader that l...

Page 9: ... intended to be used by one operator only Do not allow others to stay near the machine Do not use the splitter for other purposes than splitting firewood 6 2 1 Adjusting the stroke length When the logs are shorter than the cylinder stroke the stroke can be adjusted so that unnecessary travel of the cylinder is minimized thus speeding up the work The initial position of the stroke is adjusted by mo...

Page 10: ...ment before long storage periods touch up the paint where needed and oil the blade and other visible metal parts to prevent rust damage The cylinder should be completely retracted during storage Apply a small amount of oil to the visible part of the cylinder shaft Check the condition of the hydraulic hoses and components when the engine has been turned off and the pressure has been relieved Repair...

Page 11: ...log Log too large Max diameter 40 cm Log does not split Decreased oil pressure Check hydraulic system section 7 2 Log rises up Unsuitable log dimensions or many branches Check carriage stroke Remove branches Incorrect stroke of carriage Extend carriage stroke Log gets jammed on blade Blunt blade Sharpen the blade 7 2 Hydraulic system The hydraulic pressure of the log splitter can be checked from t...

Page 12: ...burse the price of components purchased by the customer in special cases that have been agreed in advance The warranty does not cover Normal maintenance work or parts and consumables required for it Damages caused by unusual operating conditions or ways of use negligence overheating structural changes made without the consent of Avant Tecno Oy use of non original parts or lack of maintenance Conse...

Page 13: ......

Page 14: ......

Reviews: