background image


15 (28) 


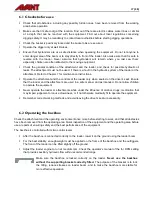
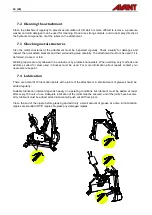
Correct storage position: 


Turn  the  backhoe  to  the  position  in  the 
adjacent figure: 


Bucket flat on the ground, straight 
front, not too close to the frame 


Boom  in  such  position  that  the 
storage support can be locked 


Valve  boom  in  forward  tilted 
position, secured with its strap 


5.3.1


Using the storage/transport support 


Before storage, transport, or service: 


Lock  the  boom  of  the  backhoe  to  prevent  it 
from moving or falling 

1. 

Keep the backhoe locked to the loader 

2. 

Operate  the  controls  of  the  backhoe  to 

move its boom to centre position and lift 
so that the red bar can be locked 

3. 

Secure  the  storage  support  with  its 

cotter pin 


5.3.2


Transport position 

Turn the backhoe to its middle position (straight forward) so that it will not affect the stability of the loader. If 
driving  with  the  backhoe  attached  over  longer  distances  or  at  high  speed,  lock  the  storage  support  on  the 
boom. 


Summary of Contents for Backhoe 170

Page 1: ...Backhoe 170 2016 1 Operator s Manual for Attachment Backhoe 170 Product number Backhoe 170 A36848 English www avanttecno com ...

Page 2: ...Backhoe 170 2016 1 ...

Page 3: ...ng the hydraulic hoses 13 5 3 Unattaching and storage 14 5 3 1 Using the storage transport support 15 5 3 2 Transport position 15 6 INSTRUCTIONS FOR USE 16 6 1 Checks before use 17 6 2 Operating the backhoe 17 6 2 1 Outriggers 18 6 2 2 Controls 19 6 3 Using digging equipment 20 6 4 Operating on inclined terrain 22 6 5 Changing of bucket 22 7 MAINTENANCE AND SERVICE 23 7 1 Checking hydraulic compon...

Page 4: ...on and maintenance of the equipment Failure to observe the instructions accompanying the symbol can lead to equipment breakdown or other property damage With these instructions even an inexperienced user can use the attachment and loader safely The manual includes important instructions for experienced AVANT operators as well Ensure that all persons using the loader have received proper guidance a...

Page 5: ...n occasional excavations with original buckets tools or options is prohibited Using too large bucket or handling too heavy loads cause the risk of tipping the loader backhoe combination over The backhoe must not be used for lifting of objects The backhoe is not intended for dredging it must not be immersed in water If the loader is equipped with a cab the windscreen or its lower part must be remov...

Page 6: ...rt the attachment as low as possible to keep the centre of gravity low and keep the telescopic boom retracted during driving Risk of electric shock Plan all excavation tasks ahead before you dig Find out about the possibility of having any electric cable gas pipe water pipe communications cable or similar buried in the ground Consult local authorities electric water and gas companies and other rel...

Page 7: ...e load as low and close to the machine as possible with the telescopic boom completely retracted to keep the centre of gravity low and for the best stability The stability of the loader may change when leaving the driver s seat leading to tipping over of the machine Always remember that the boom may lower unexpectedly due to loss of stability mechanical fault or if another person operates the cont...

Page 8: ...ping procedure Lower the boom and the attachment on the ground Shut down the loader engine and lock the parking brake Release residual pressure from the hydraulic system move all hydraulic control levers to their extreme positions a couple of times Prevent starting of the machine remove ignition key DANGER Never allow anyone to get under the raised load or the loader or backhoe boom or bucket Keep...

Page 9: ...e 5 on page Contact your AVANT dealer for availability and for more information 4 1 Safety labels and main components of the attachment Listed below are the labels and markings which must be visible on the equipment Replace the warning labels if they have become unclear or if they have detached completely New labels are available via your retailer or contact information provided on the cover The w...

Page 10: ...m danger area 4 A420373 Attachment identification plate Table 4 Main components of the Backhoe 170 1 Frame with quick attach brackets 2 Faster multi connector holder 3 Lifting boom 4 Front boom stick 5 Control valve boom 6 Control valve boom length adjustments 7 Valve boom bracket 8 Storage strap for valve boom 9 Controls control valve 10 Adjustable outriggers 11 Outrigger tine 12 Top link couplin...

Page 11: ...ttached To prevent hazardous situations always follow the attachment mounting instructions provided in the following pages Also remember the safety instructions listed in Chapter 3 WARNING Make sure that an unlocked attachment will not move or fall over Do not stay in the area between the attachment and the loader Mount the attachment only on level surface Never move or lift an attachment that has...

Page 12: ... of control of the loader Never move or lift an attachment that has not been locked Before moving or lifting the attachment make sure that the locking pins are in the lower position and come through the fasteners on the attachment on both sides WARNING Risk of crushing Avoid tipping over the attachment Excessive tilting or lifting of an unlocked attachment increases the risk of tipping the attachm...

Page 13: ...n of high pressure fluid which can cause serious injuries or burns Follow safe stopping procedure before disconnecting hydraulics Keep all fittings as clean as possible use the protective caps on both the attachment and the loader Dirt ice etc may make using the fittings significantly more difficult Never leave the hoses hanging on the ground place the couplings onto the holder on the attachment C...

Page 14: ... always disconnect the hydraulic couplings before unlocking the quick attach plate to prevent hose damage and any oil spills Reinstall the protective caps on the fittings to prevent impurities from entering the hydraulic system Releasing residual hydraulic pressure In case residual pressure is left in the hydraulic system of the attachment it is often possible to disconnect the hydraulic couplings...

Page 15: ...nsport or service Lock the boom of the backhoe to prevent it from moving or falling 1 Keep the backhoe locked to the loader 2 Operate the controls of the backhoe to move its boom to centre position and lift so that the red bar can be locked 3 Secure the storage support with its cotter pin 5 3 2 Transport position Turn the backhoe to its middle position straight forward so that it will not affect t...

Page 16: ... the excavation and around it Do not drive along the edge of an excavation Mark or fence the digging area and keep others away Know the soil type Loose soil can cave in easily Inspect the job site and take notice of any potential hazards in the area If it is necessary to reinforce the trench have materials ready when starting trenching Pile loose soil far enough from the trench never right next to...

Page 17: ...e that the loader and the attachment are used in a safe manner and as intended Do not allow children to operate the equipment Never operate the loader or attachments while under the influence of alcohol drugs medication that may impair judgement or cause drowsiness or if not otherwise medically fit to operate the equipment Remember correct working methods and avoid leaving the driver s seat unnece...

Page 18: ...d right side outriggers are different The outriggers should face forward In delivery configuration the outriggers may be placed upside down Lift the backhoe and slide the outriggers on their correct sides 2 The outriggers are equipped with spikes On soft surfaces the spikes help to prevent the backhoe from moving The spikes should sink into the ground for a better grip from the ground On hard surf...

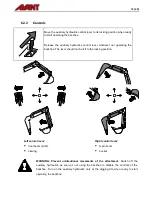
Page 19: ...backhoe The lever should not be left to the locking position Left control lever front boom stick slewing Right control lever main boom bucket WARNING Prevent unintentional movements of the attachment Switch off the auxiliary hydraulics as soon as not using the backhoe to disable the controls of the backhoe Turn on the auxiliary hydraulics only at the digging site when ready to start operating the ...

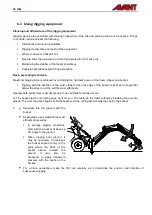
Page 20: ...et is kept at an angle that allows the edge to cut the soil the most effectively Operate both control levers simultaneously to use all three functions at once Let the bucket teeth and cutting edge work for you The teeth do the initial cutting by breaking the soil into pieces The crumbling spoil begins to fill the bucket and the curling action holds the spoil in the bucket 1 Penetrate into the grou...

Page 21: ... and lift the backhoe boom Dump material to the side at least 60 cm from the excavation Unstable soils require more distance Repeat until it is necessary to move the loader to another position Operate the backhoe only with its own hydraulic system and set of controls Do not excavate by using the driving force of the loader Working this way can damage the loader boom or the backhoe Avoid sideways l...

Page 22: ...oader and may lead to overturning of the machine WARNING Avoid tipping over The backhoe must not be used on horizontally tilted terrain Slight unevenness of the ground can be compensated with the outriggers but the outriggers are not intended to straighten the loader and the backhoe on a slope 6 5 Changing of bucket Lower the bucket close to the ground so that it will not fall when uncoupled 1 Rem...

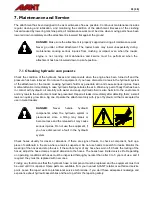
Page 23: ...aulic fluid is also harmful to the environment and any leak to the environment must be prevented Repair all leaks immediately after detecting them a small leak can quickly grow into a big one Operate the attachment only with type of hydraulic oil that is accepted for use in Avant loaders DANGER Never handle hydraulic components when the hydraulic system is pressurised since a fitting may break or ...

Page 24: ...lowed to be carried out by professional welders When welding only methods and additives suited for steel used in bucket must be used For more information about repairs contact your nearest service point 7 4 Lubrication There are a total of 10 lubrication points at the joints of the attachment A small amount of grease should be added regularly Suitable lubrication interval depends heavily on operat...

Page 25: ...y reimburse the price of components purchased by the customer in special cases that have been agreed in advance The warranty does not cover Normal maintenance work or parts and consumables required for it Damages caused by unusual operating conditions or ways of use negligence structural changes made without the consent of Avant Tecno Oy use of non original parts or lack of maintenance Consequence...

Page 26: ...dt We hereby declare that the products listed below are in conformity with the provisions of the Machinery Directive directive 2006 42 EC as amended The following harmonized standards have been applied Wir erklären hiermit dass die nachstehend aufgeführte Maschine konform ist mit den Bestimmungen der EG Maschinenrichtlinie EG Richtlinie 2006 42 EG mit Änderungen Die folgende harmonisierte Normen w...

Page 27: ......

Page 28: ......

Reviews: