
User Manual
6 www.AvantcoEquipment.com
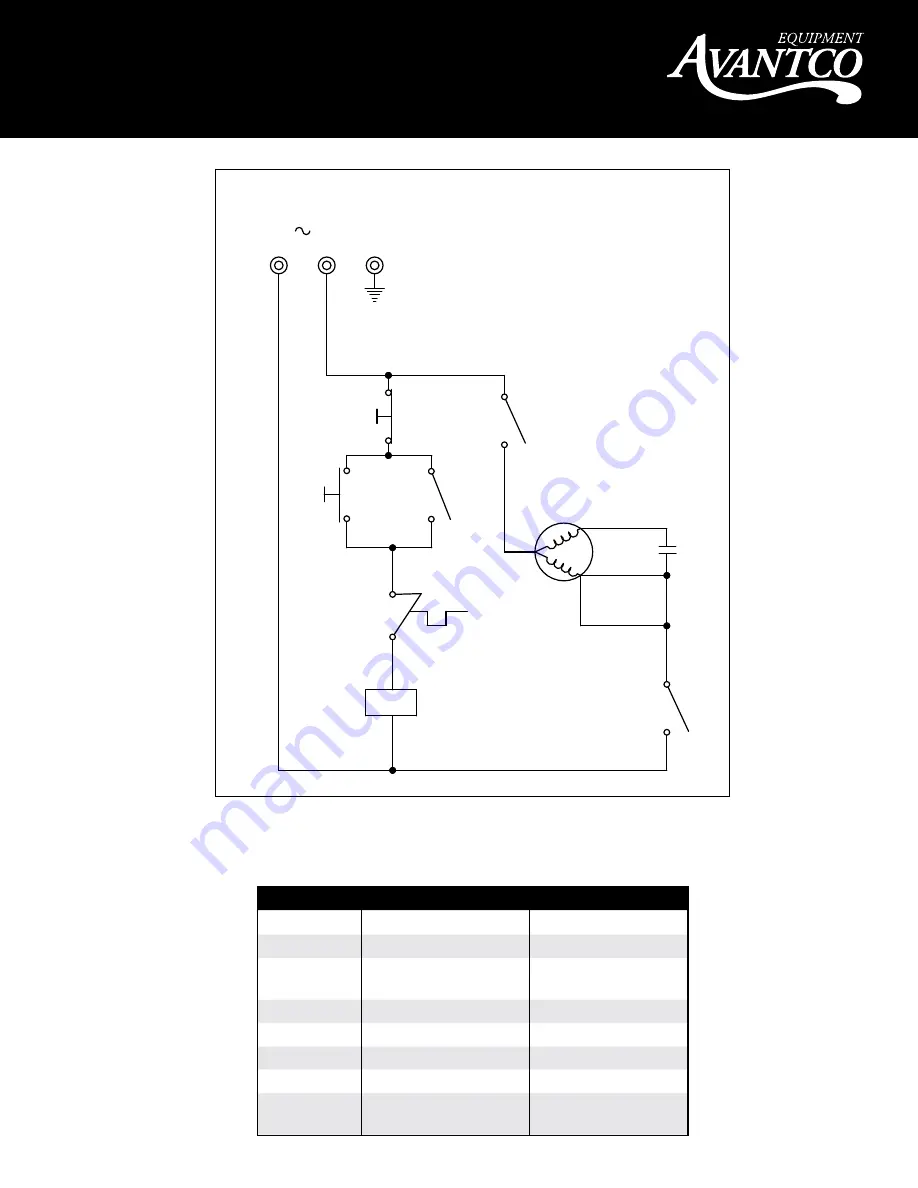
LEGEND
Description
Part Number
PB1
Push Button Stop
1-PB-SLR
PB2
Push Button Start
1-PB-SLR
T1
Oven Temp. Safety
Motor
Internally Fitted In
Motor
R1
Relay 120V
1-Rel-SLR
C1
Capacitor 20MF
1-CAP-SLR
M
Motor SL309 - 120V
1-MOT-SL309
M
Motor SL310 - 120V
1-MOT-SL310
M
Motor SL512/SL312
- 120V
1-MOT-SL512
Wiring Diagram
UNP
ACKING: Unpack the product and check for any damage incurred du
ring
transit.
This should be reported to the responsible carrier
, railway or postal
authority
, and a request for a damage report should be made
THESE INSTRUCTIONS MUST
BE FOLLOWED FOR US
TO GUARANTEE OUR FULL
SUPPOR
T OF
YOUR CLAIM
FOR PROTECTING
AGAINST
LOSS FROM CONCEALED
DAMAGE.
THE FORM FOR FILING SUCH
A
CLAIM
WILL
BE PROVIDED BY
THE CARRIER.
!
GENERAL
INST
ALLA
TION
AND OPERA
TION
INSTRUCTIONS:
INST
ALLA
TION, OPERA
TION
AND CARE OF :
SLR5009;SLR5010;SLR5012
AND SLR5312
MEA
T SLICERS
Page 1
Page 6
The
Avantco meat slicers are a range of medium duty electrically dri
ven
appliances.
They are ideal for canteens, deli’
s, caterers and sub shops.
The units have been designed to meet the highest safety and hyg
iene
standards.
The robust aluminium construction and powerful drive motor
ensure long and reliable operation and use.
1.Place the unpadded unit in the desired location with the on/o
ff switch
facing the operator
. DO NOT
plug the unit in at this point.
The supporting
table should be stable and at the correct working height.
The work surface
should be in a dry location and preferably away from passing ga
ngways.
2.IT
IS ESSENTIAL
TO STUDY
AND COMPL
Y WITH
ALL
OF
THE
SAFETY
INSTRUCTIONS DET
AILED IN
THIS MANUAL.
3 .Clean the unit with a DAMP
cloth using a neutral P
.H. dish detergent.
Wipe and dry the machine.
4.Set the thickness of slice required using the control knob ad
jacent to the
on/of
f switch.
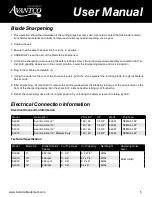
1-CAP-SLR
C1
CAPACITOR 20mF
E
1-REL-SLR
RELAY 120V
R1
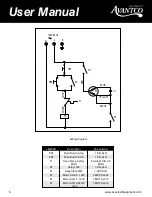
WIRING DIAGRAM
MODEL: MEAT SLICER - 120V 60Hz
MODEL CODE : SLR5009
SLR5010
SLR5012
SLR5312
LEGEND
DESCIPTION
PART NUMBER
PB1
PB2
T1
PUSH BUTTON STOP
PUSH BUTTON START
OVER TEMPERATURE SAFETY MOTOR
1-PB-SLR
1-PB-SLR
N
L
120V 60Hz
PB1
R1
R1
C1
PB2
R1
T1
WHITE
WHITE
BLUE
YELLOW
RED
BLACK
M
MOTOR SLR5009 - 120V
1-MOT-SLR5009
M
MOTOR SLR5010 - 120V
1-MOT-SLR5010
M
MOTOR SLR5012/SLR5312 - 120V
1-MOT-SLR5012
M
R1
INTERNALY FITTED IN MOTOR


