background image


3. INSTALLATION INSTRUCTIONS


BEFORE   USING   YOUR   APPLIANCE   


  Remove the exterior and interior packing. 

  Before connecting the appliance to the power source, let it stand upright for approximately 4 hours. This will 

reduce the possibility of a malfunction in the cooling system from improper handling during transportation. 

  Clean the interior surface with lukewarm water using a soft cloth.  


INSTALLATION   SPECIFICATIONS   


   This appliance requires a standard 115 Volt A.C. /50Hz electrical outlet with three-prong ground


This


appliance is designed to be 

installed built-in or free standing

.


  Locate  the  appliance  away  from  direct  sunlight  and  sources  of  heat  (stove,  heater,  radiator,  etc.).  Direct 

sunlight  may  affect  the  acrylic  coating  and  heat  sources  may  increase  electrical  consumption.    Ambient 
temperature  below  68°F  (20°C)  or  above  90°F  (32°C)  will  hinder  the  performance  of  this  appliance. 

This 

unit is not designed for use in a garage or any other outside installation. 


  Avoid locating the appliance in moist areas.  


  Plug the appliance into dedicated, properly installed-grounded wall outlet. Do not under any circumstances 

cut  or  remove  the  third  (ground)  prong  from  the  power  cord.  Any  questions  concerning  power  and/or 
grounding should be directed toward a certified electrician or an authorized service center.  

This unit is not 

designed to be installed in an RV or used with an inverter. 


After   plugging   the   appliance   into   a   wall   outlet,   allow   the   unit   to   cool   down   for   3   ~   
4   hours   before   placing   wine   bottles   or   beverage   cans   in   the   appliance.


This   wine   cooler   come   with   adjustable   legs   (in   the   front)   to   help   level   the   unit


BUILT-­‐IN   INSTALLATION   


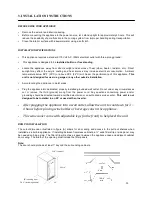
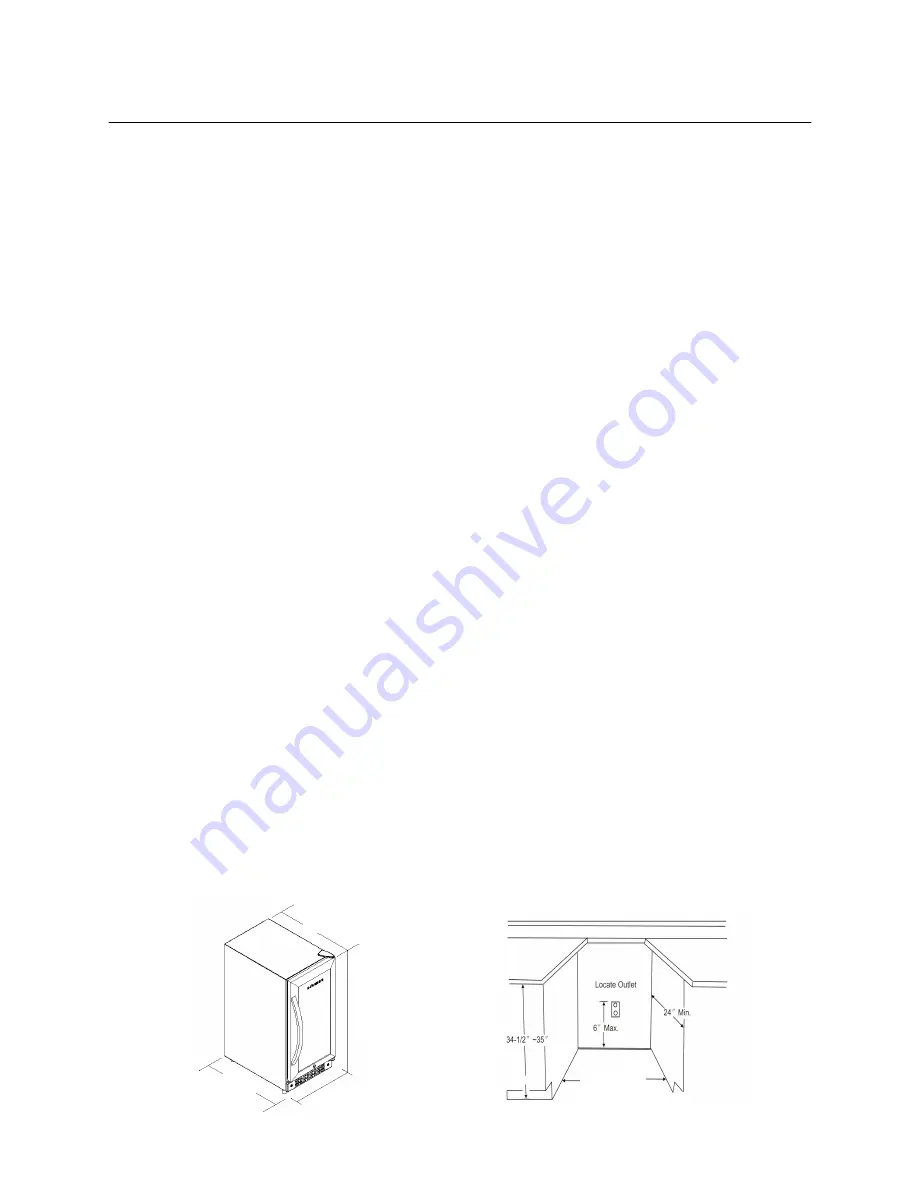
The  cutout  dimension  illustrated  in  figure  (A)  allows  for  door  swing  and  access  to  the  pull-out  shelves  when 
installed as a built-in appliance.  If installing between frameless cabinets, a 

½

” wide filler strip or side panel may 

be needed on hinge side.  The filler strip will act as a spacer between the appliance case and adjacent cabinet 
door swing.  The width of the opening must include the filter panels.   

 
Note:  

The door should protrude at least 1” beyond the surrounding cabinets.   


14 

15-3/4” 

min 

23”Including      door   

24   ½”   (Including   handle)


21   ¼”   (cabinet)   

15”   

33   3/4”   

Summary of Contents for LBWC-30SB2

Page 1: ...SB2 To ensure proper use of this appliance and your safety please read the following instructions completely before operating this appliance Pour une utilisation optimale de cet appareil ainsi que pour votre sécurité veuillez lire attentivement les instructions contenues dans ce manuel avant de faire fonctionner cet appareil ...

Page 2: ... 14 BEFORE USING YOUR APPLIANCE 14 FREE STANDING OR BUILT IN INSTALLATION 14 ELECTRICAL CONNECTION 15 4 APPLIANCE FEATURES 15 5 OPERATING YOUR APPLIANCE 16 17 6 CARE AND MAINTENANCE AUTOMATIC DEFROST 18 CLEANING 18 VACATIONS 18 MOVING YOUR APPALICANCE 18 ENERGY SAVING TIPS 18 7 TROUBLESHOOTING GUIDE 19 11 ...

Page 3: ...play 2 Circulation Fan 3 Interior Light 4 Cabinet 5 Door 6 Adjustable feet 7 Wood waver metal grid shelves LBWC 30SB2 8 Wooden ball bearing shelves TBWC 30SFD Remark Handle shelf or side light is subject to change according to model 1 2 3 4 5 7 8 7 12 6 ...

Page 4: ...it breaker is recommended Do not use extension cords Do not place or store anything on top of the unit Never clean appliance parts with flammable fluids The fumes can create a fire hazard or explosion Make sure the unit is unplugged before cleaning or repairing Do not store or use gasoline or any other flammable vapors in the vicinity or any other appliance The fumes can help create a fire or expl...

Page 5: ...n moist areas Plug the appliance into dedicated properly installed grounded wall outlet Do not under any circumstances cut or remove the third ground prong from the power cord Any questions concerning power and or grounding should be directed toward a certified electrician or an authorized service center This unit is not designed to be installed in an RV or used with an inverter After plugging the...

Page 6: ...ld up to 30 bottles wine 5 shelves that can hold 5 bottle Plus 1 bottom that holds 5 piled up Engaged Wine Shelves Any of the shelves can be removed to accommodate larger bottles To remove a shelf from the TBWC 30SFD LBWC 30SB2 unit To remove a sliding shelf Remove all bottles Pull out the shelf Take out shelf by lifting the right side bracket and lowering the left side one at the same time then p...

Page 7: ...t s original configuration in any way be sure to ask your dealer for advice 5 OPERATING YOUR APPLIANCE Recommended Temperatures for Chilling Wine Red Wines 15 18 C 58 65 F Dry White Rosé Wines 9 15 C 48 58 F Sparkling Wines 5 9 C 40 48 F TEMPERATURE CONTROL AND DISPLAY 1 When the unit is plugged indicator will light for 3 seconds indicating and an audible beep will be heard 2 The temperature in th...

Page 8: ...ing if it is not turn off TEMPERATURE SETTING COLDER WARMER Under normal conditions the temperature display will flash and indicates the current temperature of the zone When pressing either keys the temperature displayed will decrease or increase in increments of one degree If the colder or warmer key is pressed and held for one second the temperature displayed will decrease or increase in a speed...

Page 9: ...Dust or anything else blocking the vent may hinder the cooling efficiency of the appliance Vacuum the vent if necessary VACATION TIME Unplug the unit from the wall outlet Remove all the contents Clean the appliance Leave the door open slightly to avoid possible formation of condensation mold or odors Short vacations Leave the appliance operating during vacations of less than three weeks Long vacat...

Page 10: ...e Door is kept open too long or is opened too frequently Warm air enters the appliance every time the door is opened Open the door less often The door is not closed completely The door gasket does not seal properly The appliance has recently been disconnected for a period of time Note 4 hours are required for the appliance to cool down completely Temperature inside the appliance is too cold Temper...

Reviews: