background image


OPERATING YOUR FREEZER 


Temperature Control 


Your freezer has one control for regulating the temperature.   The temperature control is located 
on the lower right hand corner. 


The first time you turn the unit on, switch the temperature control to the position number 7 and run 
for at least 2 hours before putting frozen foods inside.  This will ensure the cabinet is thoroughly 
chilled before food is put in.   


The range of the temperature control is from position “1” the warmest to "7" the coldest. Adjust the 
temperature control to the setting that best suits your needs. The setting of “4 or 5” should be 
appropriate for home or office freezer use. 


To turn the freezer off, unplug the unit from the electrical outlet. 


NOTE: 


If the unit is unplugged, lost power, or turned off; you must wait 3 to 5 minutes before restarting 
the unit. If you attempt to restart before this time delay, the freezer will not start. 


Large amounts of food will lower the cooling efficiency of the appliance. 


If you choose to change the thermostat setting, adjust thermostat control by one numerical 
increment at a time.  Allow several hours for temperature to stabilize between adjustments. 


Defrosting Your Freezer 

  When? For the most efficient operation and minimum energy consumption, defrost the freezer 

when the frost on the freezer walls is excessive or ¼ to ½ inch thick. 

  Choose a time when the stock of frozen food is low. 


CAUTION 
Do not use boiling water because it may damage the plastic parts. In addition, never use a 

sharp or metallic instrument to remove frost as it may damage the cooling coils and will void 

the warranty.  We recommend using the plastic scraper provided with your unit. 


Remove the frozen food from the freezer and place it in a cooler to protect the food. 


Unplug the freezer. The Power Supply light should be off (red light out). 


During defrosting, the ice melts into the cabinet.  


Remove the drain plug on the inside floor of the freezer by pulling straight out. 


Place a shallow pan outside drain outlet.  The defrost water will drain out. 


Check the pan occasionally so the water does not overflow. 


Clean the interior of the freezer. 


Replace the plug on the inside floor. 


Reset the thermostat to desired setting.   


Allow the cabinet to cool for two hours. 


Return food to the freezer. 
 

HELPFUL HINT: 

Defrosting usually takes a few hours.  Leaving the door open will help speed the process.  
Also, pouring warm water (not boiling) on the ice/frost will help speed melting.  If you must 
use a scraper- please use caution - it is very easy to damage the freezer compartment and 
void your warranty. 


Summary of Contents for CF24Q0W

Page 1: ...CAUTION BEFORE USE PLEASE READ AND FOLLOW ALL SAFETY RULES AND OPERATING INSTRUCTIONS La secci n en espa ol empieza en la p gina 15 Avanti has a policy of continuous improvement on its products and r...

Page 2: ...Electrical Connection 8 Operating Your Freezer 9 Temperature Control 9 Defrosting Your Freezer 9 The Freezer Compartment 10 Care and Maintenance 10 Cleaning Your Freezer 10 Vacation Time 10 Moving You...

Page 3: ...s in any correspondence or service calls concerning your freezer If you received a damaged freezer immediately contact the dealer or builder that sold you the freezer Save time and money Before you ca...

Page 4: ...4 PARTS FEATURES 1 COUNTER BALANCED LID 2 TEMPERATURE CONTROL 3 DRAIN PLUG 4 ROLLERS...

Page 5: ...mmable utilis Ne pas utiliser de dispositifs m caniques pour r frig rateur d givrage Ne pas percer la tuyauterie du r frig rant DANGER Risk of fire or explosion Flammable refrigerant used To be repair...

Page 6: ...ur chest freezer unless it is specifically recommended in this material All other servicing should be referred to a qualified technician Use two or more people to move and install the chest freezer Fa...

Page 7: ...he power source let it stand upright for approximately 2 hours This will reduce the possibility of a malfunction in the cooling system from handling during transportation Clean the interior surface wi...

Page 8: ...ds that have become frayed or otherwise damaged Do not use a cord that shows cracks or abrasion damage along its length or at either end When moving the appliance be careful not to damage the power co...

Page 9: ...When For the most efficient operation and minimum energy consumption defrost the freezer when the frost on the freezer walls is excessive or to inch thick Choose a time when the stock of frozen food i...

Page 10: ...rm cloth containing a water and baking soda solution The solution should be about 2 tablespoons of baking soda to a quart of water Wash the storage basket with a mild detergent solution Be sure to kee...

Page 11: ...rmal A large amount of food has been added to the freezer The door is open too often The door is not closed completely The temperature control is not set correctly The door gasket does not seal proper...

Page 12: ...Be sure floor can adequately support freezer Level the freezer by putting wood or metal shims under part of the freezer The freezer is touching the wall Re level the freezer and move it from the wall...

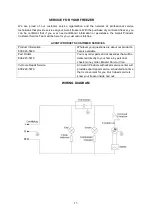
Page 13: ...for you Just call us toll free AVANTI PRODUCTS CUSTOMER SERVICES Product Information 800 323 5029 Whatever your questions are about our products help is available Part Orders 800 220 5570 You may orde...

Page 14: ...ailure to install the product in strict conformity with local fire and building codes and regulations Any external elemental and or environmental forces and factors including without limitation rain w...

Page 15: ...n un piso que sea lo suficientemente fuerte para soportar su peso cuando este totalmente lleno o cargado Deje aproximadamente 5 pulgadas de espacio entre la parte trasera y los costados de su electrod...

Page 16: ...de extensi n para este electrodom stico Sin embargo si no tiene otra opci n mas que usar un cable de extensi n aseg rese que este sea un cable de extensi n para electrodom sticos que este listado baj...

Page 17: ...do porque da ar las partes de pl stico Tampoco use puntas o instrumentos met licos para retirar la escarcha ya que da ar el espiral de enfriamiento y cancelar la garant a Le recomendamos usar la esp t...

Page 18: ...as de su congelador deben ser limpiadas con un detergente suave y agua tibia Seque el interior y el exterior con un pa o suave Se recomienda que la unidad sea limpiada en el momento en que se desconge...

Page 19: ...e El congelador recientemente fue desconectado Para que el congelador est completamente fr o necesitar enfriarse por cuatro horas La temperatura dentro del congelador est muy caliente La temperatura e...

Page 20: ...tar meciendo Aseg rese que la superficie donde tiene el congelador aguante el peso de este Nivele el congelador colocando un pedazo de madera o de metal por debajo Aseg rese que el electrodom stico es...

Page 21: ...elef nicos SERVICIO AL CLIENTE AVANTI PRODUCTS Informaci n del Producto 800 323 5029 Estamos dispuestos a ayudarlos si tiene dudas o preguntas acerca de nuestros productos Para solicitud de Partes 800...

Page 22: ...22...

Page 23: ...r future needs detach here Avanti Registration Card Name Model Serial Address Date Purchased Store Dealer Name City State Zip E mail Address Area Code Phone Number Occupation Did You Purchase An Addit...

Page 24: ...24 CF24Q0W 08282015 PRINTED IN CHINA...

Reviews: