background image

13

HOW TO USE THE NATURAL CONVECTION ELECTRIC OVEN

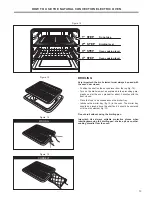
Figure  12

Figure  13

Figure  14

Figure  15

BROILING

Very important: the broil element must always be used with 

the oven door closed. 

-  Position the shelf on the second level from the top (fig. 12). 
-  Turn on the broil element, as explained in the preceding para-

graphs and let the oven preheat for about 5 minutes with the 

door closed.

-  Place the food to be cooked above the broiler tray.
-  Introduce the broiler tray (fig. 13) in the oven. The broiler tray 

should be placed above the shelf and it should be centered 

with the broil element (fig. 12). 

Do not broil without using the broiling pan

.

Important: Use always suitable protective gloves when 

inserting/removing the broiling pan, shelves, pans on other 

cooking utensils from the oven.

2

nd

  STEP

1

st

  STEP

Oven cooking level

Oven cooking level

3

rd

  STEP

4

th

  STEP

Do not use

Broiling level

WRONG

CORRECT

Summary of Contents for DER 202 BS

Page 1: ...READ AND FOLLOW ALL SAFETY RULES AND OPERATING INSTRUCTIONS Avanti has a policy of continuous improvement on its products and reserves the right to change materials and specifications without notice...

Page 2: ...ICE PACKED WITH RANGE SEE INSTALLATION INSTRUCTIONS This appliance is designed and manufactured solely for the cooking of domestic household food and in not suitable for any none domestic application...

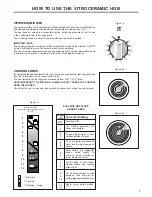
Page 3: ...ures 4 5 Before Using Your Electric Range 6 Precautions and Recommendations 7 8 How to Use the Vitroceramic Hob 9 10 How to Use the Natural Convection Electric Oven 11 13 Care and Maintenance 14 16 Tr...

Page 4: ...Rating plate 9 Oven vent 10 Glass oven door 11 Anti tip bracket 12 Broil element 13 Broiler tray 14 Shelves 15 Bake element 15 1 2 5 10 11 9 6 14 13 3 7 8 4 12 PARTS FEATURES Figure 1 WARNING VERY IMP...

Page 5: ...32 1200 W CONTROLS DESCRIPTION Cooking hob controls 5 Front left cooking zone 1 control knob 6 Rear left cooking zone 2 control knob 7 Rear right cooking zone 3 control knob 8 Front right cooking zone...

Page 6: ...NGE INSTALLED BY A QUALIFIED INSTALLER Improper installation adjustment alteration services or maintenance can cause injury or property damage Consult a qualified installer or service agency Important...

Page 7: ...improper use of the appliance To avoid any possible hazard the appliance must be installed by qualified personnel only Any repairs by unqualified persons may result in electric shock or short circuit...

Page 8: ...nge in an attempt to slide it into or out of the installation Pushing or pulling a range rather than using a lift jack also increases the possibility of bending the leg spindles or the internal coupli...

Page 9: ...n control and light up by selecting from the 12 positions on the control knob fig 4 The heat intensity can be regulated continuously from OFF to 12 max VERY IMPORTANT TO SWITCH ON ALWAYS LIGHTLY PRESS...

Page 10: ...rack in the cooktop switch the appliance off immediately and call the AVANTI After Sales Service Do not bend over the hobs when they are on Do not leave aluminium foil greaseproof paper etc or plastic...

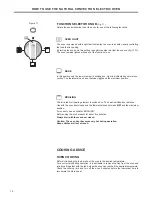
Page 11: ...with 2 heating elements which are Bake element 1800 W Lower heating element Broil element 1800 W Upper heating element OVEN THERMOSTAT fig 10 This only sets the cooking temperature and does not switc...

Page 12: ...minutes Always broil with the oven door closed Caution The oven door becomes very hot during operation Keep children well out of reach OVEN LIGHT The oven is equipped with a light that illuminates th...

Page 13: ...out 5 minutes with the door closed Place the food to be cooked above the broiler tray Introduce the broiler tray fig 13 in the oven The broiler tray should be placed above the shelf and it should be c...

Page 14: ...mato conserve vinegar etc are left on the enamel for a long time they will etch it making it opaque STAINLESS STEEL ELEMENTS Stainless steel parts must be rinsed with water and dried with a soft and c...

Page 15: ...mic hob using a special scraper tool take extra care to avoid damaging to the seal at the edges of the glass ceramic surface Do not scratch the cooktop with cutting or sharp objects Do not use the coo...

Page 16: ...oven cleaning it is possible to remove the door Please follow the instructions carefully Open the door completely Push down the lever L and keeping it in this position slowly close the door in order t...

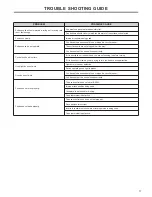
Page 17: ...urface unit control knob you are not pushing in before turning If it is oven control knob you are trying to turn the knob to wrong direction Oven light does not work Light bulb is loose or defective S...

Page 18: ...r you Just call us toll free AVANTI PRODUCTS CUSTOMER SERVICES SERVICE Product Information 800 323 5029 Whatever your questions are about our prod ucts help is available Part Orders 800 220 5570 You m...

Page 19: ...ROVIDED BY AN AUTHORIZED SERVICE COMPANY FULL 30 DAY WARRANTY FROM DATE OF PURCHASE ON GLASS PARTS AND FINISH OF PORCELAIN ENAMEL PAINTED OR BRIGHT METAL FINISHED PARTS REPLACEMENT PARTS AND REPAIR LA...

Page 20: ...ranscription errors in the present booklet The manufacturer re serves the right to make all modifications to its products deemed necessary for manufacture or commercial reasons at any moment and witho...

Reviews: