background image

13 


             WARNING!! 


ELECTRICAL GROUNDING INSTRUCTIONS 

FOR PERSONAL SAFETY, THIS APPLIANCE MUST BE PROPERLY GROUNDED. 

This appliance is equipped with a three-prong grounding plug for your protection against 

shock hazard and should be plugged directly into a properly grounded socket. Do not cut or 

remove the grounding prong from the plug. 


The gas range must be installed with all electrical connections in accordance with state 

and local codes. A standard electrical supply (115 V AC only, 60 Hz), properly grounded in 

accordance with the National Electrical Code and local codes and ordinances is required. 


Do not under any circumstances cut or remove the third (ground) prong from the 

power plug. Electrical installation should comply with national and local codes. 


REPLACEMENT PARTS


Only authorized replacement parts may be used in performing service on the range. 

Replacement parts are available from factory authorized parts distributors. Contact the 

nearest AVANTI parts distributor in your area. 


CARBON MONOXIDE WARNING

:


Carbon Monoxide is a possible danger when using any gas powered 
appliance. 
 
All gas appliances MUST be installed by a licensed professional who is 
familiar with the Carbon Monoxide levels appropriate for each appliance. 
 
The American Gas Association publishes CO emissions for appliances and 
heating equipment through the ANSI Std. Z21.1 
 
The EPA reports that a maximum CO (Carbon Monoxide) level  of 9 PPM 
over a 24 hour period is the residential interior ambient level standard. 
 
( A properly ventilated home will have a normal CO level of less than 5 
PPM.) 
 
NON-VENTED GAS COOKING APPLIANCES: 
In a residential application are normally used for a short period of time.  
The CO generated during the operation will disperse to the air in the home 
and be purged to the outside through the normal air exchange. 

Summary of Contents for DG2450SS

Page 1: ...OLLOW ALL SAFETY RULES AND OPERATING INSTRUCTIONS AND SAVE FOR LOCAL GAS AND ELECTRICAL INSPECTOR S USE La secci n en espa ol empieza en la p gina 27 Avanti Products has a policy of continuous improve...

Page 2: ...ge 9 10 Important Precautions and Recommendations 11 13 How to use the top burners 14 15 How to use the Gas oven 15 19 Oven light 19 Care and Maintenance 20 23 Troubleshooting Guide 24 25 Wiring Diagr...

Page 3: ...ll you how to reduce the chance of injury and let you know what can happen if the instructions are not followed IN THE COMMONWEALTH OF MASSACHUSETTS This product must be installed by a licensed plumbe...

Page 4: ...d free from combustible materials gasoline and other flammable vapors Do not obstruct the flow of ventilation air Disconnect the electrical supply to the appliance before servicing When removing appli...

Page 5: ...e the appliance must be secured by properly installed anti tip devices packed with the appliance WARNING ALL RANGES CAN TIP INJURY TO PERSON COULD RESULT INSTALL ANTI TIP DEVICE PACKED WITH RANGE SEE...

Page 6: ...____________ Serial Number Use these numbers in any correspondence or service calls concerning your Gas Range If you received a damaged Gas Range immediately contact the dealer or builder that sold yo...

Page 7: ...ck Panel Basic Features Front 1 Backsplash 2 Oven Vent 3 Sealed Burners Total 4 4 Control Panel 5 Oven Door Handle 6 Oven Door 7 Drawer Handle 8 Drawer 9 Leveling Legs Total 4 10 Anti tip Bracket 11 C...

Page 8: ...2 Right semi rapid burner SR 4800 BTU hr 3 Left semi rapid burner SR 4800 BTU hr 4 Rapid burner R 10000 BTU hr Note The electric gas lighting device is incorporated into the knobs CAUTION If the burn...

Page 9: ...or 1 Regulator Connector 5 Screws 3 pcs were pre installed on the cook top 1 Instruction Manual 1 Installation Manual Clean the interior surface with lukewarm water using a soft cloth Have the install...

Page 10: ...e instructions carefully before installing and using the appliance CAUTION this appliance must only be installed in a permanently ventilated room in compliance with the applicable regulations It is ad...

Page 11: ...se of the range certain parts will become very hot Do not touch hot parts Keep children away from the range when it is in use Fire risk Do not store flammable material in the oven or in the bottom dra...

Page 12: ...appliance area clear and free from combustible materials gasoline and other flammable vapors 4 Do not obstruct the flow of combustion and ventilation air 5 Disconnect the electrical supply to the appl...

Page 13: ...s may be used in performing service on the range Replacement parts are available from factory authorized parts distributors Contact the nearest AVANTI parts distributor in your area CARBON MONOXIDE WA...

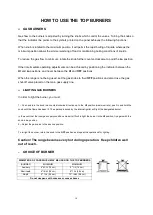
Page 14: ...and also close the gas shut off valve placed on the main gas supply line LIGHTING GAS BURNERS In order to light the burner you must 1 Push and turn the knob in a counterclockwise direction up to the H...

Page 15: ...is provided with two burners Oven burner mounted on the lower part of the oven Broil burner mounted on the upper part of the oven USING THE OVEN FOR THE FIRST TIME It is advised to follow these instr...

Page 16: ...N THERMOSTAT The numbers printed on the control panel indicate the increasing oven temperature value F To regulate the temperature set the chosen number onto the control knob indicator The position BR...

Page 17: ...manually light the burner by pressing the knob inward and immediately approach a lighted match to the opening A see the diagram above Never continue this operation for more than 15 seconds If the bur...

Page 18: ...ote that you will hear a clicking noise Hold the knob pressed inward until the oven burner is lit Once the oven burner is lit release the knob In case of power outage you can manually light the burner...

Page 19: ...d let the broil burner preheat for about 5 minutes with the door closed Place the food to be cooked above the broiling pan Introduce the broiling pan in the oven The broiling pan should be placed abov...

Page 20: ...sponge and soapy water only or other non abrasive products Dry preferably with a chamois leather If acid substances such as lemon juice tomato conserve vinegar etc are left on the enamel for a long t...

Page 21: ...when the burners are not in place CORRECT REPLACEMENT OF THE BURNERS It is very important to check that the burner flame spreader F and the cap C have been correctly positioned Failure to do so can ca...

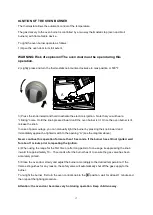
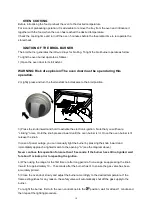
Page 22: ...facilitate oven cleaning it is possible to remove the door Please follow the instructions carefully REMOVING THE OVEN DOOR The oven door can easily be removed as follows Open the door to the full exte...

Page 23: ...RACKET INSALLATION To reduce the risk of tipping the range by abnormal usage or improper door loading the range must be secured by properly installing the anti tip device packed with the appliance Pla...

Page 24: ...g instructions in range Cleaning section Range is not set for appropriate gas input See range conversion section of installation manual Flame is orange Dust particles in main line Allow burner to oper...

Page 25: ...roperly Remove excess fat from meat SERVICE FOR YOUR GAS RANGE We are proud of our customer service organization and the network of professional service technicians that provide service on your Avanti...

Page 26: ...including but not limited to any after hour weekend or holiday service calls tolls ferry trip charges or mileage expense for serviced calls to remote areas including the state of Alaska C Pick up and...

Page 27: ...lo alertar n y le indicar n que riesgo potencial existe como reducir el riesgo y tambi n que podr a pasar en caso de no seguir las instrucciones EN MASSACHUSETTS Este producto debe ser instalado por u...

Page 28: ...de este electrodom stico y el piso bajo este electrodom stico deben estar sellados y no tener aperturas Mantenga el rea del electrodom stico limpia y libre de materiales combustibles gasolina y otros...

Page 29: ...este debe ser instalado y asegurado con los elementos anti volteo inclu dos en el paquete de su electrodom stico ADVERTENCIA TODAS LAS COCINAS SE PUEDEN VOLTEAR LA PERSONA PUEDE SUFRIR DA OS UTILICE...

Page 30: ...la unidad Caracteristicas 1 Panel Anti salpicaduras 2 Ventilaci n del horno 3 Hornillas 4 Panel de controles 5 Manija de la puerta del horno 6 Puerta del horno 7 Manija de la gaveta de almacenamiento...

Page 31: ...erecha semi r pida SR 3 Hornilla izquierda semi r pida SR 4 Hornilla R pida R Nota El elemento para encender el gas est incorporado a las perillas PRECAUCION Si la hornilla se apaga por accidente gire...

Page 32: ...ado que siga las instrucciones de instalaci n No intente reparar o reemplazar ninguna pieza de su cocina a no ser que sea espec ficamente recomendado en este manual Aseg rese que su cocina est correct...

Page 33: ...do con agua y detergente neutral luego seque cuidadosamente Coloque las rejillas y bandeja del horno en su lugar Encienda el horno a la temperatura m xima para eliminar cualquier resto de grasa del CA...

Page 34: ...e la cocina para prevenir que ni os queden atrapados Despu s de cada uso aseg rese que las perillas est n en la posici n OFF apagado No permita que los ni os u otras personas no calificadas usen el el...

Page 35: ...cuito Este electrodom stico es para uso en su hogar Nunca use el electrodom stico para otro prop sito PRECAUCIONES Y RECOMENDACIONES IMPORTANTES PARA EL USO DE ELECTRODOMESTICOS El uso de cualquier el...

Page 36: ...iado de la puerta del horno por ej Pararse sentarse o apoyarse en ella puede resultar en riesgos potenciales y o da os 8 Cuando instale o retire la cocina para darle mantenimiento use un carrito desli...

Page 37: ...iarizado con los niveles apropiados de Mon xido de Carb n para cada electrodom stico La Asociaci n Americana de Gas publica las emisiones de CO para electrodom sticos y equipos de calefacci n a trav s...

Page 38: ...da en la l nea de entrada de gas principal ENCENDIENDO LAS HORNILLAS DE GAS Para encender las hornillas ud debe 1 Girar la perilla en sentido anti horario hasta la posici n m xima presione la perilla...

Page 39: ...rolas COMO USAR EL HORNO DE GAS CARACTERISTICAS GENERALES El horno viene con dos Calentadores a Calentador del horno instalado en la parte baja del horno b Calentador de parrilla instalado en la parte...

Page 40: ...trol fig 8 indican la temperatura creciente del horno en grados F Para regular la temperatura gire la perilla hasta que el indicador apunte al grado de temperatura elegido La posici n BROIL sirve sola...

Page 41: ...horno se encienda En caso que falte la electricidad presione la perilla e inmediatamente acerque un f sforo encendido a la apertura A Nunca contin e esta operaci n por m s de 15 segundos Si el calent...

Page 42: ...r el sonido Click contin e presionando la perilla hasta que el calentador de la parrilla est encendido En caso que se apague presione la perilla e inmediatamente acerque un f sforo encendido a la aper...

Page 43: ...ebe usar siempre con la puerta del horno cerrada Posicione la rejilla en el segundo nivel de arriba hacia abajo Encienda el calentador de la parrilla tal como explicado en los p rrafos anteriores y pr...

Page 44: ...nte Siempre use guantes protectores apropiados cuando inserte o remueva la bandeja de parrilla rejillas ollas cacerolas u otros utensilios de cocina en el horno Atenci n la cocina se calienta mucho du...

Page 45: ...cloro o cida El horno siempre debe ser limpiado despu s de cada uso usando productos apropiados y teniendo en cuenta que operar la cocina por 30 minutos a la temperatura m xima elimina la mugre reduc...

Page 46: ...as seque bien las hornillas y las tapitas distribuidoras de la llama y col quelas nuevamente en su sitio Es muy importante verificar que la tapita distribuidora de llama sea colocada correctamente de...

Page 47: ...IRO DE LA REJILLA DEL HORNO GAVETA DE ALMACENAJE REMOVIBLE La gaveta se usa como cualquier otra gaveta Para sacarla h lela hacia afuera y arriba No almacene materiales inflamables en el horno o en la...

Page 48: ...e materiales inflamables en la gaveta REEMPLAZANDO LA LUZ DEL HORNO Antes que se efect e cualquier mantenimiento de partes el ctricas del electrodom stico aseg rese que est desenchufado de la fuente d...

Page 49: ...e pl stico Asegure el elemento anti volteo al piso usando los tornillos inclu dos en el paquete Deslice el electrodom stico para encajarlo con el elemento anti volteo NOTA Si la cocina luego es movida...

Page 50: ...___________________________ Address Date Purchased Store Dealer Name __________________________________ ______________________________________ City State Zip Occupation _______________________________...

Page 51: ...51 PRINTED IN CHINA Ver 002 12 6 2012...

Reviews: