background image


28 

INSTRUCCIONES EN ESPAÑOL 


Antes de usar su artefacto, debe posicionarlo correctamente e instalarlo tal como se 
describe en este manual, así que lea el manual cuidadosamente.  Para reducir el riesgo de 
incendio, choque eléctrico o daño cuando use la cocina, siga las precauciones básicas, 
incluyendo las siguientes: 
  
  
DANGER 
  

  Se recomienda usar un circuito separado, que sirva solamente para esta cocina.  

Use receptáculos que no se puedan apagar con un interruptor o cadena. 

  Nunca limpie la cocina o sus partes con líquidos inflamables.  Los vapores de estos 

podrían ocasionar un incendio o explosión.  No almacene o use gasolina u otros 
líquidos o gases inflamables cerca a éste u otro artefacto eléctrico.  Los vapores 
podrían ocasionar un incendio o explosión. 

  Asegúrese que el enchufe del artefacto este desconectado de la electricidad antes 

de empezar a limpiarlo o repararlo. 

   Si no desconecta el artefacto de la electricidad, podría ocasionar un choque 

eléctrico o muerte.  

  No intente reparar o reemplazar ninguna parte de su artefacto a no ser que esté 

específicamente recomendado en este manual.  Cualquier otro mantenimiento debe 
ser realizado por un técnico calificado. 

 WARNING 
  

  Este artefacto no se debe usar como calentador de ambiente.  La superficie de la 

unidad se deber operar solamente cuando tenga recipientes sobre ella.  Esta 
información está basada en consideraciones de seguridad.  

  Todas las aperturas en la pared detrás de este artefacto y en el piso debajo, deben 

estar selladas.  

  Mantenga el área de este artefacto despejada y libre de materiales combustibles, 

gasolina, y otros vapores o líquidos inflamables.  

  No obstruya el flujo de ventilación del aire.  

  Desconecte el suministro eléctrico del artefacto antes de darle mantenimiento.  

  Cuando mueva el artefacto para limpiarlo o darle mantenimiento: 

o

  Desconecte el suministro de electricidad. 

o

  Hale la cocina hacia Ud. cuidadosamente. 

PRECAUCION: La cocina es muy pesada. Sea cuidadoso cuando la 
manipule. 

  El uso descuidado de la puerta del horno (ej. Pararse, sentarse o apoyarse contra él) 

puede ocasionar peligros potenciales y/o daños.  

  Use una carretilla para movilizar la cocina cuando la instale o retire.  No empuje los 

lados o esquinas de la cocina para instalarla o empujarla en el sitio de instalación.  
Empujarla o jalarla (en lugar de usar una carretilla) también aumenta la posibilidad 
de doblar las patas o los conectores internos.  

  Es importante que la cocina esté nivelada para que funcione apropiadamente.  Tal 

vez sea necesario hacer unos cuantos ajustes para poder nivelarla.  

  Nunca permita que los niños operen, jueguen o gateen dentro de la cocina.  

  Instrucciones para electricidad a tierra – El artefacto debe ser instalado y conectado 

a tierra por un técnico calificado, de acuerdo con los Códigos Eléctricos Nacionales 
ANSI/NFPA No. 70 (ultima edición) y los códigos eléctricos locales establecidos.  

  Partes de reemplazo – Solo use partes de reemplazo autorizadas cuando de 

mantenimiento a esta cocina.  Las partes de reemplazo autorizadas se pueden 
conseguir en los distribuidores de partes autorizados.  Contacte el centro de servicio 
de Avanti más cercano. 

Summary of Contents for ELECRIC RANGE ER2401G

Page 1: ...OW ALL SAFETY RULES AND OPERATING INSTRUCTIONS AND SAVE FOR LOCAL ELECTRICAL INSPECTOR S USE La sección en español empieza en la página 28 Avanti Products has a policy of continuous improvement on its products and reserves the right to change materials and specifications without notice Avanti Products A Division of The Mackle Co Inc P O Box 520604 Miami Florida 33152 www avantiproducts com ...

Page 2: ...2 THIS PAGE LEFT BLANK INTENTIONALLY ...

Page 3: ...ing the Range 17 Anti tip Bracket Installation 18 Operating Your Electric Range 19 Control Panel 19 20 Using the Surface Unit 20 Cookware Tips 20 Using the Oven 21 22 Care and Maintenance 23 General Information 23 Cleaning Your Range 23 Cleaning Surface Units and Reflector Bowls 23 Lift up Cooktop 24 Removable Storage Drawer 24 Replacing the Oven Light 24 Troubleshooting Guide 25 Service for Your ...

Page 4: ...4 THIS PAGE LEFT BLANK INTENTIONALLY ...

Page 5: ...______ Serial Number Use these numbers in any correspondence or service calls concerning your Electric Range If you received a damaged Electric Range immediately contact the dealer or builder that sold you the Electric Range Save time and money Before you call for service check the Troubleshooting Guide It lists causes of minor operating problems that you can correct yourself IF YOU NEED SERVICE W...

Page 6: ...6 THIS PAGE LEFT BLANK INTENTIONALLY ...

Page 7: ...DANGER WARNING or CAUTION These words mean Danger means that failure to heed this safety statement may result in severe personal injury or death Warning means that failure to heed this safety statement may result in extensive product damage serious personal injury or death Caution means that failure to heed this safety statement may result in minor or moderate personal injury or property or equipm...

Page 8: ...the floor under the appliance shall be sealed Keep appliance area clear and free from combustible materials gasoline and other flammable vapors Do not obstruct the flow of ventilation air Disconnect the electrical supply to the appliance before servicing When removing appliance for cleaning and or service Disconnect AC power supply Carefully remove the range by pulling outward CAUTION Range is hea...

Page 9: ...ever the range can tip if you apply too much force or weight to the open door without the anti tip bracket fastened down properly To reduce the risk of tipping the appliance the appliance must be secured by properly installed anti tip devices packed with the appliance ...

Page 10: ... 11 ANTI TIP BRACKET 3 6 BURNERS 3 12 BROIL HEATING ELEMENT 4 COOKTOP 13 OVEN LIGHT 5 8 BURNER 1 14 BROILER TRAY AND GRID 6 CONTROL PANEL 15 WIRE RACKS 2 7 OVEN DOOR HANDLE 16 BAKE ELEMENT NOT SHOWN 8 GLASS OVEN DOOR 17 REMOVABLE STORAGE DRAWER 9 LEVELING LEGS ...

Page 11: ...Smother fire or flame or use dry chemical or foam type extinguisher Use Only Dry Potholders Moist of damp potholders on hot surfaces may result in burns from steam Do not let potholder touch hot heating elements Do not use a towel or other bulky cloth Use Proper Pan Size This appliance is equipped with one or more surface units of different size Select utensils having flat bottoms large enough to ...

Page 12: ...Oven Vent Ducts Unobstructed Placement of Oven Racks Always place oven racks in desired location while oven is cool If rack must be moved while oven is hot do not let potholder contact hot heating element in oven Do Not Touch Surface Units Heating Elements Interior Surfaces of Oven or Areas Near Units Surface units and heating elements may be hot even though they are dark in color Area near surfac...

Page 13: ...RTANT This range is designed and manufactured solely for the cooking of domestic household food and is not suitable for any non domestic application and therefore should not be used in a commercial environment The range warranty will be void if the range is used within a non domestic environment i e a semi commercial commercial or communal environment NOTICE Before you use this range for the first...

Page 14: ...ecome entrapped in the oven door Do not line the oven walls with aluminum foil Do not place shelves pans backing trays broil tray or other cooking utensils on the base of the oven chamber The manufacturer declines all liability for injury to persons or damage to property caused by incorrect or improper use of the range To avoid any possible hazard the appliance must be installed by qualified perso...

Page 15: ...15 INSTALLATION OF ELECTRIC RANGE Product Dimensions Model ER2001G ER2002CSS Model ER2401G ER2402CSS Installation Figure Model ER2001G ER2002CSS Model ER2401G ER2402CSS ...

Page 16: ...nd local electrical code requirements Installation should be made by a licensed electrician The range may be connected by means of permanent Hard Wiring or Power Supply Cord Kit Power supply cord is not supplied but is available through your local electric supply house Use only 3 conductor or 4 conductor UL listed range cord rated at 40 amps with 125 250V minimum voltage range These cords may be p...

Page 17: ...he back of range by removing the 2 fixing screws Assemble the strain relief in the hole on bracket Insert the power cord through the strain relief and tighten Allow enough slack to easily attach the cord terminals to the terminal block Remove the 3 wire terminal nuts and washers from the terminal block Remove the ground strap from the frame of range and terminal by removing its screw and cutting i...

Page 18: ...ppliance Place the anti tip bracket on the floor as shown figure Anti tip bracket can be installed on either right or left side Make the locations of 2 holes of ant tip bracket on the floor Use a 5 16 masonry drill bit and insert plastic anchor Secure bracket to floor using screws supplied Slide appliance into position NOTE If range is relocated the bracket must be removed and installed in new loc...

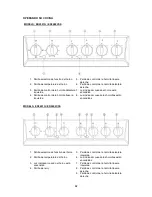
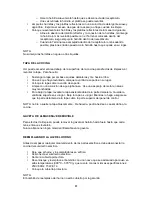
Page 19: ...ner Control Knob 7 Oven Power Indicator Light 4 Rear Left Burner Control Knob 8 Burners Power Indicator Light MODELS ER2401G ER2402CSS 1 Oven Function Selector Knob 5 Front Left Burner Control Knob 2 Oven Thermostat Knob 6 Burners Power Indicator Light 3 Oven Power Indicator Light 7 Rear Left Burner Control Knob 4 Kitchen Timer Knob 8 Rear Right Burner Control Knob 9 Front Right Burner Control Kno...

Page 20: ...rol has a variable of power output from LO to HI with a number of positions The range of heat is increased by turning the knob to HI decreased by turning the knob to LO The solid dot in the surface unit mark shows which surface unit is activated by that knob IMPORTANT To switch on always lightly press the control knob inwards then turn COOKWARE TIPS The physical characteristics of pots and pans in...

Page 21: ...at elements are switched or switched Temperature Setting Table Knob Setting Temperature in F Temperature in C WARM 150 65 200 200 93 250 250 121 300 300 149 350 350 177 400 400 204 450 450 232 FUNCTION SELECTOR KNOB Rotate the knob clockwise to set the oven for one of the following functions Oven Light The oven is equipped with a light that illuminates the oven to enable visually controlling the f...

Page 22: ...on fire Do not broil without using the broiler pan 2 Position the broiler pan on the second level from the top 3 Turn the function selector knob to the Broil position 4 Turn the thermostat control knob to the desired temperature 5 The upper heat element will cycle and to maintain the selected temperature For best results the oven should be preheated 5 minutes before adding the food to be broiled T...

Page 23: ...hen cleaning area of the controls or any electrical parts Wash the outside cabinet with warm water and mild liquid detergent Rinse well and wipe dry with a clean soft cloth Do not use steel wool or steel brush on the cook top UCLEANING SURFACE UNITS AND REFLECTOR BOWLS Disconnect the A C from the main power box or designated circuit breaker and turn off the range to make sure that burners are off ...

Page 24: ...he front edge of cooktop covers the upper edge of control panel NOTE Do not drop the cooktop Personal injury or damage to the cooktop frame could result REMOVABLE STORAGE DRAWER For cleaning you can remove the drawer by pulling it out until the stop point and lifting it up Never store any flammable material in the drawer UREPLACING THE OVEN LIGHT Before any maintenance is started involving electri...

Page 25: ...not plugged in all the way You have not set the control knobs correctly Control knobs will not turn If it is a surface unit control knob you are not pushing in before turning If it is oven control knob you are trying to turn the knob to wrong direction Oven light does not work Light bulb is loose or defective Switch operating oven light is broken Oven does not work You have blown a household fuse ...

Page 26: ...elivered directly to your home by personal check money order Master Card or Visa In Home Repair Service 800 220 5570 An Avanti Products authorized service center will provide expert repair service scheduled at a time that is convenient for you Our trained servicers know your appliance inside and out WIRING DIAGRAM 240V 60Hz BL WH RED BK L2 L1 E H1 H2 P2 L2 P1 L1 P3 5 P1 P2 2 1 3 4 THERMOSTAT 240V ...

Page 27: ... excessive moisture or extended exposure to humidity lightning power surges structural failures surrounding the appliance and acts of God Content losses of food or other content due to spoilage Incidental or consequential damages Parts and labor costs for the following will not be considered as warranty Evaporator doors door springs and or frames Inner door panels door shelves door rails and or do...

Page 28: ...so debajo deben estar selladas Mantenga el área de este artefacto despejada y libre de materiales combustibles gasolina y otros vapores o líquidos inflamables No obstruya el flujo de ventilación del aire Desconecte el suministro eléctrico del artefacto antes de darle mantenimiento Cuando mueva el artefacto para limpiarlo o darle mantenimiento o Desconecte el suministro de electricidad o Hale la co...

Page 29: ... por un técnico calificado de acuerdo a los Códigos Nacionales Eléctricos ANSI NFPA No 70 ultima edición y los códigos eléctricos locales requeridos La instalación debe ser hecha por un electricista licenciado o La cocina debe ser conectada de forma permanente con Cables Fijos o un Juego de Cables de Suministro Eléctrico El cable de suministro eléctrico no se incluye pero está disponible a través ...

Page 30: ...tire la placa de acceso del bloque terminal que se encuentra en la parte de atrás de la cocina removiendo los 2 tornillos o Ensamble el interruptor en el agujero del soporte o Inserte el cordón eléctrico al interruptor y ajuste o Deje suficiente espacio para conectar las terminales de cordón al bloque teminal fácilmente o Retire las 3 arandelas y tuercas de alambre del bloque terminal o Retire el ...

Page 31: ...soporte para evitar que la cocina se voltee en el piso tal como se muestra en la página 15 El soporte puede ser instalado tanto en el lado derecho como en el izquierdo o Marque en el piso el lugar donde coincidirán los dos agujeros del soporte o Use un taladro de 5 16 e inserte un ancla de plástico o Asegure el soporte al piso usando los tornillos que incluímos o Coloque la cocina en su sitio NOTA...

Page 32: ...lla de control de la hornilla trasera izquierda 8 Luz indicador cuando las hornillas están encendidas MODELS ER2401G ER2402CSS 1 Perilla selectora de function del horno 5 Perilla de control de la hornilla delantera izquierda 2 Perilla de temperatura del horno 6 Luz indicador cuando las hornillas están encendidas 3 Luz indicador cuando el horno está encendido 7 Perilla de control de la hornilla tra...

Page 33: ... una serie de posiciones numéricas entre la alta y la baja El nivel de temperatura se incrementa al girar la perilla hacia la temperatura HI y se baja al girar la perilla hacia la temperatura LO El punto sólido en la superficie de la cocina indica cual de las hornillas está siendo activada por cada perilla IMPORTANTE Para encender siempre presione ligeramente la perilla de control y luego gírela C...

Page 34: ...e la cocina para evitar voltearlas por accidente Esto también dificultará que los niños alcancen las ollas y o sartenes USANDO EL HORNO Puede usar el horno para BAKE hornear y BROIL asar Por ese motivo el horno tiene dos calentadores diferentes los cuales son Calentador de BAKE 2100 W calentador inferior Calentador de BROIL 2000W calentador superior PRECAUCION La puerta del horno se calienta mucho...

Page 35: ...ara obtener mejores resultados recuerde siempre que el aire caliente debe circular alrededor de los recipientes que estén dentro del horno para que el aire caliente sea uniforme y alcance todas las partes del horno Por tanto coloque los recipientes en el centro del horno y deje por lo menos 2 pulgadas de espacio entre los recipientes y el horno Broil asar En esta función solamente el calentador de...

Page 36: ... mayoría de residuos reduciéndolos a cenizas LIMPIANDO SU COCINA Desconecte el suministro eléctrico A C de la caja general o interruptor verifique que la cocina esté apagada y que todas las hornillas estén apagadas y frías antes de mover nada Luego retire todos las piezas incluyendo las rejillas Limpie las superficies interiores con una solución de agua tibia y polvo de hornear La solución deber s...

Page 37: ...ue la varilla de soporte en su lugar Coloque la tapa sobre la varilla de soporte Limpie con una solución de agua jabonosa Use una esponja de metal en áreas muy manchadas Para bajar la tapa levante la tapa sosteniéndola de la parte delantera Guarde la varilla de soporte en su lugar Baje la tapa a su lugar Mientras lo haga asegúrese que la parte delantera de la tapa cubra la parte superior del panel...

Page 38: ...nilla no está bien conectada al receptáculo No uso la perilla de control correctamente Los controles de temperatura no giran Si es una perilla de control de hornillas presiónela antes de girarla Si es una perilla de control del horno debe girarla en sentido horario La luz del horno no funciona El bombillo está suelto o está quemado El interruptor de encender la luz del horno está roto El horno no ...

Page 39: ...o best meet your future needs detach here Avanti Registration Card Name Model Serial Address Date Purchased Store Dealer Name City State Zip E mail Address Area Code Phone Number Occupation Did You Purchase An Additional Warranty As your Primary Residence Do You Extended Own Rent None Your Age Reason for Choosing This Avanti Product Please indicate the most important factors That influenced your d...

Page 40: ...40 Electric ranges VER 3 0 02 29 2012 PRINTED IN CHINA ...

Reviews: