background image


15 


LEVELING THE RANGE


The range must be level to obtain proper operating. The four screws 
type leveling legs located on the corners at the bottom of range should 
be adjusted by turning them clockwise to make the range higher or 
counter-clockwise to lower the range until the range is level. Use a level 
on surface units to check the leveling of the range. 


ANTI-TIP BRACKET INSALLATION


To reduce the risk of tipping the range by abnormal usage or improper door loading, the range must 
be secured by properly installing the anti-tip device packed with the appliance. 


Place the anti-tip bracket on the floor as shown figure. Anti-tip bracket can be installed on either 
right or left side. 


Make the locations of 2 holes of ant-tip bracket on the floor. 


Use a 5/16” masonry drill bit and insert plastic anchor. 


Secure bracket to floor using screws supplied. 


Slide appliance into position. 


NOTE: 

If range is relocated, the bracket must be removed and installed in new location. 


Summary of Contents for ER20P0W

Page 1: ...ASE READ AND FOLLOW ALL SAFETY RULES ANDOPERATING INSTRUCTIONS AND SAVE FOR LOCAL ELECTRICAL INSPECTOR S USE La secci n en espa ol empieza en la p gina 25 Avanti Products has a policy of continuous im...

Page 2: ...g the Range 15 Anti tip Bracket Installation 15 Operating Your Electric Range 16 Control Panel 16 Using the Surface Unit 17 Cookware Tips 17 Using the Oven 18 19 Care and Maintenance 20 General Inform...

Page 3: ..._____ Serial Number Use these numbers in any correspondence or service calls concerning your Electric Range If you received a damaged Electric Range immediately contact the dealer or builder that sold...

Page 4: ...DANGER WARNING or CAUTION These words mean Danger means that failure to heed this safety statement may result in severe personal injury or death Warning means that failure to heed this safety statemen...

Page 5: ...eep appliance area clear and free from combustible materials gasoline and otherflammable vapors Do not obstruct the flow of ventilation air Disconnect the electrical supply to the appliance before ser...

Page 6: ...wever the range can tip if you apply toomuch force or weight to the open door without the anti tip bracket fastened down properly To reduce the risk of tipping the appliance the appliance must be secu...

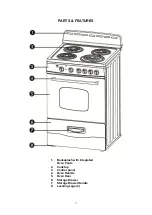
Page 7: ...7 PARTS FEATURES 1 Backsplash with integrated Oven Vents 2 Cooktop 3 Control panel 4 Oven Handle 5 Oven Door 6 Storage Drawer 7 Storage Drawer Handle 8 Leveling Legs 4...

Page 8: ...ther fire or flame or use dry chemical or foam type extinguisher Use Only Dry Potholders Moist of damp potholders on hot surfaces may result in burns from steam Do not let potholder touch hot heating...

Page 9: ...en Vent Ducts Unobstructed Placement of Oven Racks Always place oven racks in desired location while oven is cool If rack must be moved while oven is hot do not let potholder contact hot heating eleme...

Page 10: ...pector s use and for future reference Please observe all local and national codes and ordinances IMPORTANT This range is designed and manufactured solely for the cooking of domestic household food and...

Page 11: ...come entrapped in the oven door Do not line the oven walls with aluminum foil Do not place shelves pans backing trays broil tray or other cooking utensils on the base of the oven chamber The manufactu...

Page 12: ...d locating the unit in moist areas As this may result in the risk of electrical shock ELECTRICAL CONNECTION The range may be connected by means of permanent Hard Wiring or Power Supply Cord Kit Power...

Page 13: ...13...

Page 14: ...center of terminal block The power leads must be connected to L1 and L2 Plug washers and tighten nuts securely Assemble the Terminal Block Access Plate 4 Wire Power Cord Installation Remove the Termin...

Page 15: ...ION To reduce the risk of tipping the range by abnormal usage or improper door loading the range must be secured by properly installing the anti tip device packed with the appliance Place the anti tip...

Page 16: ...Timer Digital or Mechanical Knob depending on your specific model 5 Rear Left Burner Control Knob 2 Indicator Lights 6 Front Right Burner Control Knob 3 Oven Temperature Knob 7 Rear Right Burner Cont...

Page 17: ...is activated by that knob IMPORTANT To switch on always lightly press the control knob inwards then turn COOKWARE TIPS The physical characteristics of pots and pans influence the performance of any c...

Page 18: ...r an alarm tone Clock To set the clock press and hold the SET button for once clock indicator will light when the hour position flash adjust the hour by pressing the up or down button press SET when d...

Page 19: ...he position open door fully and remove the food Always remember that when the oven is hot outside surfaces of the range get hot IMPORTANT Always use suitable protective gloves when inserting removing...

Page 20: ...en cleaning area of the controls or any electrical parts Wash the outside cabinet with warm water and mild liquid detergent Rinse well and wipe drywith a clean soft cloth Do not use steel wool or stee...

Page 21: ...panel NOTE Do not drop the cooktop Personal injury or damage to the cooktop frame could result REMOVABLE STORAGE DRAWER Lift the left small hook upward at the same time push the right small hook down...

Page 22: ...t plugged in all the way You have not set the control knobs correctly Control knobs will not turn If it is a surface unit control knob you are not pushing in before turning If it is oven control knob...

Page 23: ...here for you Just call us toll free AVANTI PRODUCTS CUSTOMER SERVICES Product Information 800 323 5029 Whatever your questions are about our products help is available Part Orders 800 220 5570 You may...

Page 24: ...ithout limitation rain wind sand floods fires mud slides freezing temperatures excessive moisture or extended exposure tohumidity lightning power surges structural failures surrounding the appliance a...

Page 25: ...uras en la pared detr s de este artefacto y en el piso debajo deben estar selladas Mantenga el rea de este artefacto despejada y libre de materiales combustibles gasolina y otros vapores o l quidos in...

Page 26: ...entra da ado haga que un Centro de Servicio autorizado por Avanti Products lo reemplace o El electrodom stico debe se propiamente instalado y conectado a tierra por un t cnico calificado de acuerdo a...

Page 27: ...res o Coloque las arandelas y tuercas y aj stelas o Ensamble la placa de acceso del bloque Terminal INSTALACION DEL CORDON DE 4 ALAMBRES o Retire la placa de acceso del bloque terminal que se encuentr...

Page 28: ...do con la cocina o Coloque el soporte para evitar que la cocina se voltee en el piso tal como se muestra en la p gina 18 El soporte puede ser instalado tanto en el lado derecho como en el izquierdo o...

Page 29: ...29...

Page 30: ...ctivo 5 Perilla de control del quemador Trasero Izquierda 2 Luces indicadoras 6 Perilla de control del quemador Frente Derecha 3 Perilla de control del horno 7 Perilla de control del quemador Trasero...

Page 31: ...eratura con una serie de posiciones num ricas entre la alta y la baja El nivel de temperatura se incrementa al girar la perilla hacia la temperatura HI y se baja al girar la perilla hacia la temperatu...

Page 32: ...s manijas de las ollas no sobresalgan del borde de la cocina para evitar voltearlas por accidente Esto tambi n dificultar que los ni os alcancen las ollas y o sartenes USANDO EL HORNO Puede usar el ho...

Page 33: ...tes del horno Por tanto coloque los recipientes en el centro del horno y deje por lo menos 2 pulgadas de espacio entre los recipientes y el horno Broil asar En esta funci n solamente el calentador de...

Page 34: ...por 30 minutos en la temperatura m s alta elimina la mayor a de residuos reduci ndolos a cenizas LIMPIANDO SU COCINA Desconecte el suministro el ctrico A C de la caja general o interruptor verifique...

Page 35: ...tapa por ambas esquinas delanteras y tire hacia arriba Una vez que haya levantado coloque las varillas de soporte en su lugar Coloque la tapa sobre la varillas de soporte Limpie con una soluci n de a...

Page 36: ...quemado o el interruptor apagado La hornilla no est bien conectada al recept culo No uso la perilla de control correctamente Los controles de temperatura no giran Si es una perilla de control de horni...

Page 37: ...37 Rating label location 240V 2015 08 20 ER20P0WG 240V 2015 08 20 240V 2015 08 20 ER20P3SG 240V 2015 08 20 240V 2015 08 20...

Page 38: ...38...

Page 39: ...future needs detach here Avanti Registration Card Name Model Serial Address Date Purchased Store Dealer Name City State Zip E mail Address Area Code Phone Number Occupation Did You Purchase An Additi...

Page 40: ...40 Electric ranges VER 07 9 15 PRINTED IN CHINA...

Reviews: