background image


- 21 -

OPTIONS AND FEATURES 


19.


Courtesy Lamp


The in built Courtesy Lamp will switch on each time the AGDO is activated and then switch off 
automatically 90 sec after receiving the last Hand Transmitter or run signal.


In order to conserve remaining battery power the Courtesy Light will not function once battery voltage falls 
below 24V. (Battery Powered AGDO only)


Bulb Replacement 


Hinge open the Courtesy Lamp Cover to expose the bulb (Fig.18-A) 


Remove the bulb by first pushing-in and then turning anti clockwise (same as removing and replacing a 
household light bulb) 


Replace bulb with identical 24V 20W Incandescent 


Close the Courtesy Lamp Cover 


Important Note: Replacing the bulb with 12V version will cause the transformer to overheat and may 
permanently damage the transformer and Control Board. Always ensure that replacement bulb is 
rated at 24V and no more than 20W.


20.


Dip Switches 


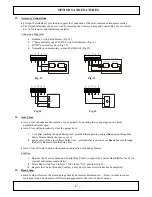
The Dip Switches located on the Control Board (Fig.16) enable or disable specific functionality. 


The Dip Switches can be accessed by removing the Courtesy Lamp and Control Box Covers (Refer Sec.18 
for removal and replacement details) 


Read through the following table and select the specific functionality best suited your specific personal or 
garage door requirements. 


Functionality Table 


Function 


       Dip No.           Dip Position   Details 


Adaptive Mode (A/M) – Enable  


ON 


Sec.12.1 

Manual Mode (A/M) – Enable   


OFF 


Sec.12.2 

Safety Beams (SB) - Enable 


ON 


Sec.26 

Safety Beams (SB) – Disable 


OFF 


Sec.26 

Auto Close (AC) - Enable 


         2 & 3 


ON 


Sec.14 

Auto Close (AC) – Disable 


OFF 


Sec.14 

Door Service Monitor (DSM) – Enable   


ON 


Sec.21 

Door Service Monitor (DSM) – Disable   


OFF 


Sec.21 

Soft 

Stop 

(SS) 

– 

Enable 

   5 

 ON 

 Sec.29 


Soft Stop (SS) – Disable 


             5 


OFF 


Sec.29 

Back Jump (BJ) – Enable 


ON 


Sec.15 

Back Jump (BJ) – Disable 


OFF 


Sec.15 

Safety Reverse - Partial (PR) 


7  


ON 


Sec.27 

Safety Reverse - Full (PR)* 


OFF 


Sec.27 

*Not available within battery powered AGDO 


Enabling 


Remove the Courtesy Lamp and Control Box Covers to expose the Control Board (Refer Sec.18 for removal 
and replacement details) 


Select the Dip Switches as required to enable the desired functionality (Fig.16) 


Replace the Control Box and Courtesy Lamp Covers 


21.


Door Service Monitor (DSM) 


Door Service Monitor will monitor the spring balance of the garage door by logging the run time differential 
between open and close cycles.  


Summary of Contents for SDO-21 DP

Page 1: ...1...

Page 2: ...2...

Page 3: ...ustments 12 Engaging Disengaging 12 Door Travel Adjustment 13 Safety Obstruction Force Adjustment 13 Adaptive Mode 14 Manual Mode 15 Options and Features 17 Accessory Connections 17 Auto Close 17 Back...

Page 4: ...ecome rusty over time resulting in additional operating friction between the coils which may cause the AGDO to malfunction b Seasonal temperature changes may cause the garage door springs to expand an...

Page 5: ...lways ensure that the garage door is fully open stationary before driving in or out of the garage 26 Always ensure the garage door is fully closed and stationary before moving out of its view 27 Adjus...

Page 6: ...Rail OR mounted on the ceiling next to Drive Rail OR mounted on side wall of garage optional cable extension kit required Drive Rail supported by Drive Rail Hanger which is mounted flush to the ceili...

Page 7: ...into the Tensioning Block Fig 3B D1 Ensure that the plastic chain insulator ends are fully abutted and form one continuous piece Insert the Terminal Bracket Fig 3 E into the Drive Rail Segment closest...

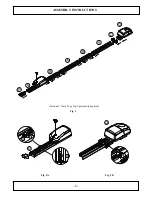
Page 8: ...8 ASSEMBLY INSTRUCTIONS Sectional Track Type Tip Up assembly depicted Fig 3 Fig 3A Fig 3B...

Page 9: ...tability of the fixing points b Mounting the Drive Rail more than 50mm above the Highest Arcing Point of the garage door may cause the Drive Rail to flex excessively Always ensure that the bottom edge...

Page 10: ...underside of the Drive Rail should be no more than 50mm above the highest arcing point for its entire length Mounting the Drive Rail more than 50mm above the Highest Arcing Point of the garage door m...

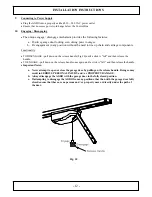
Page 11: ...the installer to determine the structural suitability of the fixing points 8 Attaching Towing Arms Close the garage door Remove the Drive Unit cover and insert the Straight Towing Arm through the slot...

Page 12: ...NGAGE pull down on the release handle Fig 10 until a click is felt and then release the handle TO ENGAGE pull down on the release handle once again until a click is felt and then release the handle Im...

Page 13: ...Fig 11 Loosen the Limit Prong Lock Screw by half a turn and slide the Prong towards the Control Box to increase garage door travel and away from the Control Box to decrease travel Re tighten the Limit...

Page 14: ...lash Important Note During initial power up learning the Safety Obstruction Force values of the AGDO default to a maximum setting Encounter a solid obstruction during the course of the initial learnin...

Page 15: ...s The LED Indicator will cease to quick flash once learning has been completed Important Note During a Forced Learn the Safety Obstruction Force values default to a maximum setting Encounter a solid o...

Page 16: ...rotate the green Open Offset Adjustment Pin 5 degrees in the appropriate direction clockwise to increase force anti clockwise to decrease force and then repeat the previous testing steps Safety Obstr...

Page 17: ...ill automatically close the garage door i 3 sec after reaching the open limit point provided that a person or object has passed through the Safety Beams during the open cycle or ii upon expiry of the...

Page 18: ...The Battery Charger provided with Battery Powered AGDO only should be plugged in to a dedicated power supply and remain permanently on A red LED located on the back of the charger will glow solid to...

Page 19: ...ols from which the AGDO may be adjusted and functionality customized to suit individual requirements Most commonly used functionality controls are accessible from within the Courtesy Lamp Cover Less c...

Page 20: ...Note the Control Box Cover can be removed once the head of the screw is protruding by approx 5mm v remove the Control Box Cover by pulling first outwards and then downwards at the finger recess points...

Page 21: ...ntrol Box Covers Refer Sec 18 for removal and replacement details Read through the following table and select the specific functionality best suited your specific personal or garage door requirements...

Page 22: ...smitter button LED Indicator will extinguish v momentarily press the Hand Transmitter button again LED Indicator will begin to quick flash rapidly programming is completed once the LED Indicator cease...

Page 23: ...til garage door is fully closed Sleep Mode Press and hold in conjunction with Learn Button 26 Safety Beams Genuine 2 wire or aftermarket 4 wire Safety Beams may be connected to the AGDO The installati...

Page 24: ...ion If the garage door commences a close cycle but within 1 second stops and reverses check that the Safety Beams are aligned correctly as outlined in Alignment Override In the event of Safety Beam ma...

Page 25: ...imum speed Note Available only when Adaptive Mode has been selected Adjustment To enter Speed Control adjustment mode i move the Drive Unit so that it is positioned mid way between the 2 Limit Adjust...

Page 26: ...late and mounting instructions provided with the switch The Wireless Wall Switch may be learned into be AGDO as per the procedure outlined on Sec 22 Code Learning Important Note The wireless Wall Swit...

Page 27: ...active 18 17 1 Door requires excessive force Check for correct Safety Obstruction Force adjustment settings 13 12 to Safety Reverse Door requires excessive force Check for correct Safety Obstruction F...

Page 28: ...28 NOTES...
Reviews: