background image


8

  After plugging the appliance into a wall outlet, allow the unit to cool down for 2-3 hours before 

placing items in the compartment.


¾


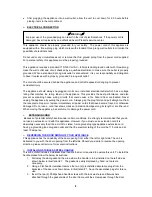
ELECTRICAL CONNECTION 


This appliance should be properly grounded for your safety.  The power cord of this appliance is 
equipped with a three-prong plug which mates with standard three prong wall outlets to minimize the 
possibility of electrical shock. 
 
Do not under any circumstances cut or remove the third ground prong from the power cord supplied. 
For personal safety, this appliance must be properly grounded. 
 
This appliance requires a standard 115/120 Volt AC ~/60Hz electrical ground outlet with three-prong. 
Have the wall outlet and circuit checked by a qualified electrician to make sure the outlet is properly 
grounded. When a standard 2-prong wall outlet is encountered, it is your responsibility and obligation 
to have it replaced with a properly grounded 3-prong wall outlet.  
 
The cord should be secured behind the appliance and not left exposed or dangling to prevent 
accidental injury. 


The appliance should always be plugged into its own individual electrical outlet which has a voltage 
rating that matches the rating label on the appliance. This provides the best performance and also 
prevent overloading house wiring circuits that could cause a fire hazard from overheated. Never 
unplug the appliance by pulling the power cord.  Always grip the plug firmly and pull straight out from 
the receptacle. Repair or replace immediately all power cords that have become frayed or otherwise 
damaged. Do not use a cord that shows cracks or abrasion damage along its length or at either end. 
When moving the appliance, be careful not to damage the power cord. 
 

¾


EXTENSION CORD 

 Because of potential safety hazards under certain conditions, it is strongly recommended that you do 
not use an extension cord with this appliance. However, if you must use an extension cord it is 
absolutely necessary that it be a UL/CUL-Listed, 3-wire grounding type appliance extension cord 
having a grounding type plug and outlet and that the electrical rating of the cord be 115 volts and at 
least 10 amperes. 
 

¾


REVERSING THE DOOR SWING OF YOUR APPLIANCE 

This appliance has the capability of the door opening from either the left or right side. The unit is 
delivered to you with the door opening from the left side. Should you desire to reverse the opening 
direction, please call service for reversal instructions. 


¾


INSTALLING STAINLESS STEEL HANDLE 

This wine chiller includes a stainless steel handle that is not required to operate this unit. To install the 
handle please follow the below instructions: 

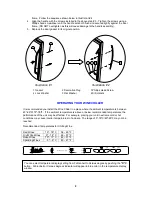
1.  Pull away the door gasket in the area where the handle is to be installed on the left side as 

shown below in Illustration # 1.  The gasket is easily displaced by hand, no tools are 
necessary. 

2.  Using a Flat head screwdriver remove the two (2) pre-installed decorative plugs from the 

backside of the door as shown below in Illustration #1.  Save the decorative plugs for future 
use. 

3.  Insert the two (2) Phillips head handle screws with the lock washers and flat washers 

attached through the gasket side of the door frame until the screws pass through the door 

a

Warning

a


Improper use of the grounded plug can result in the risk of electrical shock. If the power cord is 
damaged, have it replaced by an authorized Avanti Products service center. 

Summary of Contents for WC400SS

Page 1: ...AFETY RULES AND OPERATING INSTRUCTIONS La sección en español empieza en la página 15 Avanti Products has a policy of continuous improvement on its products and reserves the right to change materials and specifications without notice Avanti Products A Division of The Mackle Co Inc P O Box 520604 Miami Florida 33152 www avantiproducts com ...

Page 2: ...ne Appliance 8 Installing Stainless Steel Handle 8 Operating Your Wine Chiller 9 ON OFF Power 10 Setting the Temperature Control 10 Storage 10 Interior Light 10 Door Lock 10 Shelves 10 Care and Maintenance 11 Cleaning Your Wine Chiller 11 Power Failure 11 Vacation Time 11 Moving Your Wine Chiller 11 Energy Saving Tips 11 Troubleshooting Guide 12 Service for Your Appliance 13 Wiring Diagram 13 Your...

Page 3: ...the words DANGER WARNING or CAUTION Danger means that failure to heed this safety statement may result in severe personal injury or death Warning means that failure to heed this safety statement may result in extensive product damage serious personal injury or death Caution means that failure to heed this safety statement may result in minor or moderate personal injury or property or equipment dam...

Page 4: ...s it is specifically recommended in this material All other servicing should be referred to a qualified technician FOLLOW WARNING CALL OUTS BELOW ONLY WHEN APPLICABLE TO YOUR MODEL Use two or more people to move and install appliance Failure to do so can result in back or other injury To ensure proper ventilation for your appliance the front of the unit must be completely unobstructed Choose a wel...

Page 5: ...correspondence or service calls concerning your Wine Chiller If you received a damaged Wine Chiller immediately contact the dealer or builder that sold you the Wine Chiller Save time and money Before you call for service check the Troubleshooting Guide It lists causes of minor operating problems that you can correct yourself IF YOU NEED SERVICE We re proud of our service and want you to be pleased...

Page 6: ...6 PARTS FEATURES 1 DIGITAL CONTROL PANEL 2 SECURITY LOCK 3 STAINLESS STEEL GLASS DOOR 4 STAINLESS STEEL HANDLE 5 LARGE SHELVES Total 5 6 SMALL SHELVES Total 2 7 LEVELING LEGS 4 8 CABINET ...

Page 7: ...ore connecting the Wine Chiller to the power source let it stand upright for approximately 2 hours This will reduce the possibility of a malfunction in the cooling system from handling during transportation Clean the interior surface with lukewarm water using a soft cloth Install the handle on the left side of the door INSTALLATION OF YOUR WINE CHILLER This appliance is designed to be free standin...

Page 8: ...or abrasion damage along its length or at either end When moving the appliance be careful not to damage the power cord EXTENSION CORD Because of potential safety hazards under certain conditions it is strongly recommended that you do not use an extension cord with this appliance However if you must use an extension cord it is absolutely necessary that it be a UL CUL Listed 3 wire grounding type ap...

Page 9: ... install the Wine Chiller in a place where the ambient temperature is between 23º 26ºC 72º 78ºF If the ambient temperature is above or below recommended temperatures the performance of the unit may be affected For example placing your unit in extreme cold or hot conditions may cause interior temperatures to fluctuate The range of 5º 18ºC 40º 65ºF may not be reached Recommended Temperatures for Chi...

Page 10: ...n the LED readout This is normal and it is due to the length of the activation time Once the wine chiller is running for a few hours everything will be back to normal STORAGE Many bottles may differ in size and dimensions As such the actual number of bottles you may be able to store may vary NOTE You can place 40 standard bottles in this wine chiller Bottle capacities are approximate maximums when...

Page 11: ... personal injury POWER FAILURE Most power failures are corrected within a few hours and should not affect the temperature of your appliance if you minimize the number of times the door is opened If the power is going to be off for a longer period of time you need to take the proper steps to protect your contents VACATION TIME Short vacations Leave the Wine Chiller operating during vacations of les...

Page 12: ...al A large amount of contents has been added to the wine chiller The door is opened too often The door is not closed completely The temperature control is not set correctly The door gasket does not seal properly The light does not work Not plugged in The circuit breaker tripped or a blown fuse The light button is OFF Vibrations Check to assure that the Wine Chiller is level The Wine Chiller seems ...

Page 13: ...be here for you Just call us toll free AVANTI PRODUCTS CUSTOMER SERVICES Product Information 800 323 5029 Whatever your questions are about our products help is available Part Orders 800 220 5570 You may order parts and accessories that will be delivered directly to your home by personal check money order Master Card or Visa In Home Repair Service 800 220 5570 An Avanti Products authorized service...

Page 14: ...binet liners Punctured evaporator that voids the warranty on the complete sealed system LIMITED SECOND THROUGH FIFTH YEAR WARRANTY For the second through the fifth year from date of original purchase Avanti Products will provide a replacement compressor free of charge due to a failure You are responsible for the service labor and freight charges In rental or commercial use the limited compressor w...

Page 15: ...té en uso o tome alguna medida para asegurar que no presente peligro INSTRUCCIONES DE INSTALACION Saque los embalajes exteriores limpie bien el exterior con un paño suave seco y el interior con un paño húmedo y tibio Evite colocar la vinera cerca de una fuente de calor luz de sol directa o lugar húmedo Ubicación 1 Seleccione un lugar con su piso fuerte y nivelado 2 Evite la luz directa del sol o c...

Page 16: ...o tinto en el estante superior Si usted ha programado el enfriador de vino a 15º por ejemplo podría aumentarlo oprimiendo el botón marcado UP sucesivamente o podría bajarlo oprimiendo el botón marcado DOWN Luz interior La luz interior se controla manualmente y no funciona al abrir ni cerrar la puerta Para prender o apagar la luz presione el boton marcado de la luz ubicado en el panel de control Si...

Page 17: ...as b desconecte la vinera del tomacorriente c limpie bien el refrigerador para vinos d deje la puerta abierta para evitar la formación de condensación moho u olores Corte de corriente La mayoría de los cortes de corriente se corrigen en una o dos horas y no afectarán las temperaturas de su vinera Sin embargo Ud deberá reducir la cantidad de veces que abra la puerta cuando la corriente esté apagada...

Page 18: ...18 ...

Page 19: ...____ _____________________________________ Address Date Purchased Store Dealer Name __________________________________ ______________________________________ City State Zip Occupation __________________________________ As Your Primary Residence Do You Area Code Phone Number Own Rent Did You Purchase An Additional Warranty Your Age Extended Food Loss None under 18 18 25 26 30 Reason For Choosing Th...

Page 20: ...20 PRINTED IN CHINA ...

Reviews: