background image

14

Automatically scans each function of 

TIME, SPEED, DISTANCE, CALORIES, ODOMETER, 

RPM,

 and 

PULSE

 in sequence with change every six seconds. Press and release the 

MODE

 button until the arrow points to 

“SCAN”.

Displays the time from one second up to 99:59 minutes.

Displays the current speed from zero to 999.9 miles per hour.

Displays the distance from zero to 999.9 miles.

Displays the calorie consumption from zero to 999.9 Kcal.

The  calorie  readout  is  an  estimate  for  an  average  user.  It  should  be  used  only  as  a 

comparison between workouts on this unit.

Displays the total accumulated distance you have traveled from zero to 9999 miles. The 

total accumulated distance is retained when the meter is turned off.

Displays crank RPM (revolutions per minute) from zero to 9999 rpm.

Displays your pulse rate in beats per minute. To display pulse, select the 

PULSE

 mode 

and  grasp  the  pulse  sensors  on  the  handlebar,  one  in  each  hand. The  heart  symbol                      


“ will begin flashing when the meter senses your pulse. Your pulse will be displayed 

approximately five (5) seconds after the heart symbol is displayed. If the heart symbol 

does not appear, relax your grip or change your grip on the pulse sensors.

FUNCTIONS:

SCAN:

TIME:

SPEED:

DISTANCE:

CALORIES:

ODOMETER:

RPM:

PULSE:

Pedal movement or push the 

MODE

 button.

Automatic  shut  off  after  four  minutes  of 

inactivity.

POWER OFF :

POWER  ON :

MODE BUTTON:

Press to select display functions, include 

SCAN, TIME, SPEED, 

DISTANCE, CALORIES, ODOMETER, RPM,

 and 

PULSE.

Press and hold for three seconds to reset all functions to zero, 

except

 ODOMETER

.

The meter will shut off automatically after four minutes of inactivity. All function values will 

be reset to zero, except

 ODOMETER.

 The 

ODOMETER

 will be reset to zero after batteries 

are removed for battery replacement or storage of the unit.

NOTE:

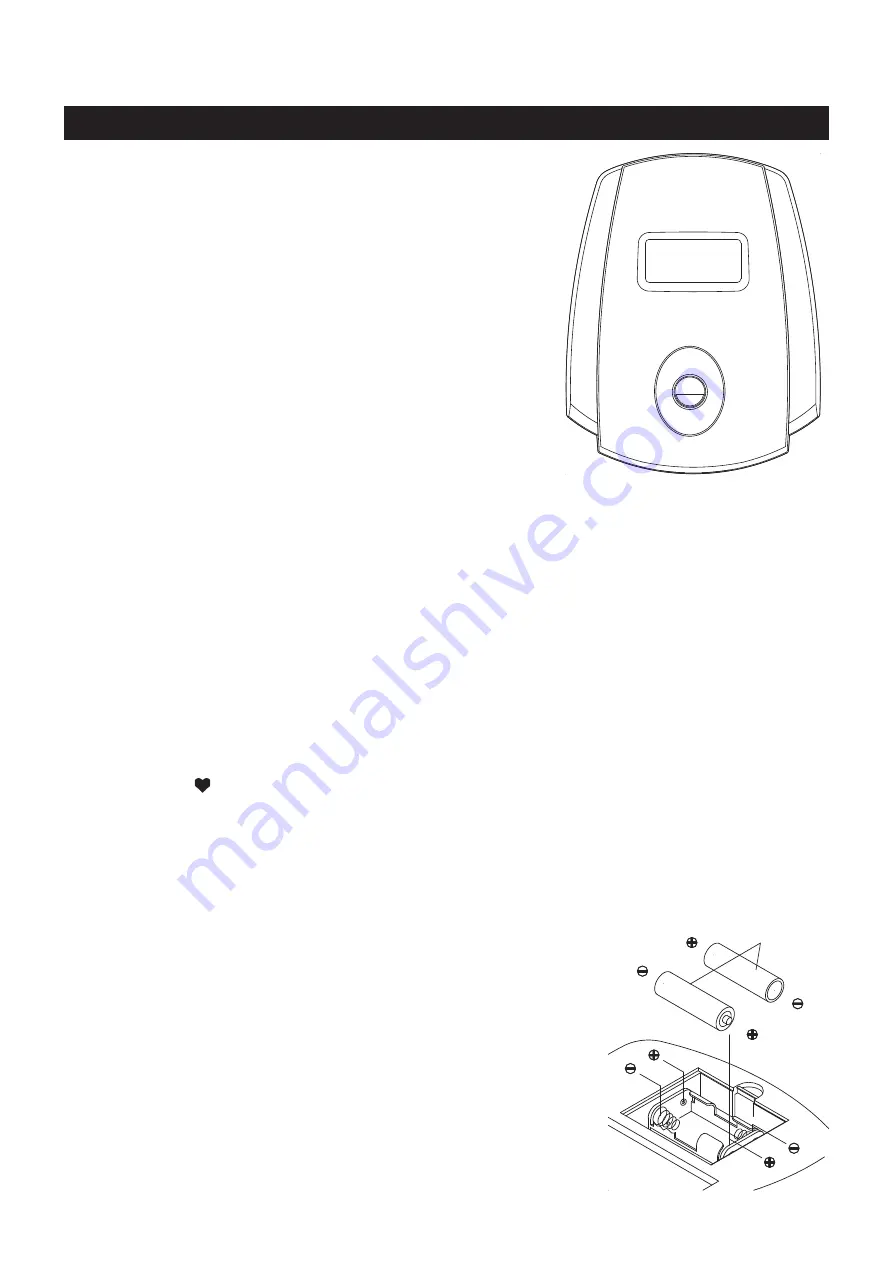
OPERATIONAL INSTRUCTIONS

USING THE FITNESS METER

1.  Open the Battery Door on the back of the meter.

2.  The  meter  operates  with  two AA  batteries,  the  batteries  are  not 

included. Refer to the illustration to install or replace the batteries.

1.  Do not mix a new battery with an old battery.

2.  Use the same type of battery. Do not mix an alkaline battery with 

another type of battery.

3.  Rechargeable batteries are not recommended.

NOTE:

HOW TO INSTALL AND REPLACE BATTERIES:

AA Batteries

MODE

QUICK

START

SCAN TIMESPEEDDIST

CAL

ODOMETER

RPM

PULSE

Summary of Contents for A550-090

Page 1: ...a physician before beginning any exercise program with this equipment If you feel faint or dizzy immediately discontinue use of this equipment Serious bodily injury can occur if this equipment is not...

Page 2: ...as running walking or cross training shoes that fit well provide foot support and feature non skid rubber soles 14 Be careful to maintain your balance while using mounting dismounting or assembling th...

Page 3: ...service staminaproducts com To enact your warranty please register your product by going to register staminaproducts com Call Us First 1 800 375 7520 Customer Service THANK YOU FOR PURCHASING THE AVAR...

Page 4: ...andards of manufacturing and quality control there can sometimes be missing parts or incorrectly sized parts If you have any questions or problems with the parts included with your AVARI Magnetic Elli...

Page 5: ...vided to help identify the warning caution and notice labels on the AVARI Magnetic Elliptical Please take a moment to familiarize yourself with all of the warning caution and notice labels EQUIPMENT W...

Page 6: ...f the bolts or screws on the circles to check for the correct diameter Use the small scale to check the length of the bolts and screws NOTICE The length of all bolts and screws except those with flat...

Page 7: ...oll free at 1 800 375 7520 in the U S Our Customer Service Staff is available to assist you from 7 30 A M to 5 00 P M Central Time Monday through Thursday and 8 00 A M to 3 00 P M Central Time on Frid...

Page 8: ...SION CABLE 17 2 Pull on the Cable of the TENSION KNOB 8 firmly so that enough cable is available to allow the METAL FITTING to go through the slot in the top of the BRACKET 3 Insert the METAL FITTING...

Page 9: ...47 STEP 5 Slide the lower end of the PIVOTING ARM 71 into the bracket on the PEDAL ARM 9 and secure with the SHOULDER BOLT 15 9x77mm M10x1 5 threaded 13 WASHER M10x 21x1 5mm thick 60 and NYLOCK NUT M1...

Page 10: ...the right side STEP 7 There is a L decal on the LEFT PEDAL CAP 30 and a R decal on the RIGHT PEDAL CAP 31 Attach the LEFT PEDAL CAP 30 to the PEDAL ARM 9 on the left side with BUTTON HEAD BOLTS M8x1 2...

Page 11: ...AD BOLTS M8x1 25x15mm 67 and WASHERS M8 68 STEP 9 Install two AA batteries into the METER 15 the batteries are not included See page 14 for detailed battery installation instructions Plug the EXTENSIO...

Page 12: ...77 so the AVARI Magnetic Elliptical sits on the floor without rocking Remove and reposition the LEVELING CAPS 18 on the REAR STABILIZER 77 to level the AVARI Magnetic Elliptical MOVING The AVARI Magn...

Page 13: ...rd and Reverse The AVARI Magnetic Elliptical can be used in the forward and reverse direction to vary the muscles that you work out This will also vary your workout helping you to stay motivated To ch...

Page 14: ...yed If the heart symbol does not appear relax your grip or change your grip on the pulse sensors FUNCTIONS SCAN TIME SPEED DISTANCE CALORIES ODOMETER RPM PULSE Pedal movement or push the MODE button A...

Page 15: ...regularly examined for damage and wear Special attention should be given to the following MAINTENANCE 1 Adjust the TENSION KNOB 8 and verify that it functions properly and the resistance changes 2 Ve...

Page 16: ...of your maximum heart rate zone Start at the lower intensity and build up to higher intensity as you become more aerobically fit If you feel dizzy or lightheaded you should slow down or stop exercisin...

Page 17: ...cool down should include the stretches listed above and should be completed after each strength training session Lower Body Stretch Place feet shoulder width apart and lean forward Keep this position...

Page 18: ...PRODUCT PARTS DRAWING BACK FRONT 18...

Page 19: ...h Plate 1 21 Spacer 16 x 20 x 4mm 4 22 Crank 2 23 Screw Round Head M3 x 8mm 2 24 Crank Cap 2 25 Flange Nut M10 x 1 25 2 26 Spacer 8 x 12 5 x 10 5mm 1 27 Bearing Nut M17 x 1 2 28 Washer 17 x 22 x 1mm t...

Page 20: ...2 62 Bolt Button Head M6 x 1 x 40mm 4 63 Bolt Button Head M8 x 1 25 x 45mm 4 64 Pulse Sensor Wire 2 65 Dome Plug 22 2mm 2 66 Cover Cap 2 67 Bolt Button Head M8 x 1 25 x 15mm 3 68 Washer M8 10 69 Dome...

Page 21: ...IVERY OF THE PRODUCT TO THE PURCHASER This limited warranty is not transferable IF ANY PART OF THE PRODUCT IS NOT IN COMPLIANCE WITH THIS LIMITED WARRANTY OR ANY IMPLIED WARRANTY THE REMEDY OF REPAIR...

Page 22: ...NOTES 22...

Page 23: ...ER YOUR PRODUCT TO CONTACT CUSTOMER SERVICE TO ORDER PARTS TO CONTACT CUSTOMER SERVICE For your convenience Stamina s customer service representatives can be reached by email at customerservice stamin...

Reviews: