background image

188

Consulting the manual as required

Menu overview

Appointments 

Charges 

Menu line in basic 
menu

...


One menu level 
lower 

...


One menu level 
lower 

Timeframe

> Appointment data 

(only if appointment 
entered)
Enter new 
appointment

> Time 00:00

Date XX.XX.XX
Text
Call number
Timeframe

Menu line in basic 
menu

...


One menu level 
lower 

...


One menu level 
lower 

Charges

> Charge display for 

last call
... for next-to-last call
... for third-last call
... for fourth-last call
Total call charges
Charges

> On

Off

Charge displ.

> Amount

Units

Delete single 
counter

Summary of Contents for 9620 Deskphone Edition

Page 1: ...ct Centers Mobility Services Avaya one X Deskphone Edition 1 0 9620 9630 9640 9650 connected to Integral Enterprise Benutzerhandbuch User s guide Manual de usuario Manuel utilisateur Manuale d uso Gebruikersdocumentatie ...

Page 2: ...ing functions in the menu 19 Canceling or exiting an action 19 What does the idle display show 20 Softkeys 20 Function keys 9650 21 Functions in several levels 9630 50 21 Entering text 22 telephoning made easy 24 Initial operation of your telephone 25 Connecting the telephone 25 If no gatekeeper is found on automatic search run 25 Selecting the gatekeeper when logging in 27 Telephoning as usual Ma...

Page 3: ...41 Forwarding additional callers 41 Three way conference 42 Multiple conference 45 Diverting calls 52 Diverting all calls for your telephone 52 Diverting calls if your line is busy 53 Diverting internal calls after a certain amount of time 53 Diverting external calls after a certain amount of time 53 Setting up and activating the double call destination 54 Disabling call diversion 54 Changing call...

Page 4: ... 73 Dialing an entry from the main phone book 73 Saving an entry from the main phone directory in the local phone directory 74 Saving an entry from the central phone book to a destination 74 Requesting messages 75 Diverting calls to voicemail 75 Listening to voice messages 75 Deactivating call diversion to voicemail 76 Deleting a message 76 Deleting all messages 76 Viewing charges 77 Viewing the c...

Page 5: ...ed partner diversion 101 Setting the deputy key 103 Extending a partner group 105 Reducing a partner group 106 Restricting partner signaling 107 Assigning a line as the executive line 108 Setting up a connection for partners 109 Filtering 110 Secretary 111 Executive line 111 Customizing your telephone Do not disturb 113 Assigning functions numbers to keys 114 Assigning functions to keys 114 Creati...

Page 6: ...two way intercom system to the secretary 139 Announcements from the executive telephone 142 Using the VIP functions 145 Activating Handsfree Answer Back 146 Audio contrast and language settings 147 Audio settings 147 Select ringer melody 148 Setting contrast and brightness 149 Selecting the language for the display 150 Displaying the function list in the idle display 151 Activating function keys i...

Page 7: ... function 174 Display keys as destination keys 174 Display keys as function keys 175 Headset 176 Operating corded headsets 176 Operating cordless headsets 177 Setting the CTI application 178 Consulting the manual as required Function keys 180 Information in the idle display 183 Ringing and handset tones 185 Tones for internal and external calls 185 Tones in the handset 185 Call melodies 186 Menu o...

Page 8: ...izing yourself with your telephone Familiarizing yourself with your telephone Familiarizing yourself with your telephone Important information 9 Your Avaya IP telephone at a glance 13 All the keys at a glance 15 ...

Page 9: ...gn of these telephones makes them unsuitable for direct operation on interfaces of public telecommunications networks Avaya cannot guarantee successful operation of the IP telephones in LAN or Intranet environments in which no Avaya telecommunications system is present If any problems should occur during operation please initially contact your specialist dealer or your system administrator The com...

Page 10: ...d by the end user License type s A license assigned to a system systems DS The end user may only install and use the software on an assigned computer unless a different number of allocated computers is stipulated in the documentation or in other materials available to the end user Avaya is authorized to require identification of the assigned computer s by means of indication of the type the serial...

Page 11: ...n Notes on description of the operating steps All the procedures described in this user manual assume a standard assignment of the function keys If you reassign function keys please bear in mind that this may change the operating procedures Additional functions Functions marked by an asterisk are not supplied as standard with your telephone Other functions may be blocked or depending on the system...

Page 12: ...sorted municipal waste household waste In order to protect the environment public collection points have been set up to ensure the correct disposal of old electrical and electronic equipment marked with this symbol To reduce the risk of these substances being released into the environment and to reduce the burden on natural resources it is also possible to participate in Avaya s used equipment ret...

Page 13: ...ur telephone Your Avaya IP telephone at a glance Your Avaya IP telephone at a glance 1 2 3 4 6 7 11 12 14 15 16 17 13 18 19 20 21 5 24 22411 22399 9620 1 2 3 4 6 7 11 12 14 15 16 17 13 18 19 20 21 5 22 24 8 22399 22567 22411 9630 9640 ...

Page 14: ...rmation line 16 CALL LOG 5 Display keys or LEDs 9620 next to menu items 17 Avaya MENU 6 Assignment of softkeys 18 VOLUME 7 Softkeys 19 HEADSET 8 Switch level functions 20 MUTE 9 Function key functions 21 LOUDSPEAKER SPEAKER 10 Function keys 22 CALL DIVERSION FORWARD 11 MESSAGE 23 Scroll bar 12 Navigation keys 24 Key block 1 2 3 4 6 7 11 12 14 15 10 13 18 16 20 21 5 24 8 9 17 19 23 30777 30765 9650...

Page 15: ...oves the cursor during text entry Used this way in the processes OK Shortcut key for executing the current standard function marked display line For example when a call log entry is selected you can select the number with the OK key Switch level 9630 9640 9650 Switches the active level of the softkeys or function keys When this key s LED is flashing rapidly it means that a partner is being called ...

Page 16: ... in you phone book CALL LOG Displays a list of your incoming outgoing and missed calls LOUDSPEAKER SPEAKER Activates the loudspeaker or the handsfree equipment HEADSET Activates a connected headset MUTE Turns off your microphone during a call Softkeys Keys with alternating functions The function is displayed above every key in white lettering on a black background Each telephone has four softkeys ...

Page 17: ...tting to know your telephone Getting to know your telephone Getting to know your telephone The display helps you 18 Basic rules of operation 19 telephoning made easy 24 Initial operation of your telephone 25 ...

Page 18: ...all The phone number of all external callers appears in the display assuming they have not disabled number ID display This allows you to see who is calling If your phone book already contains the name and phone number of the caller their name will displayed when they call All softkeys functions and display keys can have various functions You can see the current function of each key on the display ...

Page 19: ... during a call or when the receiver has been lifted you can view information about the IP settings and also implement settings yourself Speed dial with display keys For 9630 50 telephones you can directly select the functions in the menu items by pressing a key Press the display key The function that is displayed in the adjoining menu item is selected Scroll bar Not all menu entries can be display...

Page 20: ...one in idle mode Softkeys The four Softkeys 9620 9630 9640 9650 have alternating functions These functions depend on the current status of the telephone The current function of each key is displayed directly above it in a lower display line as text or as a symbol It is written in white lettering on a black background Status messages Functions Information line Aux 4 Aux 3 Aux 2 Aux 1 Aux 8 Aux 6 Au...

Page 21: ... 9630 9640 These functions can be accessed by pressing the function keys 9650 or softkeys 9630 9640 In the 9650 you can assign functions to up to seven levels in the 9630 and 9640 you can assign up to five levels Press the Switch level key to switch to the next level The display switches to the functions of this level The information line shows the level in which you currently are Level 3 of the f...

Page 22: ... key to get the desired character Example You want to enter the name Böhm Press number key 2 twice B Press number key 6 six times ö Press number key 4 twice h Press number key 6 once m Key 1 2 3 4 5 6 7 8 9 10 11 1 1 2 A a B b C c 2 2 Ä ä Á á Â â À Å å Ç ç 3 D d E e F f 3 3 É é Ê ê È è Ë ë 4 G g H h I i 4 4 Ğ ğ Í í Î î Ì ì Ï ï Ý ý 5 J j K k L l 5 5 6 M m N n O o 6 8 Ñ ñ Ö ö Ó ó Ô ô Ò ò 7 P p Q q R...

Page 23: ...the text entered the Bksp key has a backspace function the characters entered are deleted from right to left If the cursor is in the middle of the text characters are entered in front of the cursor position In phone book entries the first letter of a word is automatically capitalized You can use the key to switch between upper and lower case within a word ...

Page 24: ...dset and the handsfree settings to your environment Adjust the contrast or the brightness of the display to the lighting conditions where you are 149 Select the language 150 in which you want all displays to appear The standard available languages are English French and German French Italian Dutch Slovenian Polish Czech Russian and Turkish can be downloaded Save frequently used numbers in your pho...

Page 25: ...e interfering with network access This is indicated in the status line and the information line with IP address conflict If this is the case the phone is not functional Your system administrator must resolve the error in the network Instead of the standard gatekeeper you can select a different gatekeeper when logging in 27 If no gatekeeper is found on automatic search run The automatic search for ...

Page 26: ...or the PIN is 0000 if user is asked for a PIN For secure encrypted communication your system administrator will tell you the default setting for the PIN if user is asked for a SecPIN After the first time you log on to secure communication an information message will ask you to change your PIN It is advisable to change your PIN right away so that no one who knows your default PIN can log on to anot...

Page 27: ...eeper other than the standard gatekeeper when you log in This requires your system administrator to have compiled a list of gatekeepers The phone shows the logon display Scroll to status message Gatekeeper list Confirm selection Scroll to the desired gatekeeper e g GK 2 Confirm selection Now enter your own number and PIN 26 as usual ...

Page 28: ...ng as usual Telephoning as usual Telephoning as usual Making a call 29 Answering calls 35 Making calls without the handset 37 Making several connections 39 Diverting calls 52 Answering calls elsewhere follow me 59 ...

Page 29: ...witch off phone number and charge displays You can cut in on another call within your system if you have something urgent to tell one of the subscribers Making a call within your system In the idle display Enter the desired number Lift the handset Of course you can pick up the handset first and then dial the number However in this case you cannot correct an input error If you do not want the other...

Page 30: ...ions numbers to keys 114 Automatic callback The internal number you dialed is free or busy Scroll to the Automatic callback menu item Confirm selection Replace the handset Your telephone rings as soon as the other line is free Lift the handset The other line is called automatically via the communication server Delete automatic callback In the idle display Scroll to the Callback enabled status mess...

Page 31: ... list 66 Dialed subscriber is free or busy Scroll to the Callback request menu item Confirm selection Replace the handset Deleting a callback request You can delete a callback request initiated by you in the redial list This deletes the callback request from the call list of the desired subscriber Press the Redial softkey Scroll to the desired entry Press the Delete softkey A prompt is displayed P...

Page 32: ...set to perform some operation After you have performed this operation you will be asked whether you want automatic redialing to resume Automatic redialing is canceled when a call is accepted No prompt will follow Deactivating phone number and charge display During a call Press the Display softkey Your caller s name and number will no longer be displayed The number is not saved in the redial or in ...

Page 33: ... in tone You are now included in the conversation and can give the subscribers your message Cutting in is only possible within your system and must be programmed for your telephone and the other telephone concerned If you require this option contact your system administrator Ending cut in Scroll to the End cut in menu item Confirm selection You can also replace the handset to end cut in ...

Page 34: ...ode for your system e g 89 You will hear a dial tone as confirmation If necessary enter your secret PIN number e g 1234 Enter the system s external line code and the phone number you want to call via the communication server e g 0004197543 This number is dialed immediately Making calls remotely via the system must be enabled by the system administrator The system administrator will also tell you t...

Page 35: ...ting procedures you have already started e g editing a phone book entry When you are called Your telephone rings The call is shown on the display Lift the handset Making calls without the handset Press SPEAKER key Internal and external calls can be differentiated by the different ringer tones You can find more information in the chapter Tones for internal and external calls 185 If you do not want ...

Page 36: ...ther option for picking up a call All you have to do is enter a code After picking up the handset enter 6 for the Pick up function for example and then dial the number of the ringing phone You will then hear a special dial tone for approx one second The call is then directly transferred If you have any questions please contact your system administrator Putting a call on hold You receive a call but...

Page 37: ...LED on Monitoring speaker is on LED flashes Handsfree speaker and handsfree microphone are on LED off Speaker and handsfree microphone are off Hearing the caller through the speaker monitoring While calling with the handset lifted Press the SPEAKER function key LED lights up You are now in monitoring mode and can hear the other party out loud in the room The desired speaker volume can be set using...

Page 38: ...ress the SPEAKER key twice LED flashes Replace the handset You can hear the other person out loud and you can also talk to them with the handset on hook Handsfree continuing the call with the handset During a handsfree call Lift handset LED off Handsfree ending the call During a handsfree call Press the SPEAKER key LED flashes ...

Page 39: ...ant to forward the additional caller to number 1234 for example Scroll to the New call to menu item Confirm selection The first party is waiting Enter the number of the extension you want to connect your party to in this example 1234 When that extension answers you can announce the caller Press the Transfer softkey Confirm selection When the called extension answers you can also put the first call...

Page 40: ... LED next to it flashes Answer the call You are connected to the second caller The first caller is on hold and cannot hear your other conversation If you want to end the existing call because you have a second call Press the Drop softkey Consultation during a call refer back During a call Scroll to the new call to menu item Confirm selection Enter the number you wish to consult You can maintain th...

Page 41: ...hile you are on the phone e g from number 06975058 The call is shown on the display e g 06975058 and the display key or LED next to it flashes Answer the call You are connected to the second caller Your initial party is on hold Scroll to the new call to menu item Confirm selection Enter the number of the extension you want to connect the caller to in this example 1234 You can now announce the call...

Page 42: ...erence feature has been enabled then you can involve up to seven subscribers in a conference multiple conference 45 Adding a conference participant to a call During a call Scroll to the Conference with menu item Confirm selection Enter number of second conference participant When you are connected with the participant you can immediately hold a three party conference If the third participant whom ...

Page 43: ...m you are calling does not answer press the Drop softkey to switch back to the first party You can also configure a Conference function key More details on configuring function keys can be found in the Chapter Assigning functions numbers to keys 114 A conference between a second caller and the first party is not possible Speaking with just one conference participant You wish to speak only with con...

Page 44: ...ring the conference Scroll to the Transfer to menu item Confirm your selection You can also connect the two conference participants with one another by replacing the handset Ending a conference During the conference Press the Drop softkey There is no longer a connection between the conference participants ...

Page 45: ...an have several subscribers on hold first and then connect the waiting connections into the conference one after another The controller can also call a subscriber via refer back by selecting the Conference with line Once the subscriber answers the call he is automatically included in the conference If the controller receives calls during the multiple conference he can include these in conference b...

Page 46: ...ubscriber is participating in the conference Hourglass the subscriber is on hold if the subscriber initiated a consultation for example the subscriber is taking part in the conference on behalf of the previous subscriber The controller can disconnect a participant from the conference in the list of all conference users Scroll to the desired entry Press the Drop softkey You are prompted to confirm ...

Page 47: ... subscriber you are calling does not answer press the Drop softkey The selection line is only available if more participants can be added to the conference Adding a participant via refer back During a call Press the Refer back function key The multiple conference is put on hold Enter the number of the next conference participant Once you are connected with this participant you can add him to the c...

Page 48: ...selection You are now reconnected with the desired subscriber You can Disconnect this connection by pressing the Drop key Add this connection to the multiple conference by selecting Conference with If the waiting subscriber is a multiple conference it is possible to switch back to the multiple conference by selecting Back to conference The original caller is put back on hold ...

Page 49: ...irm selection The subscriber is removed from the conference Transferring a multiple conference If the multiple conference consists of a total of three participants then the controller can transfer the conference to the participants using the Transfer to menu line The conference controller can leave the multiple conference without ending it Scroll to the Transfer conference menu item Confirm your s...

Page 50: ... may be possible depending on the local setting Passive conference participants The passive conference participant is added to the multiple conference by the conference controller The header of the passive conference participant s display indicates Conference The passive conference participant can Not set up any more conferences Place his connection in the queue wait status via refer back and then...

Page 51: ...users Press the Refer back softkey Enter the number of the new conference participant You can transfer the conference once you are connected to this subscriber The Refer back key is locked for passive participants in a three way conference Passive conference participants Ending participation The passive participant in a multiple conference can end participation as follows Replace the handset The p...

Page 52: ...phone both ring at the same time when there is a call double call If voicemail is connected to your communication server you can have your calls diverted there Callers can then leave messages for you as if they were speaking to an answering machine Diverting a call can be greatly simplified by creating a macro 120 You can then enable or disable this call diversion by pressing a single key Call div...

Page 53: ...N 9630 9640 Scroll to the Int after time menu item Enter the internal phone number to which you want to divert the external calls after the set period of time e g to 1234 Confirm selection Call diversion is now activated The status Delayed internal call div to 1234 is shown on the display Diverting external calls after a certain amount of time Press the softkey Call div or the key CALL DIVERSION 9...

Page 54: ...ouble call destination Confirm selection Double call is now activated The message Double call to 1234 appears in the display Disabling call diversion Press the softkey Call div or the key CALL DIVERSION 9630 9640 Select active call diversion indicated by On for example to 1234 On Confirm selection Call diversion is now deactivated You can also select the active call diversion in the display and th...

Page 55: ...all diversion e g 6055 Enter your secret PIN number e g 1234 Now you can set up change or deactivate call diversion Setting up or changing call diversion Enter codes for Activate follow me e g star key 14 Enter the system s external line code and the phone number to which you want to divert calls e g 00897543 As confirmation an acknowledgement tone sounds after a short time Deactivating call diver...

Page 56: ...call diversion that was set up manually The status of the manual call diversion is indicated by an hourglass Once automatic call diversion has finished manual call diversion becomes active again A follow me that was activated before the automatic start time is not reactivated with the stop time If call diversion with a time window that contains the current time is switched on then call diversion i...

Page 57: ...to 1234 Scroll to Start time Enter the start time e g 12 00 Scroll to Stop time Enter the stop time e g 14 00 Scroll to Weekday Confirm selection Select pattern e g Mon Fri Once you activate automatic call diversion Automatic 1 will start Mondays to Friday from 12 00 pm to 2 00 pm Press the Save softkey The setting is saved Configure additional automatic call diversion if necessary This menu item ...

Page 58: ...ic 2 menu item Confirm selection The call diversion window will be activated This is indicated in the call diversion status display by a check mark in front of the call diversion status The call diversion status indicates whether call diversion is currently active This menu item is only displayed if authorization has been granted by the your system administrator ...

Page 59: ...ystem administrator for the valid codes Preparing follow me on your own telephone Lift the handset Press the star key and enter the code e g 13 Replace the handset Activating follow me at a different telephone At another phone Lift the handset Press the star key and enter the code e g 14 Dial your own phone number Replace the handset Incoming calls to your telephone are then diverted to the other ...

Page 60: ...s usual Answering calls elsewhere follow me Deactivating follow me at a different telephone At another phone Lift the handset Press the pound key and enter the code e g 14 Dial your own phone number Replace the handset ...

Page 61: ...alls with ease Editing the call log 62 Editing a redial list call log outgoing 66 Editing a call list call log missed 67 Function list 68 Using the phone book 71 Requesting messages 75 Viewing charges 77 Set reminders appointments 79 Locking the telephone 82 ...

Page 62: ...You can easily transfer phone numbers from the call log into your phone book Symbols in the call log You can tell the type of an entry in the call log by means of the symbols If you press the Details softkey the phone will display a detailed list of entries including the time of the call Numbers that you dialed call log outgoing Numbers that you dialed with a callback request call log outgoing Cal...

Page 63: ...e keyCALL LOG Press the right arrow Only missed calls are shown call list Press the right arrow again Only answered calls are shown call list Press the right arrow again Only outgoing calls are shown redial list Press the right arrow again All entries are displayed Dialing an entry from the call log Press the keyCALL LOG Scroll to the desired number e g 006975051234 Lift the handset You can also s...

Page 64: ...o call back In the detail view entries without confirmation prompts are deleted immediately Deleting all entries Press the keyCALL LOG Press the Clear All softkey A prompt appears in the info line Press the Clear All softkey again Adding an entry to the phone book Press the keyCALL LOG Scroll to the desired entry e g 0069123456 Press the Contacts softkey The entry is added to the phone book If an ...

Page 65: ... audio data for every call entered there this is information about the voice quality during the call Press the keyCALL LOG Scroll to the desired entry e g 0069123456 Press the Details softkey Press the Audiod softkey You will now see some parameters relating to voice quality during this connection ...

Page 66: ... numbers The system administrator can however change the number of entries The remaining entries are generated by callback request Each callback request that you initiate is its own entry in the redial list You can dial the individual entries delete them or save them in the phone book just like all call log entries Open Redial list Press the Redial softkey You can access the redial list through th...

Page 67: ...tered in it The list contains the 30 most recent entries You can dial the individual entries delete them or save them in the phone book just like all call log entries The LED in the CALL LOG key remains lit Until you have viewed the details of each new call list entry or You have called back all the new entries from the call list or If calls with a request for callback are on the list If you want ...

Page 68: ...the phone to display the function list when the phone is idle 151 Switching between the function list and the telephone status standard display In idle state Press right arrow and left arrow Entering a function in the function list Press the MENU key Scroll to the Settings menu item Confirm selection Scroll to the Keys menu item Confirm selection Scroll to the Set function keys menu item Confirm s...

Page 69: ...e MENU key Scroll to the Settings menu item Confirm selection Scroll to the Keys menu item Confirm selection Scroll to the Set destination keys menu item Confirm selection Scroll to the Edit destination menu item Confirm selection Press the destination key that you wish to add to your function list Scroll to the Add to function list menu item Confirm selection ...

Page 70: ... functions or destinations from the function list Open the function list by pressing the right arrow and left arrow Scroll to the function or destination that you wish to delete Press the Delete softkey You are prompted Press the Delete softkey again ...

Page 71: ... 67 and call log 62 can be quickly and easily saved in the phone book You can easily assign a phone book entry to a destination key 116 Creating a new entry in the phone book Press the PHONE BOOK key Press the New softkey Enter the name Scroll to the Call number menu item Enter the desired number Press the Save softkey With the Ringing tone menu item you can define a melody 186 as a ringing tone W...

Page 72: ... enter one or more of the first letters in the name You can also search for a name or phone number by using an asterisk as a wild card as you can on your PC For example if you input mobile all entries which include the string mobile will be displayed Editing entries in the phone book Press the PHONE BOOK key Scroll to the desired entry e g Chopin 0069123456 Press the Details softkey Edit the numbe...

Page 73: ...e main phone book Press the PHONE BOOK key Press the Main softkey Enter one or more of the first letters in the name Scroll to the desired entry e g Wagner 4321 Lift the handset You can also select the desired entry straightaway using the Details softkey so that the connection can then be made using Dial Your telephone automatically switches to handsfree You can also search for a name or phone num...

Page 74: ...e book menu item Confirm selection Saving an entry from the central phone book to a destination Press the PHONE BOOK key Press the Main softkey Enter one or more of the first letters in the name Scroll to the desired entry e g Wagner 4321 Press the Details softkey Scroll to the Save to destination key menu item Confirm selection Press the function key that you wish to assign The display indicates ...

Page 75: ...ls from your system administrator Diverting calls to voicemail Press the softkey Call div or the key CALL DIVERSION 9630 9640 Scroll to the to menu item Enter the internal phone number which is set up for voicemail on your system e g 4321 Confirm selection Call diversion is now activated Call div to 4321 appears in the display and the LED in the call diversion key lights up Listening to voice mess...

Page 76: ...a message Press the MESSAGE key Scroll to the desired message e g Voicemail 1 069123456 Press the Delete softkey A prompt appears in the info line Press the Delete softkey again In the detail view messages without confirmation prompts are deleted immediately Deleting all messages Press the MESSAGE key Scroll to the Delete all entries menu item Press the Clear All softkey A prompt appears in the in...

Page 77: ...your communication server can also record and account for the call charges for single projects or private calls separately Viewing the charge display Press the MENU key Scroll to the Charges menu item Confirm selection Deleting call charges Press the MENU key Scroll to the Charges menu item Confirm selection Scroll to the Delete single counter menu item Confirm selection The charges for the indivi...

Page 78: ...1 This external line code may have 1 to 5 digits Enter the code that is set up in your telephone system for private calls or the relevant project e g 3433 This code may have 1 to 12 digits Enter the desired phone number Lift the handset The charges for this call are now recorded and accounted in the system with the appropriate project or private code For security reasons the code is not shown in t...

Page 79: ...ointments specifically Entering a new appointment Press the MENU key Scroll to the Appointments menu item Confirm selection Scroll to the Enter new appointment menu item Confirm your selection and enter the desired appointment data and text Scroll to the One time appointment menu item Implement any required changes using the Modify key Press the Save softkey The message Appointment enabled appears...

Page 80: ... the signal tone The Appointment expired status message now appears in the idle display and the LED in the corresponding display key lights up If you have entered a number when entering the appointment it is shown in the display after acknowledgement of the appointment signal You then only need to lift the handset or press the SPEAKER function key to call the subscriber with that number The Appoin...

Page 81: ...firm selection Scroll to the Appointments One time appointment or Daily appointmentmenu item Set to Appointments off Press the Save softkey Deleting appointments In idle state Scroll to the Appointment enabled menu item Confirm selection Scroll to the desired appointment e g 22 03 01 15 00 Meeting on Press the Delete softkey A prompt appears in the info line Press the Delete softkey again ...

Page 82: ...hanging the PIN Personal Identification Number Press the MENU key Scroll to the Lock menu item Confirm selection Scroll to the Change PIN menu item Confirm selection Enter the current PIN default setting 0000 see also below Scroll to the New PIN menu item Enter the new PIN Scroll to the Reenter PIN menu item Enter the new PIN again to verify Press the Save softkey If central locking is enabled in ...

Page 83: ...ock menu item Confirm selection Scroll to the Lock menu item Confirm your selection You can only lock the phone if you have changed the default PIN Unlocking the telephone In the idle display Scroll to the Telephone locked status message Confirm selection Enter the current PIN Confirm input If you enter the wrong PIN three times in succession the telephone will be blocked for 15 minutes The PIN ma...

Page 84: ...firm selection Scroll to the Automatic lock menu item Confirm selection Scroll to the desired setting Confirm selection This lock function is only activated after the phone has returned to idle where applicable Automatic locking is not applied if the phone has already been locked If Automatic lock has been activated the phone will be locked every day at the same time ...

Page 85: ...roll to the Lock at menu item The cursor will flash under the first number where you can enter the hour ten s place You can enter the following 0 1 2 Afterwards you can specify the one s place for the hour and then the minutes Confirm selection The time can only be changed if the automatic lock function has been deactivated ...

Page 86: ...partner group 106 Reducing a partner group 107 Restricting partner signaling 108 Assigning a line as the executive line 109 Setting up a connection for partners 110 Filtering 111 Your system administrator can connect several telephones on your system to a partner group 9650 max 16 partners 9630 9640 max 10 partners The display tells you what each partner is doing You can set your telephone to soun...

Page 87: ...nu item Confirm selection Scroll to the partner phone number to which you want to assign a name Confirm selection You can now allocate the relevant name to the selected number Two fields are available for this purpose In the Long name field you can enter up to seven letters If no partner call diversion is set up this text then appears in the display However if a call diversion to the partner or fr...

Page 88: ... the first three letters of the name entered in the Long name field appear when a call diversion is set up to the partner or from the partner To reach the partner menu more quickly you can assign a Partner function key or with the receiver on hook press a partner key and then select the Partner setup menu item ...

Page 89: ...s You are informed about your partners activities in the assigned display fields 4711 Partner 4711 is free 4711 Partner 4711 is being called 4711 Partner 4711 is being called by two different callers simultaneously 4711 Partner 4711 is busy 4711 Partner 4711 is busy and will be called additionally 711 715 Partner 4711 has set up a partner diversion to partner 4715 ...

Page 90: ...splayed for the assigned display fields by the LEDs of the function keys Signaling can be changed by the system administrator Partner status LED Available Off Call Flashes quickly Call diversion destination Flashes quickly Second call Flashes quickly Busy On Busy call On Free call diversion to active Flashes slowly Free diversion destination Off Partner diversion Flashes slowly ...

Page 91: ...91 Telephoning with partners Calling a partner Calling a partner Lift the handset Press the function key for the desired partner ...

Page 92: ... with partners Answering a call for a partner Answering a call for a partner A partner telephone rings and the corresponding display flashes Press the Partner key and wait until the call reaches you Lift the handset ...

Page 93: ...n Scroll to the Partners menu item Confirm selection Scroll to the Adapt my partners menu item Confirm selection To scroll to the Change partner position menu option Confirm selection Select the partner you want to assign to another key e g Liszt Confirm selection Press the partner or function key that you want to assign The previous key assignment is displayed Press the Save softkey The partner i...

Page 94: ...Scroll to the Partners menu item Confirm selection Scroll to the Adapt my partners menu item Confirm selection Scroll to the Hide show partner keys menu item Confirm selection Select the partner key that you no longer want to appear in your display e g Partner key Liszt Press the Modify softkey The display switches to Partner key Liszt off Press the Save softkey The partner key is no longer displa...

Page 95: ...ection Scroll to the Adapt my partners menu item Confirm selection Scroll to the Set partner beep menu item Confirm selection Scroll to the partner for which you want to activate the partner beep e g for Verdi Confirm selection Scroll to the Acoustics Off menu item Press the Modify softkey several times if necessary until the desired signaling is displayed For example the display switches to Acous...

Page 96: ...he Delay menu item Press the Modify softkey several times if necessary until the desired delay is displayed e g Delay 10 sec Scroll to the Partn div from my phone Off menu item Press the Modify softkey The display switches to Partner div from me phone On Press the Save softkey The settings are saved You will only receive notification of those calls from the partner Verdi beep or display diverted t...

Page 97: ...ion Scroll to the Partners menu item Confirm selection Scroll to the Adapt my partners menu item Confirm selection Scroll to the Assign partner to DSS module menu item The partners are transferred to the display fields of the Button Module in their current order The previous key assignments on the button are overwritten Using the Assign partner to telephone menu item you can transfer the partners ...

Page 98: ...on Scroll to the partner to whom you want to divert calls e g to Verdi Off Press the Modify softkey The display switches to to Verdi On Press the Save softkey Partner diversion is now activated You can also activate diversion to a partner by scrolling to the Partner div from my phone menu item and then pressing the key of the partner to whom your calls are to be diverted Partner diversion is then ...

Page 99: ...alls to yourself e g from Verdi Off Press the Modify softkey The display switches to from Verdi On Press the Save softkey Partner diversion is now activated Partner diversion keys can also be set and deleted using the Call Diversion Menu Partner Diversion Operation using the Settings Applications Partners menu is described here for illustrative purposes You can also activate diversion from a partn...

Page 100: ...onfirm selection Scroll to the Partners menu item Confirm selection Scroll to the Set delete partner diversion menu item Confirm selection Scroll to the Partner diversion from to others menu item Confirm selection Scroll to the partner from whom you wish to divert calls e g from Verdi Confirm selection Now you have select the partner to whom you want to divert calls e g from Verdi to Liszt Confirm...

Page 101: ...rtner diversion If they have the appropriate authorization subscribers of a partner group can set up a call diversion to any number for every subscriber in the partner group This means that call diversion can be activated to a partner s mobile or home number Press the MENU key Scroll to the Settings menu item Confirm selection Scroll to the Applications Partner menu item Confirm selection Scroll t...

Page 102: ...ed Authorization for extended partner diversion is locked by default A maximum of five status displays for extended partner diversion can be shown in the display Partner names are replaced by the number in extended partner diversion You can program a macro 123 to a function key in order to set a certain partner diversion faster In the 9650 the LED of the function key shows the current status ...

Page 103: ...nfirm selection Scroll to the Partners menu item Confirm selection Scroll to the Set delete partner diversion menu item Confirm selection Scroll to the Set deputy key menu item Confirm selection Scroll to the partner being diverted Confirm selection Scroll to the Deputy after menu item Confirm selection Scroll to the partner to whom you want to divert calls e g to Liszt Confirm selection ...

Page 104: ...t selected partners menu item Confirm selection The calls for the selected partners will now be diverted to the partner you entered This diversion destination can be your own phone number You can now set up a Function key 114 with the name Deputy key This key activates the partner diversions in the idle menu according to the following pattern First press of the key Set up selected partner diversio...

Page 105: ...artner group size menu item Confirm selection Scroll to the Expand partner group menu item Enter the phone number of the subscriber you want to add to your partner group Press the key to which you want to assign the partner s number After inputting the partner s number you can also press the OK key The phone number of the partner will then be entered into the next free display field The phone numb...

Page 106: ...irm selection Scroll to the Applications Partner menu item Confirm selection Scroll to the Partners menu item Confirm selection Scroll to the Adapt partner group size menu item Confirm selection Scroll to the Reduce partner group menu item Confirm selection Scroll to the partner who you want to delete e g Verdi Press the Delete softkey ...

Page 107: ...to the Adapt partner group size menu item Confirm selection Scroll to the Restrict signaling Off menu item Press the Modify softkey The display switches to On Press the Save softkey The partners can no longer see in their display whether you are on a call whether you are being called whether there call diversion exists for you etc The Restrict partner signaling function must be enabled by your sys...

Page 108: ...ample a secretary can assign a line for her boss To do this an Executive line function key must be set up on the secretary s telephone Press the EXLN function key Press the key for the partner for whom you want to assign a line The status message Line busy appears in the display of the partner telephone The partner can continue to telephone as usual You can now set up a connection for this partner...

Page 109: ...tner Enter the desired phone number Lift the handset If the other party answers Scroll to the new call to menu item Confirm selection Press the partner key Replace the handset The partner is now connected to the other party Your own telephone is now free again The partner call diversion is lifted If you have lifted the receiver and replace it immediately the line is enabled unless you have started...

Page 110: ...le And one reception desk can activate filtering for several executive lines Subscribers can only program the filtering key in the function key menu when filtering has been initialized by the communication server Filtering keys that have already been programmed are shown first Function keys INT and EXT for internal calls and external calls to the executive phone FILTER on reception s phone On the ...

Page 111: ...lished to the device that accepted the call first One reception desk can be assigned a maximum of five executive lines in the filtering group A maximum of ten filtering group subscribers with status can be shown in the display Executive line Function key programming allows you to assign keys for filtering with INT and EXT If a function key has been defined on the 9650 the LED also indicates the st...

Page 112: ...ion 129 Activating key beep tones 130 Time zones 131 Private User Mobility 132 Saving emergency numbers 134 Setting up own name 135 Relocating with the telephone 136 Saving personal data 137 Setting up VIP functions 139 Activating Handsfree Answer Back 146 Audio contrast and language settings 147 Activating CSTA Answer Call 153 Leaving a hunt group 154 Logging in to automatic call distribution 155...

Page 113: ...Settings menu item Confirm selection Scroll to the Display Acoustics menu item Confirm selection Scroll to the Do not disturb menu item Confirm selection Scroll to the desired menu item e g Signal tone On Press the Modify softkey The display changes to Signal tone Off Confirm the change by pressing the Save softkey The new setting is then saved To re activate any of these tones scroll to the respe...

Page 114: ...nction keys If you reassign function keys please bear in mind that this may change the operating procedures Assigning functions to keys Press the MENU key Scroll to the Settings menu item Confirm selection Scroll to the Keys menu item Confirm selection Scroll to the Set function keys menu item Confirm selection Scroll to the function you want to assign to the key e g Charges Confirm selection Pres...

Page 115: ...nction or call number to which the key was previously assigned Confirm new key assignment by pressing the Save softkey In the idle state you can also press an unprogrammed key directly You can then enter the number you want to store there immediately In general you work with a Consultation call refer back If you press a destination key during a call a new connection is immediately established thro...

Page 116: ...e desired entry e g Ligeti 0069123456 Confirm selection Press the Assign softkey You will be prompted to press the key to which you wish to assign the destination Press the function key that you wish to assign The display indicates the function or call number to which the key was previously assigned Confirm new key assignment by pressing the Save softkey In the idle state you can also press an una...

Page 117: ...Confirm selection Scroll to the Set destination keys menu item Confirm selection Scroll to the Edit destination key menu item Confirm selection Press the key that you want to edit You can now change the name and the number Confirm the change by pressing the Save softkey You can also change the existing destination by pressing the associated function key and select the Edit destination key menu ite...

Page 118: ...nfirm selection Scroll to the Set function keys or Set destination keys menu item Confirm selection Scroll to the Delete entry or Delete destination key menu item Confirm selection Press the key whose assignment you want to clear You can now see the function or destination previously assigned to the key Scroll to the Delete function or Delete destination key menu item Confirm using the OK key ...

Page 119: ...l to the Keys menu item Confirm selection Scroll to the Display key assignment menu item Confirm selection Press the desired display key function key or key on the Button Module You can now see which function or destination is currently assigned to this key You can exit the menu by pressing the Back key Functions keys with LED 9650 Your telephone has 8 function keys with LEDs The LED shows you the...

Page 120: ...ng up a macro call diversion and pick up Press the MENU key Scroll to the Settings menu item Confirm selection Scroll to the Keys menu item Confirm selection Scroll to the Set macro function menu item Confirm selection Scroll to the macro function you want to assign to the key e g Call diversion 1 Confirm selection Enter the phone number to which you want to divert calls call diversion or from whi...

Page 121: ...assign to the key e g Partner diversion 1 Confirm selection Press the Assign softkey Scroll to the partner from whom you wish to divert calls e g from Verdi Confirm selection Now you have select the partner to whom you want to divert calls e g from Verdi to Liszt Confirm selection Now you have to select whether you require another alternative call diversion destination e g from Verdi to Liszt or F...

Page 122: ...inations then you can switch between these two destinations by pressing a single key You can now only activate the partner diversion with two destinations using the menu Call up the basic Partner menu and select the menu item Partner diversion from to others in the Set delete partner diversion menu Then select the desired diversion from the list to deactivate the partner diversion If you have only...

Page 123: ...selection Scroll to the macro function you want to assign to the key e g CFF Partner diversion 1 Confirm selection Press the Assign softkey Scroll to the partner from whom you wish to divert calls e g from Verdi Confirm selection Now enter the destination Confirm selection Press the key to which you want to assign the macro function You can now see the function or number previously assigned to the...

Page 124: ...o the Set macro function menu item Confirm selection Scroll to the Going menu item Confirm selection You can now specify up to three from to partner diversions and one call diversion Use the digits and partner keys to make your entry Switches the selected diversion on off Press the Assign softkey Press the key to which you want to assign the macro function You can now see the function or number pr...

Page 125: ...Scroll to the Settings menu item Confirm selection Scroll to the Dial settings menu item Confirm selection Scroll to the Anonymous call Off menu item Press the Modify softkey The setting changes to Off Anonymous call On Press the Save softkey The new setting has been saved Anonymous call appears in the status display If you assign the function to a function key you can enable and disable it with o...

Page 126: ...to the Settings menu item Confirm selection Scroll to the Display Acoustics menu item Confirm selection Scroll to the Second call Off menu item Press the Modify softkey The setting switches to Second call On Press the Save softkey The new setting has been saved Second call appears in the status display If you assign the function to a function key you can enable and disable it with one push of a bu...

Page 127: ...ey Scroll to the Settings menu item Confirm selection Scroll to the Dial settings menu item Confirm selection Scroll to the Direct dial menu item Press the Select softkey Select the menu item that you wish to change e g Direct digit dial Change setting Press the Save softkey The new setting has been saved If you want to reactivate direct dialing for destinations then scroll to the Direct dest dial...

Page 128: ...ese digits are neither displayed nor entered into the redial memory Press the MENU key Scroll to the Settings menu item Confirm selection Scroll to the Dial settings menu item Confirm selection Scroll to the Tone dial DTMF switchover On menu item Press the Modify softkey The setting changes to DTMF switchover Off Confirm the change by pressing the Save softkey The new setting has been saved If you...

Page 129: ...ain answering machines a pulse duration of 1000 ms slow is required with others 500 ms average Your telephone is preset to 100 ms fast Press the MENU key Scroll to the Settings menu item Confirm selection Scroll to the Dial settings menu item Confirm selection Scroll to the Tone DTMF duration quick menu item Press the Modify softkey several times if required and select the desired setting e g DTMF...

Page 130: ... to the Settings menu item Confirm selection Scroll to the Keys menu item Confirm selection Scroll to the Key beep Off menu item Press the Modify softkey The setting switches to Key beep On Confirm the entry by pressing the Save softkey The new setting has been saved If you wish to deactivate the key beep scroll to the Key beep On menu item and change it as described above ...

Page 131: ...world displayed Press the MENU key Scroll to the Time zones menu item Confirm selection The display shows the current date and time in 26 cities The time that your telephone shows for a city can differ from the actual time in that city as the change between summer and winter time is different in the various countries ...

Page 132: ...wo function keys must have the functions Log on and Log off assigned to them The PIN is identical to your locking PIN If you want to use PUM the PIN must be exactly 6 digits long Logging on to the telephone Press the Log on user function key or the IN display key depending on whether you have assigned the function to a function or display key Enter your personal phone number Scroll to the Code men...

Page 133: ...ion to a function key or a display key You are now logged out of this telephone Your personal settings call log call list redial call diversion callbacks entered are cleared You are logged off automatically if another subscriber logs on to this telephone with his personal number You can also log off by selecting the PUM user Chopin status message by pressing followed by Log off softkey ...

Page 134: ... name and phone number Press the Assign softkey Press the key to which you want to assign the emergency number You can now see the function or number previously assigned to the key Confirm new key assignment by pressing the Save softkey Warning The emergency numbers must also be set up in your communication server otherwise they cannot be selected when the phone is locked If you press the function...

Page 135: ...n the display Press the MENU key Scroll to the Settings menu item Confirm selection Scroll to the Display Acoustics menu item Confirm selection Scroll to the Set own name menu item Press the Select softkey and enter or change your name Confirm the change by pressing the Save softkey The new setting has been saved ...

Page 136: ...ne number and previous PIN in order to access your personal settings and phone book there Before relocating Before relocating you need to log out 156 Your personal settings and your phone book will then be saved and no longer be available at that telephone After relocating To be able to access your personal settings and phone book again you will need to log on 26 with your own number and PIN ...

Page 137: ...om a central location This can be avoided by blocking central data saving Carrying out immediate central data saving Press the MENU key Scroll to the Settings menu item Confirm selection Scroll to the Security menu item Confirm selection Scroll to the Save data menu item Confirm selection Scroll to the Save data centrally menu item Confirm selection Enter your PIN The digits of the PIN are shown a...

Page 138: ...ta menu item Confirm selection Scroll to the Access to save data centrally Blocked menu item Confirm selection Press the Modify softkey The display switches to Access to save data centrally Free Confirm the change by pressing the Save softkey Your data cannot now be saved from a central location If you want to deactivate central data saving then scroll to the Access to save data centrally free men...

Page 139: ...d the receiving telephone the secretary telephone Using the executive telephone as a two way intercom system to the secretary Setting up the executive telephone Press the MENU key Scroll to the Settings menu item Confirm selection Scroll to the VIP menu item Confirm selection Enter the current PIN Confirm input Scroll to the Send VIP functions menu item Press the Modify softkey several times if ne...

Page 140: ...he executive phone For this it will also be necessary to make several more settings 140 for the secretary phone Setting up the secretary telephone Press the MENU key Scroll to the Settings menu item Confirm selection Scroll to the VIP menu item Confirm selection Enter the current PIN Confirm input Scroll to the Receive VIP functions menu item Press the Modify softkey several times if necessary unt...

Page 141: ... the Entry from phone book or Entry from key assign or Personal emergency call or Partner menu item Confirm selection Scroll to the entry for the executive telephone Confirm selection Scroll to the Receive from user menu item Press the Modify softkey The setting changes to On Confirm the setting by pressing the Save softkey ...

Page 142: ...ctions the call results in Announcement with reply A call window opens for both the person called and the person being called Setting up the executive telephone Press the MENU key Scroll to the Settings menu item Confirm selection Scroll to the VIP menu item Confirm selection Enter the current PIN Confirm input Scroll to the Send VIP functions menu item Press the Modify softkey several times if ne...

Page 143: ...oftkey several times if necessary until the setting with announc is displayed Confirm the setting by pressing the Save softkey If you select on instead of with announcm only the VIP ring tone will be heard on the secretary phone when the secretary phone is called by the executive phone For this it will also be necessary to make several more settings 144 for the secretary phone ...

Page 144: ...until the desired setting is displayed All callers if you want VIP functions to be possible with all subscribers Authorized if you want VIP functions to only be available to subscribers you specify or have already specified in the Set VIP partner menu Scroll to the Set VIP partner menu item Confirm selection Scroll to the Entry from phone book or Entry from key assign or Personal emergency callor ...

Page 145: ...ons Using the announcement or two way intercom system Press the relevant destination key for the secretary telephone or select the phone book entry Press the SPEAKER function key or pick up the handset Handsfree is automatically activated on the secretary telephone The two parties can now speak to one another For Announcement the loudspeaker is activated on the secretary telephone You can make an ...

Page 146: ...nal tone and your telephone s microphone and loudspeaker are activated immediately This means that you can speak to the caller right away Press the MENU key Scroll to the Settings menu item Confirm selection Scroll to the Handsfree Answer Back Off menu item Change setting Press the Save softkey The status display Handsfree Answer Back on appears in the display You can disable Handsfree Answer Back...

Page 147: ...ttings Press the MENU key Scroll to the Settings menu item Confirm selection Scroll to the Display Acoustics menu item Confirm selection Scroll to the Set acoustics menu item Confirm selection Scroll to the desired menu item e g Ringing tone volume Increase or reduce volume New ring settings are sounded immediately so you can check them Confirm the change by pressing the Save softkey The new setti...

Page 148: ...ection Scroll to the Display Acoustics menu item Confirm selection Scroll to the Set acoustics menu item Confirm selection Scroll to the Select ringer melody menu item Confirm selection Scroll to the relevant call type e g Internal call Melody 1 Confirm selection Select the melody you want to use e g Melody 2 Confirm selection This melody will now be saved and also replayed immediately as a check ...

Page 149: ... menu item Confirm selection Scroll to the Set contrast or Set brightness menu item Confirm selection Increase or reduce contrast Confirm the entry by pressing the Save softkey The new setting has been saved You can also change any setting by pressing the numeric key 1 8 of the desired setting by pressing the arrow keys or with the keys You can only adjust the brightness or contrast on your teleph...

Page 150: ... menu item Confirm selection Scroll to the Display Acoustics menu item Confirm selection Scroll to the Switch language menu item Confirm selection Select the desired language for display texts for example English Confirm the setting by pressing the Save softkey Your telephone will reset itself All display texts will now be in the selected language ...

Page 151: ...of the telephone status in the idle display Press the MENU key Scroll to the Settings menu item Confirm selection Scroll to the Display Acoustics menu item Confirm selection Scroll to the Function list active Off menu item Press the Modify softkey The setting switches to Function list active On Confirm the setting by pressing the Save softkey The new setting has been saved ...

Page 152: ...e the phone so that your programmed first function key level is activated by default displayed inversely Press the MENU key Scroll to the Settings menu item Confirm selection Scroll to the Display Acoustics menu item Confirm selection Scroll to the Function keys Off menu item Press the Modify softkey The setting changes to Function keys On Confirm the setting by pressing the Save softkey The new s...

Page 153: ...answer calls on your PC When the phone rings click the icon for CSTA Answer Call on your PC monitor screen The telephone is automatically set to handsfree mode and you can speak with the caller Press the MENU key Scroll to the Settings menu item Confirm selection Scroll to the Applications menu item Confirm selection Scroll to the CSTA Answer Call Off menu item Change setting Press the Save softke...

Page 154: ...nt group temporarily Calls will then be diverted to the next hunt group subscriber Press the MENU key Scroll to the Settings menu item Confirm selection Scroll to the Applications menu item Confirm selection Scroll to the Participate in a hunt group On menu item Change setting Press the Save softkey The new setting has been saved ...

Page 155: ...Press the MENU key Scroll to the Settings menu item Confirm selection Scroll to the Applications menu item Confirm selection Scroll to the CC user function menu item Confirm selection Enter your personal phone number maximum 5 digits Scroll to the Password menu item Enter your personal six digit password Log in using the Login softkey To log off confirm with OK when you see the status message User...

Page 156: ...er menu item Confirm selection Enter the current PIN Confirm selection Next the message Log out complete appears in the display If you have appropriate authorization you can also log out without entering the PIN If you communicate securely logging out without a PIN is not configurable You can configure an ON OUT function key 114 for logging out quickly If a user is logged in then the function key ...

Page 157: ...nfirm selection Confirm the displayed number Scroll to the Change PIN menu item Confirm selection Enter the current PIN Scroll to the New PIN menu item Enter the new PIN Scroll to the Reenter PIN menu item Enter the new PIN again to verify Confirm the entry by pressing the Save softkey The new setting is then saved This PIN is identical to the lock PIN that you can use to lock your phone 82 ...

Page 158: ...s menu item Confirm selection Scroll to the User administration menu item Confirm selection Confirm the displayed number Scroll to the Delete PIN menu item Confirm selection Enter the current PIN Confirm selection Next the message PIN deleted appears in the display If you communicate securely you cannot delete the PIN ...

Page 159: ...em administrator to be able to access your telephone and adjust certain settings via a Web browser on a PC You can bar this access In addition you can also make settings to allow CTI applications to log onto your telephone Viewing your IP settings Press the MENU key Scroll to the Settings menu item Confirm selection Scroll to the IP settings menu item Confirm selection Scroll to the Gatekeeper lis...

Page 160: ...nu item Confirm selection Scroll to the Send ping menu item Confirm selection Scroll to the network component whose accessibility you want to test e g Def GK Confirm selection You will then receive an info message stating whether the selected network components have been reached Under IP address you can yourself input an IP address whose accessibility you want to test ...

Page 161: ... Scroll to the Settings menu item Confirm selection Scroll to the IP settings menu item Confirm selection Scroll to the Security menu item Confirm selection Scroll to the Web terminal access Off menu item Press the Modify softkey The setting switches to Web terminal access On Press the Save softkey The new setting has been saved ...

Page 162: ... Scroll to the Login mode menu item Confirm selection Enter the PIN Press the Save softkey The login mode is now activated for 1 minute You must start the CTI application e g Avaya Com4Tel on the PC during this time After successful registration login mode is immediately ended and the message CTI application registered is displayed If you wish to register a CTI application on a different PC on you...

Page 163: ...the MENU key Scroll to the Settings menu item Confirm selection Scroll to the IP settings menu item Confirm selection Scroll to the Security menu item Confirm selection Scroll to the 802 1X registration data menu item Confirm selection Scroll to the 802 1X ID menu item Change the ID if necessary Scroll to the Password menu item Enter old PIN Scroll to the New password menu item Enter the new PIN S...

Page 164: ...gs Press the Save softkey The new setting is then saved Your system administrator will give you the password In order to save a change in the 802 1X you must always change the password at the same time The new password may not be identical to the old password ...

Page 165: ...selection Scroll to the IP settings menu item Confirm selection Scroll to the User data menu item Confirm selection Scroll to the Save data menu item Press the Save softkey Your personal settings and your phone book will now be saved By default this feature is not enabled If you have any questions please contact your system administrator ...

Page 166: ...Confirm selection Scroll to the IP settings menu item Confirm selection Scroll to the User data menu item Confirm selection Scroll to the Load data menu item Confirm selection If data have been saved they will now be loaded By default this feature is not enabled If you have any questions please contact your system administrator ...

Page 167: ...menu item Confirm selection Scroll to the Display Acoustics menu item Confirm selection Scroll to the Recogn partial nos menu item Confirm selection A list of partial numbers assigned to date opens You can create edit and delete entries as usual The local telephone number uses the number name translation first then the partial number list The first suitable partial number will be used for name tra...

Page 168: ...l to the Settings menu item Confirm selection Scroll to the Display Acoustics menu item Confirm selection Scroll to the Recogn partial nos menu item Confirm selection A list of partial numbers assigned to date opens Scroll to the Create new entry menu item Confirm selection Enter the number and name Press the Save softkey ...

Page 169: ...he MENU key Scroll to the Settings menu item Confirm selection Scroll to the Display Acoustics menu item Confirm selection Scroll to the Recogn partial nos menu item Confirm selection Select a list entry Confirm selection You can change the number and name in the individual view Press the Save softkey ...

Page 170: ...leting partial number entries Press the MENU key Scroll to the Settings menu item Confirm selection Scroll to the Display Acoustics menu item Confirm selection Scroll to the Recogn partial nos menu item Confirm selection Select a list entry Press the Delete softkey ...

Page 171: ...xtent For example remove internal calls from the call list An entry is included in the call list only when the internal caller explicitly requests a callback Press the MENU key Scroll to the Settings menu item Confirm selection Scroll to the Show call list menu item Confirm selection Scroll to the desired entry e g Internal calls Confirm selection Select the desired setting for example No Confirm ...

Page 172: ...172 Add on equipment Add on equipment Add on equipment Button module 173 Headset 176 Setting the CTI application 178 ...

Page 173: ...splay keys that show the assigned functions The display keys of the Button Module can be assigned to Partners Abbreviated dialing destinations Functions All keys and settings of the Button Module are treated by your phone just like the keys and settings set up on the phone 1 2 2 1 Display keys 2 Display areas ...

Page 174: ...ress the flashing display key without lifting the handset you answer the call in handsfree mode Display keys as destination keys If your system administrator has enabled call numbers on your Button Modules you can use the display keys as destination keys Lift the handset Press the display key When you press the display key without lifting the handset you call the destination in handsfree mode You ...

Page 175: ...phone You can assign functions to the Button Module s display keys yourself 114 Setting display contrast and brightness Press the MENU key Scroll to the Settings menu item Confirm selection Scroll to the Display Acoustics menu item Confirm selection Scroll to the Brightness or Contrast menu item Confirm selection Scroll to the DSS Module menu item Increase or decrease the brightness Confirm the en...

Page 176: ...rs you can talk with them through your headset Answering calls If you receive a call Press the HEADSET key You are now speaking to the other party via the headset Continuing a call through the headset with the handset picked up During a call Press the HEADSET function key LED lights up Replace the handset You are now speaking to the other party via the headset Continuing a headset call using the h...

Page 177: ... press the HEADSET key on the telephone Otherwise you will not be answer or end calls as usual Second calls are not signaled in the headset The ringing tone on the telephone may not be set to Off Otherwise calls will not be signaled in your headset When Automatic line seizure has been set IntelliStand You immediately dial when you lift the headset from the cradle Replace the headset in the cradle ...

Page 178: ...st proceed as follows Press the MENU key Scroll to the Settings menu item Confirm selection Scroll to the CTI application TAPI menu item Press the Modify softkey several times if required until the setting changes to CTI application Other CTI Press the Save softkey You now need to use the CTI setup menu item to carry out additional settings for this CTI application e g protocol type or dialing met...

Page 179: ...g the manual as required Consulting the manual as required Consulting the manual as required Function keys 180 Information in the idle display 183 Ringing and handset tones 185 Menu overview 187 Troubleshooting 192 ...

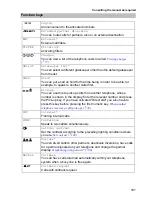
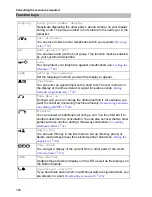
Page 180: ...ust be enabled in the communication server ON Log in user PUM If this function has been enabled in the communication server you can log onto any telephone in your system with your extension number and a personal PIN Log in out Log in out user The function key showsOFF IP for a logged in user and ON IP when no user is logged in The IP user can log on and out directly If you have authorization from ...

Page 181: ...from another telephone whose number is shown in the display Enter the relevant number and press the Pick up key If you have activated Direct dial you also have to press this key before pressing the first numeric key When another telephone receives a call pick up 36 INT Internal Filtering internal calls CONF Conference Speak to two callers simultaneously Setting contrast Set the contrast according ...

Page 182: ...s Setting reminders appointments 79 Tone dial on During a call you can change the dialing method if for example you want to control an answering machine remotely Deactivating automatic tone dialing DTMF 128 Transfer You can answer an additional call during a call You then forward it to another subscriber in a consultation You can also connect the two other parties with one another during a three w...

Page 183: ...P address conflict From the time it is commissioned the IP phone checks repeatedly whether there is another device in the network with the same IP address and is therefore interfering with network access If this is the case the terminal is not functional other devices also experience malfunctions Your system administrator must resolve the error in the network Seize line for PAxx PAxx is a placehol...

Page 184: ... diverted to another telephone Call diversions enabled Call diversions have been set up for several of your own numbers Hunt group x off You have removed your telephone from hunt group x Searching network Gatekeeper cannot be reached The LAN has been successfully accessed but registration at a gatekeeper has still failed Telephone locked Your telephone is locked Select the Telephone locked menu it...

Page 185: ...ls You can deactivate this tone 113 Alert tone Additional call during a conversation partner beep Executive call VIP function you can deactivate this tone 113 Call for Handsfree Answer Back Announcement also with reply Message on busy special tone Tone during a cut in call Signal tone When switching on monitoring handsfree and dialing with the handset on hook The other party can also hear this ton...

Page 186: ...186 Consulting the manual as required Ringing and handset tones Call melodies Melody 1 Melody 2 T3D3 Tivoli Sabah Springtime Waterfall Practice Jumping Infantryman ...

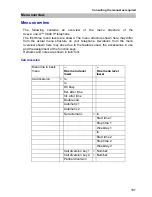
Page 187: ...e menu overview shown here may arise due to the features used the accessories in use and the assignment of the function keys Remarks and notes are shown in italic font Call diversion Menu line in basic menu One menu level lower One menu level lower Call diversion to to On busy Ext after time Int after time Double call Automatic 1 Automatic 2 Set automatic to Start time 1 Stop time 1 Weekday 1 to S...

Page 188: ...ent data only if appointment entered Enter new appointment Time 00 00 Date XX XX XX Text Call number Timeframe Menu line in basic menu One menu level lower One menu level lower Charges Charge display for last call for next to last call for third last call for fourth last call Total call charges Charges On Off Charge displ Amount Units Delete single counter ...

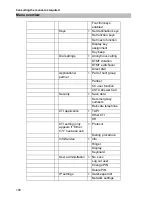
Page 189: ...IN Automatic locking On Off Lock at 00 00 Menu line in basic menu One menu level lower One menu level lower Time zones Current time zones Menu line in basic menu One menu level lower One menu level lower Settings Display Acoustics Second call Do not disturb Set acoustics Setting contrast not for 9640 Set brightness only 9640 Switch language Own name Request time partner Partial numbers Function li...

Page 190: ...tchover Direct dial Applications partner Part of hunt group Partner CC user function CSTA Answer Call Security Save data Set emergency numbers Relocate telephone CTI application TAPI Other CTI Off CTI setting only appears if Other CTI has been set Protocol Dialing procedure Info Service Info Ringer Display Keyboard User administration No xxxx Log out user Change PIN Delete PIN IP settings Gatekeep...

Page 191: ...equired Menu overview Send ping Security User data VIP PIN entry Receive VIP functions Send VIP functions Set VIP partner Display call list if authorized Internal calls External calls Answering position Handsfree Answer Back Off On ...

Page 192: ...tner display is updated by the communication server Note The display is automatically updated when a partner or one of your colleagues uses their telephone Short tones during a call A second call is being signaled Consult the Making several connections simultaneously 39 section to find out about possible operating steps or You have activated monitoring or handsfree You and the other party hear a s...

Page 193: ...r A call is shown in the display but your telephone does not ring Check whether the ringing tone is deactivated in the Do not disturb menu Prolonged IP address conflict From the time it is commissioned the IP phone checks repeatedly whether there is another device in the network with the same IP address and is therefore interfering with network access If this is the case the terminal is not functi...

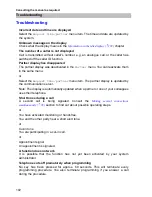
Page 194: ...194 Consulting the manual as required Troubleshooting ...

Page 195: ...ppointment message 80 Deactivating 81 Deleting 81 Menu 188 New entry 79 Viewing 80 Assigning a line as the executive line 108 Assigning numbers to keys 114 Automatic callback 30 Automatic connection 146 Automatic locking 84 Automatic redial 32 B Basic rules of operation 19 Being called 35 Block 82 Blocking central data saving 138 Brightness display 149 Busy 30 32 C Call diversion 52 187 Automatic ...

Page 196: ...l 52 Diverting from partner to partner 100 Diverting on busy 53 Diverting partner calls to your telephone 99 Diverting to partner 98 Diverting to voicemail 75 During a conversation 40 Forwarding 41 Picking up from another phone 36 Pick up 36 Putting on hold 36 Cancel entry 19 Canceling automatic callback 30 Canceling or exiting an action 19 Carrying out immediate central data saving 137 Changing t...

Page 197: ...me 20 Deactivate automatic tone dialing DTMF 128 Deactivating direct dialing 127 Declaration of conformity 9 Delayed internal call diversion 53 Destination key 30 Creating 115 From phone book 116 Modify number 117 Display 18 20 Display keys 18 Speed dial 19 Displaying key assignment 119 Disposing of old equipment correctly 12 Diverting calls 52 Diverting partners 98 Do not disturb 113 Double call ...

Page 198: ...ding callers 39 Function keys 21 90 180 Information in the idle display 152 Setting up 120 121 with LED 119 Function list 68 Idle display 151 Functions 180 Assigning to keys 114 In several levels 21 Selecting in the menu 19 G Gatekeeper 25 Entering manually 25 None found on autom Search run 25 Search 25 Selecting 27 Selecting when logging in 27 H Handset Making calls without 37 Handsfree 37 176 Co...

Page 199: ...t a glance 15 L LED display 90 Letters 22 Levels 21 License 9 List of all conference users 46 Listening to a caller out loud monitoring 37 Listening to voice messages 75 Location Tips 11 Lock 82 189 Lock at 85 Locking 83 Log in 132 Log out 133 Log out user 156 Logging in 25 132 Logging in to automatic call distribution 155 Logging on to the telephone 132 Logging out from the telephone 133 Lower ca...

Page 200: ... 75 Messages Delete 76 Deleting all 76 Listening to 75 Monitoring 37 Multiple conference 45 47 Controller 45 Ending 50 Passive participants 45 Transferring 49 Mute 29 35 N Notes Operating steps 11 Troubleshooting 192 Number saving in a different location 63 64 76 O Open Source 9 Overview 13 15 29 P Partial numbers Deleting an entry 170 Editing entries 169 New entry 168 Partner 86 Assigning to anot...

Page 201: ...IN 82 PIN Personal Identification Number 82 Changing 82 157 Deleting 158 Entering 26 Placing a call 29 91 With a destination key 30 Private User Mobility 132 Programming 19 Protection 82 Putting groups together 105 R Reception 111 Recognition of partial numbers 167 Redial list 66 Redialing Automatic 32 Reducing groups 106 Refer back 40 in consultation 115 Registering CTI application 162 Relocating...

Page 202: ...key 103 Setting up a connection for partners 109 Setting up and activating the double call destination 54 Setting up own name 135 Setting up partner names 87 Setting up the secretary telephone 140 144 Setting up VIP functions 139 Settings 24 189 Softkeys 20 Status 20 Switch 39 Switch off microphone 29 35 Switching between calls 41 Switching between parties 41 Switching dialing method 128 Switching...

Page 203: ...ternal and external calls 185 Tones in the handset 185 Two way intercom system 139 U Unlocking 83 Upper case letters 22 User data load 166 Saving 165 Viewing modifying 156 User manual in other languages 11 User manual language versions 11 Using VIP functions 145 V Viewing audio data 65 VIP functions using 145 VIP ringing tone 113 ...

Page 204: ...ankfurt am Main Germany T 0 800 266 10 00 F 0 800 266 12 19 International T 49 69 7505 28 33 F 49 69 7505 5 28 33 infoservice avaya com avaya de 2008 All rights reserved for Avaya Inc and Avaya GmbH Co KG 02 08 Edition 1 0 Integral Enterprise en ...

Reviews:

Related manuals for 9620 Deskphone Edition