background image

câble (les extrémités métalliques exposées d'un connecteur de câble) connectés au port

RJ11.

Installation et retrait du module interne Advanced Gateway 2330

Cette section fournit des informations sur l'installation et le retrait des modules internes du

Advanced Gateway 2330.

Retrait du couvercle du Advanced Gateway 2330

Utilisez les instructions de cette procédure pour retirer le couvercle du Advanced Gateway

2330.

 Voltage:

N'ouvrez pas le couvercle du Advanced Gateway 2330 lorsque l'unité est alimentée.

Produits préalables

• Veuillez vous assurer que vous possédez un module prêt à être installé avant d'ouvrir le

couvercle du châssis.

• Veuillez vous assurer que vous avez un tournevis Phillips N°1.
• Veuillez vous assurer que le Advanced Gateway 2330 est éteint. Vous ne pouvez pas

remplacer les composants internes à chaud.

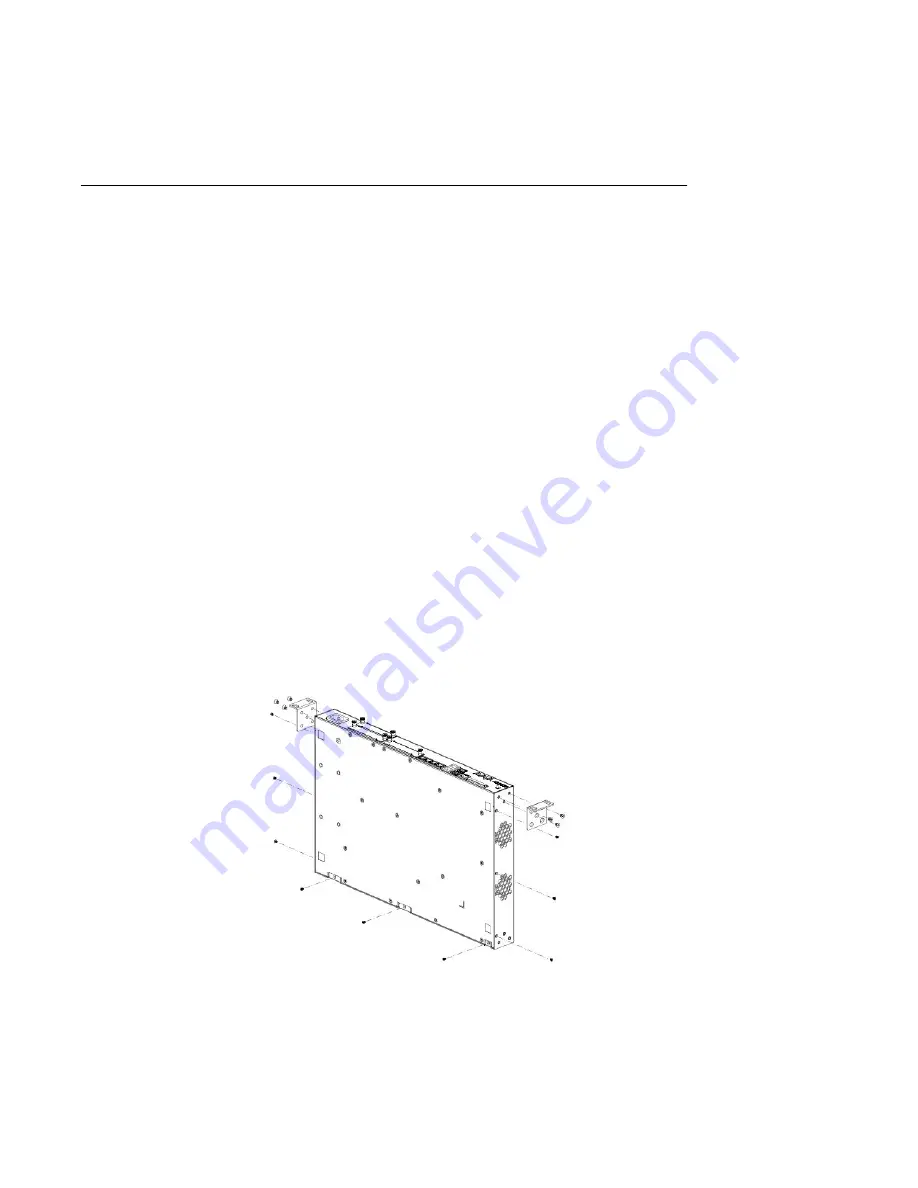
1. Retirez les trois vis fixant le support gauche au châssis et au couvercle.

Veuillez vous référer au schéma suivant.

2. Retirez les trois vis fixant le côté gauche du couvercle au châssis.
3. Retirez les trois vis fixant le support droit au châssis et au couvercle.

Modules du Advanced Gateway 2330

Regulatory Information

August 2013     67

Summary of Contents for Advanced Gateway 2330

Page 1: ...Regulatory Information Avaya Advanced Gateway 2330 Release 10 3 5 NN47264 106 Issue 01 02 August 2013 ...

Page 2: ...Heritage Nortel Software for which the scope of the license is detailed below Where the order documentation does not expressly identify a license type the applicable license will be a Designated System License The applicable number of licenses and units of capacity for which the license is granted will be one 1 unless a different number of licenses or units of capacity is specified in the document...

Page 3: ...ountries Downloading Documentation For the most current versions of Documentation see the Avaya Support website http support avaya com Contact Avaya Support See the Avaya Support website http support avaya com for product notices and articles or to report a problem with your Avaya product For a list of support telephone numbers and contact addresses go to the Avaya Support website http support ava...

Page 4: ...4 Regulatory Information August 2013 Comments infodev avaya com ...

Page 5: ...aya Mentor videos 13 Support 14 Chapter 3 English 15 Before you begin 15 Installing the Advanced Gateway 2330 on a table or shelf 15 Installing the Advanced Gateway 2330 on a wall or under a desktop 16 Installing the Advanced Gateway 2330 in an equipment rack 17 Advanced Gateway 2330 power and grounding specifications 19 Advanced Gateway 2330 power specifications 19 Advanced Gateway 2330 grounding...

Page 6: ...nte de alimentación de CA 49 Módulos de Advanced Gateway 2330 49 Protección de los módulos de Advanced Gateway 2330 49 Instalación y extracción de módulos internos de Advanced Gateway 2330 51 Protección de los cables y conectores 54 Mensajes de seguridad 55 Chapter 6 Français 59 Avant de commencer 59 Installer le Advanced Gateway 2330 sur une table ou une étagère 59 Installer le Advanced Gateway 2...

Page 7: ...ds as detailed below National Electromagnetic Compliance EMC Statements of Compliance FCC statement USA only This equipment has been tested and found to comply with the limits for a Class A digital device pursuant to Part 15 of the Federal Communications Commission FCC rules These limits are designed to provide reasonable protection against harmful interference when the equipment is operated in a ...

Page 8: ...rder Code Network Connectors T1 lines 1 16 04DU9 1SN 04DU9 1ZN 6 0N RJ 48C ICES statement Canada only Canadian Department of Communications Radio Interference Regulations This digital apparatus Avaya Advanced Gateway 2330 does not exceed the Class A limits for radio noise emissions from digital apparatus as set out in the Radio Interference Regulations of the Canadian Department of Communications ...

Page 9: ...lity to radio interference in accordance with the application of Council Directive 2004 108 EC Conformity is declared by the application of EN 55024 CISPR 24 EN 300386 statement The Avaya Advanced Gateway 2000 complies with the requirements of EN 300386 V1 3 3 for emissions and for immunity for a Class A device intended for use in either Telecommunications centre or locations other than telecommun...

Page 10: ...uipment is used in a domestic environment radio disturbance may arise When such trouble occurs the user may be required to take corrective actions BSMI statement Taiwan only This is a Class A product based on the standard of the Bureau of Standards Metrology and Inspection BSMI CNS 13438 and CNS14336 Class A National Safety Statements of Compliance EN 60950 statement This is to certify that the Av...

Page 11: ...0 VAC 0 5 A Max 50 60 Hz Información NOM unicamente para México La información siguiente se proporciona en el dispositivo o en los dispositivos descritos en este documento en cumplimiento con los requisitos de la Norma Oficial Méxicana NOM Exportador Avaya 4655 Great America Parkway Santa Clara CA 95054 USA Importer Avaya de México S A de C V Avenida Insurgentes Sur 1605 Piso 30 Oficina Col San Jo...

Page 12: ... Lead including solder used in PCBs Cadmium Mercury Hexavalent Chromium and Bromine Avaya declares compliance with the European Union EU RoHS Directive 2002 95 EC WEEE Directive Compliance Statement This product at end of life is subject to separate collection and treatment in the EU Member States Norway and Switzerland and therefore is marked with the symbol shown at the left Treatment applied at...

Page 13: ...more information or to register you can access the Web site at http avaya learning com Avaya Mentor videos Avaya Mentor is an Avaya run channel on YouTube that includes technical content on how to install configure and troubleshoot Avaya products Go to http www youtube com AvayaMentor and perform one of the following actions Enter a key word or key words in the Search Channel to search for a speci...

Page 14: ...lso search for release notes downloads and resolutions to issues Use the online service request system to create a service request Chat with live agents to get answers to questions or request an agent to connect you to a support team if an issue requires additional expertise Introduction 14 Regulatory Information August 2013 Comments infodev avaya com ...

Page 15: ...tch unit for ventilation Between 2 to 3 feet ft 0 61 to 0 91 meters m of additional clearance around the Advanced Gateway 2330 for access to the cable connectors on the front and front panels Installing the Advanced Gateway 2330 on a table or shelf You can install a single Advanced Gateway 2330 on any flat surface that can safely support the weight of the router with interface modules installed 8 ...

Page 16: ...ing brackets for either the front or rear panel of the router to face the operator The following figures illustrate the mounting bracket positions for under desktop installation Figure 1 Front panel facing operator Figure 2 Rear panel facing operator 2 Insert screws through the holes in the mounting brackets into the underside of the desktop Follow these steps to install the Advanced Gateway 2330 ...

Page 17: ...tool Phillips screwdriver for attaching brackets to the switch The Advanced Gateway 2330 requires one rack unit 1 75 inches 44 45 millimeters The rack must be bolted to the floor and braced if necessary The rack must be grounded to the same grounding electrode used by the power service in the area The ground path must be permanent and must not exceed 1 ohm of resistance from the rack to the ground...

Page 18: ...ateway 2330 in an equipment rack Table 1 Mounting bracket position options for the Advanced Gateway 2330 Position Description Front panel facing operator Rear panel facing operator 2 Slide the switch into the rack Insert and tighten the rack mount screws The Advanced Gateway 2330 has two internal non removable fans Allow sufficient clearance within and around the unit for maintenance and for prope...

Page 19: ...ont panel You must attach the other end of the ground wire to the most convenient site grounding point for your installation Use a maximum of 8 AWG grounding cable for the Advanced Gateway 2330 Important Avaya recommends that you install the chassis in the equipment rack before you install the ground lug and the optional external interface modules Connecting the Advanced Gateway 2330 to AC power R...

Page 20: ...late and handles Do not touch pins or electrical connections Do not leave interface module or power supply module slots empty You must fill all slots with modules or slot covers to maintain safety compliance proper cooling and electromagnetic interference EMI containment in the shelf Ensure that your environment meets the requirements for temperature humidity and cleanliness Do not overtighten thu...

Page 21: ...tes the ringer Foreign Exchange Office FXO Interface Modules Important Ensure you use standard straight through RJ11 modular telephone cables with FXO interface modules TIP must connect to TIP and RING must connect to RING Voltage The 2 port and 4 port FXO interface modules can receive a ring signal that is a source of hazardous voltage Do not touch the RJ11 port conductors or the conductors of a ...

Page 22: ...e screws securing the right hand side bracket to the chassis and the top cover 4 Remove the three screws securing the right hand side of the top cover to the chassis 5 Slowly slide the top cover back to take it off of the Advanced Gateway 2330 Installing the Advanced Gateway 2330 internal PVIM module Use the procedure in this section to install an internal PVIM module Prerequisites Ensure you have...

Page 23: ...n the slot on the Main Board pushing down gently but firmly to fully seat the module The release latches close when the PVIM is properly installed Removing the Advanced Gateway 2330 internal PVIM module Use the procedure in this section to remove a PVIM module from the Advanced Gateway 2330 Prerequisites Ensure you have a Phillips 1 screwdriver Ensure the Advanced Gateway 2330 is powered off You c...

Page 24: ...s and connectors to LAN ports on the Advanced Gateway 2330 Support cables to prevent stress on the connectors If you have a high density cable configuration use an appropriate cable management system to relieve stress on the cables Also ensure that cables are threaded neatly and that you employ cable ties as required Do not exceed the bend radius recommended for the type of cable installed Fiber o...

Page 25: ...to an optical fiber or connector port Always assume that fiber optic cables are connected to a light source Warning Installation must be performed by qualified service personnel only Read and follow all warning notices and instructions marked on the product or included in the documentation Warning This product relies on the building installation for overcurrent protection Ensure that a fuse or cir...

Page 26: ...n Line Cord for all network connections Caution ensure you provide DC power through either a fuse or DC circuit breaker with a maximum rating of 12 amps Caution Risk of equipment damage The fan is essential for maintaining optimal system operating temperature If you plan to replace the fan tray while the system power is on ensure you have another fan tray ready to insert immediately Watch the fan ...

Page 27: ...ear an antistatic wrist strap connected to an ESD jack when you work with interface modules The router does not have an ESD jack connect the antistatic wrist strap to an ESD jack at your site Ensure that the wrist strap makes contact with your skin Safety Messages Regulatory Information August 2013 27 ...

Page 28: ...English 28 Regulatory Information August 2013 Comments infodev avaya com ...

Page 29: ...tens 5 08 cm zur Belüftung auf jeder Seite der Switcheinheit Zwischen 60 und 90 cm zusätzlichem Abstand um den Advanced Gateway 2330 für Zugang zu den Kabelanschlüssen auf der Vorderseite und den Bedienfeldern Montage des Advanced Gateway 2330 auf einem Tisch oder Regal Sie können einen einzelnen Advanced Gateway 2330 auf einer ebenen Oberfläche anbringen die das Gewicht des Routers mit installier...

Page 30: ...hren Sie zur Befestigung des Advanced Gateway 2330 unter einer Arbeitsfläche die folgenden Schritte aus 1 Bringen Sie an jeder Routerseite eine Befestigungsklammer an Sie können die Befestigungsklammer so anbringen dass die Vorder oder Rückseite in Richtung zum Bediener liegt Die folgenden Abbildungen zeigen die Positionen der Befestigungsklammern bei der Montage unter einer Arbeitsfläche Deutsche...

Page 31: ...te der Arbeitsfläche ein Führen Sie zur Montage des Advanced Gateway 2330 an einer Wand die folgenden Schritte aus 1 Bringen Sie an jeder Routerseite eine Befestigungsklammer an Die folgende Abbildung zeigt die Positionen der Befestigungsklammer bei der Wandmontage Montage des Advanced Gateway 2330 an einer Wand oder unter einer Arbeitsfläche Regulatory Information August 2013 31 ...

Page 32: ... mm Der Träger muss im Boden verschraubt und gegebenenfalls verstärkt werden Der Träger muss durch die gleiche Erdungselektrode geerdet werden die vom Stromversorger in dem Bereich verwendet wird Der Erdungspfad muss dauerhaft bestehen und darf 1 Ohm Widerstand vom Träger zur Erdungselektrode nicht überschreiten Stellen Sie sicher dass die Befestigungsklammern fest am Gehäuse angebracht sind Stell...

Page 33: ...teway 2330 Position Beschreibung Vorderseite in Richtung zum Bediener Rückseite in Richtung zum Bediener 2 Schieben Sie den Switch in den Träger Führen Sie die Trägerbefestigungsschrauben ein und ziehen Sie sie an Der Advanced Gateway 2330 verfügt über zwei interne nicht entfernbare Lüfter Lassen Sie für eine ausreichende Belüftung und zu Wartungszwecken ausreichend Abstand innerhalb und außerhalb...

Page 34: ...gskabel mit dem Bügel verbinden und den Bügel rechts auf der Gehäusevorderseite anbringen Das andere Ende des Erdungskabels müssen Sie an dem für die Montage am besten geeigneten Erdungspunkt anbringen Verwenden Sie für den Advanced Gateway 2330 maximal ein Erdungskabel der Größe AWG 8 Important Es wird empfohlen zuerst das Gehäuse im Geräteträger anzubringen bevor Sie den Erdungsbügel und die opt...

Page 35: ...Avaya Advanced Gateway 2330 Tragen Sie stets ein geerdetes antistatisches Armband wenn Sie mit Modulen umgehen Platzieren Sie Module immer auf geeignetem antistatischem Material Fassen Sie Module an der Blende und den Griffen an Berühren Sie keine Anschlussstifte oder elektrischen Verbindungen Lassen Sie keine Steckplätze für Schnittstellen oder Netzteilmodule leer Verschließen Sie alle Steckplätz...

Page 36: ...nittstellenmodule mit zwei und vier Anschlüssen verfügen über einen Klingeltongenerator der gefährliche Spannungen erzeugen kann Berühren Sie keine RJ11 Anschlussleiter keine mit dem RJ11 Anschluss verbundene Kabelleiter d h die offenen Metallenden eines Kabelanschlusses und keine Platine wenn der Rufstromgeber aktiv ist ein eingehender Anruf aktiviert den Rufstromgeber FXO Schnittstellenmodule Fo...

Page 37: ...t ist Vorbereitung Stellen Sie sicher dass das zu installierende Modul bereitliegt bevor Sie die obere Gehäuseabdeckung öffnen Legen Sie einen Kreuzschlitzschraubendreher Nr 1 bereit Stellen Sie sicher dass der Advanced Gateway 2330 ausgeschaltet ist Ein Hot Swapping interner Komponenten ist nicht möglich 1 Entfernen Sie die drei Schrauben mit denen die linke Seitenklammer am Gehäuse und der obere...

Page 38: ...stallierende PVIM Modul bereitliegt bevor Sie die obere Gehäuseabdeckung öffnen Legen Sie einen Kreuzschlitzschraubendreher Nr 1 bereit Stellen Sie sicher dass der Advanced Gateway 2330 ausgeschaltet ist Ein Hot Swapping interner Komponenten ist nicht möglich Verfahrensschritte 1 Entfernen Sie die obere Abdeckung des Advanced Gateway 2330 Weitere Informationen finden Sie unter Entfernen der oberen...

Page 39: ...uzschlitzschraubendreher Nr 1 bereit Stellen Sie sicher dass der Advanced Gateway 2330 ausgeschaltet ist Ein Hot Swapping interner Komponenten ist nicht möglich Stellen Sie sicher dass für das entfernte PVIM Modul ein Antistatikbeutel oder eine Antistatikfolie bereitliegt Verfahrensschritte 1 Entfernen Sie die obere Abdeckung des Advanced Gateway 2330 Weitere Informationen finden Sie unter Entfern...

Page 40: ...beltyp nicht den empfohlenen Biegeradius Lichtleitkabel und Lichtleitkabel Stecker erfordern eine besondere Behandlung Bringen Sie auf nicht angeschlossenen Steckern einen Gummi Schutzkontaktstecker an Reinigen Sie die Stecker bevor Sie Lichtleitkabel installieren oder austauschen Überschreiten Sie nicht den für Lichtleitkabel empfohlenen Biegeradius Der zulässige Biegeradius für Lichtleitkabel li...

Page 41: ...iter verwendet wird Caution Dieses Gerät ist ein Produkt der Klasse A Beim Betrieb des Geräts in häuslichen Umgebungen können Funkstörungen auftreten In diesem Fall muss der Benutzer gegebenenfalls die erforderlichen Maßnahmen zu deren Beseitigung ergreifen Caution Stapeln Sie bei der Montage des Geräts in einem Träger keine Einheiten direkt aufeinander Jede Einheit muss im Träger mit geeigneten B...

Page 42: ...m Verbinden von Kabeln oder bei Wartungsarbeiten für einen Advanced Gateway 2330 stets ein antistatisches Armband das an einer ESD Buchse angeschlossen ist um eine Beschädigung durch elektrostatische Entladung zu vermeiden Stellen Sie sicher dass das Armband Ihre Haut berührt Caution Gefahr von Geräteschaden Fassen Sie Schnittstellenmodule immer an den Kanten oder gegebenenfalls Griffen an Electro...

Page 43: ...ada a menos de 1 8 metros 6 pies es necesario un circuito para cada fuente de alimentación consultar la tabla especificaciones de alimentación de CA y CC al menos 5 08 cm 2 pulgadas a cada lado de la unidad de conmutación para la ventilación entre 0 61 y 0 91 metros m 2 y 3 pies de zona libre adicional alrededor de Advanced Gateway 2330 para el acceso a los conectores de los cables de la parte fro...

Page 44: ...ación de Advanced Gateway 2330 en una pared o debajo de un escritorio Herramienta necesaria destornillador de estrella para instalar los soportes en el conmutador Para instalar Advanced Gateway 2330 debajo de un escritorio siga estos pasos 1 Instale un soporte de montaje a cada lado del enrutador Los soportes de montaje se pueden instalar para que el panel frontal o el panel trasero del enrutador ...

Page 45: ...e inferior del escritorio Para instalar Advanced Gateway 2330 en una pared siga estos pasos 1 Instale un soporte de montaje a cada lado del enrutador Las figuras siguientes ilustran las posiciones de los soportes de montaje en una instalación de pared Instalación de Advanced Gateway 2330 en una pared o debajo de un escritorio Regulatory Information August 2013 45 ...

Page 46: ...idor 44 45 milímetros 1 75 pulgadas El bastidor debe estar atornillado al suelo y apuntalado si fuera necesario El bastidor debe estar conectado a tierra en el mismo electrodo de tierra que utiliza el servicio de alimentación eléctrica de la zona La conexión a tierra debe ser permanente y no debe superar 1 ohmio de resistencia desde el bastidor hasta el electrodo de tierra Asegúrese de que los sop...

Page 47: ... Posición Descripción Panel frontal hacia el usuario Panel trasero hacia el usuario 2 Deslice el conmutador en el bastidor Inserte y apriete los tornillos de montaje del bastidor Advanced Gateway 2330 tiene dos ventiladores internos no extraíbles Deje suficiente espacio libre dentro y alrededor de la unidad para realizar el mantenimiento y para que haya una circulación de aire adecuada Mantenga lo...

Page 48: ...adecuado No utilice alargadores Especificaciones de conexión a tierra de Advanced Gateway 2330 Con Advanced Gateway 2330 se incluye un terminal de tierra El cable de tierra se debe conectar al terminal y el terminal al chasis en la parte derecha del panel frontal El otro extremo del cable de tierra se debe conectar al punto de conexión a tierra más conveniente para la instalación Para la conexión ...

Page 49: ...5 15P 100 ó 120 V de CA 50 60 Hz Monofásico Reino Unido Enchufe macho BS1363 con fusible 240 V de CA 50 Hz Monofásico Australia Enchufe macho AS3112 1981 240 V de CA 50 Hz Monofásico Módulos de Advanced Gateway 2330 Protección de los módulos de Advanced Gateway 2330 Las siguientes prácticas evitan que el equipo sufra daños al trabajar con Advanced Gateway 2330 de Avaya Lleve siempre una pulsera an...

Page 50: ...n terminal de hilo B RING Si invierte la polaridad el inicio de conexión a tierra FXS no funciona Important Avaya no admite conexiones de puerto FXS con el exterior del edificio Utilice conexiones FXS únicamente en el interior del edificio Voltage Los módulos de interfaz FXS de 2 y 4 puertos tienen un generador de señal de llamada que es una fuente de voltajes peligrosos No toque los conductores d...

Page 51: ... Advanced Gateway 2330 Voltage No abra la cubierta superior de Advanced Gateway 2330 mientras la unidad esté activada Requisitos esenciales Asegúrese de tener un módulo listo para su instalación antes de abrir la cubierta superior del chasis Asegúrese de tener un destornillador de estrella del nº 1 Asegúrese de que Advanced Gateway 2330 esté desactivado No se pueden sustituir componentes internos ...

Page 52: ...e esta sección Requisitos esenciales Asegúrese de tener un módulo PVIM listo para su instalación antes de abrir la cubierta superior del chasis Asegúrese de tener un destornillador de estrella del nº 1 Asegúrese de que Advanced Gateway 2330 esté desactivado No se pueden sustituir componentes internos con el enrutador activado Pasos del procedimiento 1 Retire la cubierta superior de Advanced Gatewa...

Page 53: ...n módulo PVIM de Advanced Gateway 2330 siga el procedimiento de esta sección Requisitos esenciales Asegúrese de tener un destornillador de estrella del nº 1 Asegúrese de que Advanced Gateway 2330 esté desactivado No se pueden sustituir componentes internos con el enrutador activado Asegúrese de tener una bolsa u hoja antiestática disponible para el módulo PVIM que se está extrayendo Pasos del proc...

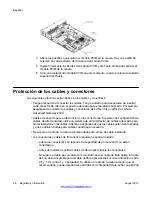
Page 54: ...ctores Si existe una configuración de cables de alta densidad utilice un sistema de administración de cables adecuado para aliviar la tensión en los cables Además asegúrese de que los cables estén bien roscados y que se utilicen bridas para cables cuando sea necesario No supere el radio de curvatura recomendado para el tipo de cable instalado Los conectores y cables de fibra óptica requieren espec...

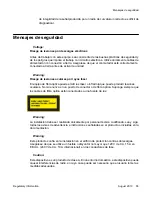
Page 55: ...re nunca en un puerto de conector o de fibra óptica Suponga siempre que los cables de fibra óptica están conectados a una fuente de luz Warning La instalación debe ser realizada únicamente por personal técnico cualificado Lea y siga todos los avisos de advertencia e instrucciones señaladas en el producto o incluidas en la documentación Warning Este producto confía en la instalación en el edificio ...

Page 56: ... certificación CSA en todas las conexiones de red Caution Asegúrese de que la alimentación de CC se realice a través de un fusible o disyuntor de CC con una potencia nominal máxima de 12 amperios Caution Riesgo de daños en el equipo El ventilador es esencial para mantener la temperatura óptima de funcionamiento del sistema Si planea sustituir la bandeja de ventiladores mientras el sistema está act...

Page 57: ...r daños por descargas electrostáticas lleve siempre una pulsera antiestática conectada a un conector ESD al trabajar con módulos de interfaz El enrutador no dispone de conector ESD conecte la pulsera antiestática a un conector ESD del emplazamiento Asegúrese de que la pulsera haga contacto con la piel Mensajes de seguridad Regulatory Information August 2013 57 ...

Page 58: ...Español 58 Regulatory Information August 2013 Comments infodev avaya com ...

Page 59: ...ère s accumuler Bloc d alimentation adéquat dans un rayon de deux mètres circuit requis pour chaque alimentation électrique voir le tableau spécificités de l alimentation en CA et CC Au moins de 5 cm de chaque côté de la boîte de commutation pour une ventilation adéquate Entre 0 5 et 1 mètre d espace supplémentaire autour du Advanced Gateway 2330 pour pouvoir accéder aux câbles de connexion à l av...

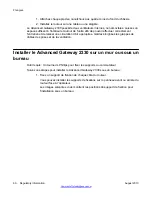
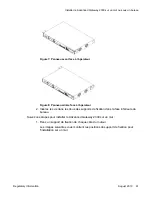
Page 60: ...bles des prises et de la ventilation Installer le Advanced Gateway 2330 sur un mur ou sous un bureau Outil requis Un tournevis Phillips pour fixer les supports au commutateur Suivez ces étapes pour installer le Advanced Gateway 2330 sous un bureau 1 Fixez un support de fixation de chaque côté du routeur Vous pouvez installer les supports de fixations sur le panneau avant ou arrière du routeur face...

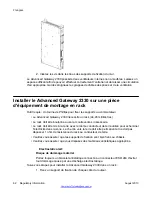
Page 61: ...ace inférieure du bureau Suivez ces étapes pour installer le Advanced Gateway 2330 sur un mur 1 Fixez un support de fixation de chaque côté du routeur Les images suivantes vous montrent les positions du support de fixation pour l installation sur un mur Installer le Advanced Gateway 2330 sur un mur ou sous un bureau Regulatory Information August 2013 61 ...

Page 62: ...venté si nécessaire Le rack doit être mis à la terre avec le même conducteur de terre utilisé pour acheminer l électricité dans la zone Le chemin vers la terre doit être permanent et ne doit pas dépasser 1 ohm de résistance du rack au conducteur de terre Veuillez vous assurer que les supports de fixation sont bien fixés au châssis Veuillez vous assurer que vous disposez des matériaux antistatiques...

Page 63: ...mutateur dans le rack Insérez et serrez les vis de montage du rack Le Advanced Gateway 2330 possède deux ventilateurs internes non amovibles Laissez un espace suffisant à l intérieur et autour de l unité afin de pouvoir effectuer les tâches d entretien de manière appropriée et de laisser une circulation d air adéquate Gardez éloignées les grappes de câbles des prises et des échappements d air Inst...

Page 64: ...llonge Particularités de mise à la terre du Advanced Gateway 2330 Le Advanced Gateway 2330 est livré avec une cosse de mise à la terre Vous devez connecter votre câble de mise à la terre à la cosse et attacher la cosse au châssis à droite du panneau avant Vous devez attacher l autre extrémité du câble de mise à la terre au point de mise à la terre du site le plus approprié de votre installation Ut...

Page 65: ... Hz Monophasé Royaume Uni Connecteur mâle BS1363 avec fusible 240 VCA 50 Hz Monophasé Australie Connecteur mâle AS3112 1981 240 VCA 50 Hz Monophasé Modules du Advanced Gateway 2330 Protection du module du Advanced Gateway 2330 Les pratiques suivantes préviennent les dommages matériels lorsque vous travaillez sur le Avaya Advanced Gateway 2330 Portez toujours un bracelet antistatique relié à la ter...

Page 66: ...IP doit être connecté à TIP et RING doit être connecté à RING La mise à la terre de la FXS ne fonctionne pas si la polarité est inversée Important Avaya ne prend pas en charge les connexions au port FXS quittant le bâtiment Utilisez les connexions FXS uniquement dans le bâtiment Voltage Les modules d interface FXS à 2 et 4 ports possèdent un générateur de signal d appel étant une source de tension...

Page 67: ...orsque l unité est alimentée Produits préalables Veuillez vous assurer que vous possédez un module prêt à être installé avant d ouvrir le couvercle du châssis Veuillez vous assurer que vous avez un tournevis Phillips N 1 Veuillez vous assurer que le Advanced Gateway 2330 est éteint Vous ne pouvez pas remplacer les composants internes à chaud 1 Retirez les trois vis fixant le support gauche au châs...

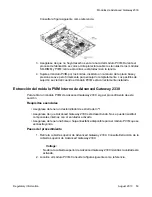
Page 68: ... de la procédure 1 Retirez le couvercle du Advanced Gateway 2330 Veuillez consulter la rubrique Retrait du couvercle du Advanced Gateway 2330 Voltage N ouvrez pas le couvercle du Advanced Gateway 2330 lorsque l unité est alimentée 2 Localisez la fente du connecteur du module PVIM interne Veuillez vous référer au schéma suivant 3 Veillez à ce que la fente PVIM ne soit pas obstruée La bande protectr...

Page 69: ...apes de la procédure 1 Retirez le couvercle du Advanced Gateway 2330 Veuillez consulter la rubrique Retrait du couvercle du Advanced Gateway 2330 Voltage N ouvrez pas le couvercle du Advanced Gateway 2330 lorsque l unité est alimentée 2 Localisez le module PVIM Veuillez consulter le schéma suivant 3 Débloquez les loquets fixant le PVIM dans la fente Il y a un loquet de blocage aux deux extrémités ...

Page 70: ...rs par des connecteurs de sécurité en caoutchouc lorsqu ils ne sont pas connectés Avant d installer ou de remplacer des câbles en fibres optiques nettoyez les connecteurs Ne dépassez pas le rayon de pliage recommandé pour les câbles en fibres optiques Le rayon de pliage acceptable pour un câble en fibres optiques est de dix fois son diamètre soit 2 5 à 5 cm 1 à 2 in Si vous utilisez un rayon infér...

Page 71: ...ution Ce dispositif est un produit de Catégorie A Dans une maison ce dispositif pourra causer des perturbations radioélectriques dans ce cas l utilisateur devra prendre des mesures appropriées Caution Lors du montage de ce dispositif dans un rack n empilez pas les unités les unes sur les autres dans le rack Chaque unité doit être fixée au rack grâce aux supports de fixation appropriés Les supports...

Page 72: ...entilateur pour voir les alertes Electrostatic alert Risque de dommage matériel Afin d éviter les décharges électrostatiques portez toujours un bracelet antistatique connecté à un connecteur ESD lors du branchement des câbles ou de l entretien du Advanced Gateway 2330 Veuillez vous assurer que le bracelet entre en contact avec votre peau Caution Risque de dommage matériel Tenez toujours les module...

Reviews: