Additional maintenance procedures
DS1 CPE loopback jack (T1 only)
Maintenance Procedures
357
December 2003
Administration
1
At the management terminal, enter change ds1 location (the DS1 Interface circuit pack for which
the loopback jack was installed).
2
Be sure the
near-end CSU type
is set to integrated.
3
On page 2 of the screen, change the
supply CPE loopback jack power
field to y.
NOTE:
Setting this field to y informs the technician that a loopback jack is present on the facility.
This allows a technician to determine that the facility is available for remote testing.
4
Enter save translation to save the new information.
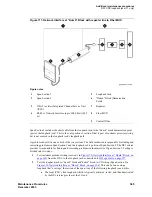
DS1 span test
This test should only be performed after the DS1 circuit pack and the 120A2 (or later) ICSU have been
successfully tested using appropriate maintenance procedures. The DS1 span test consists of 2 sequential
parts. Each part provides a result indicating if there is a problem in the CPE wiring. CPE wiring may be
considered problem-free only if the results of both parts are successful.
The first part of the span test powers-up the loopback jack and attempts to send a simple code from the
DS1 board, through the wiring and loopback jack, and back to the DS1 board. Maintenance software
waits about 10 seconds for the loopback jack to loop, sends the indication of the test results to the
management terminal, and proceeds to the second part of the test.
The second part of the test sends the standard DS1 3-in-24 stress testing pattern from the DS1 board,
through the loopback jack, and back to a bit error detector and counter on the DS1 board. The bit error
rate counter may be examined on the management terminal, and provides the results of the second part of
the test. The test remains in this state until it is terminated so that the CPE wiring may be bit error rate
tested for as long as desired.
1
Busy out the DS1 circuit pack by entering
busyout board
location
.
2
At the management terminal, enter
change ds1
location
and verify the
near-end csu
type
is set to integrated.
3
On page 2 of the DS1 administration screen, confirm that the
TX LBO
field is 0 (dB). If not,
record the current value and change it to 0 dB for testing. Press
Enter
to implement the changes or
press
Cancel
to change nothing.
4
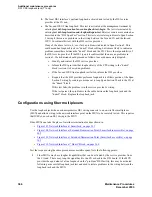
Enter
test ds1-loop
location
cpe-loopback-jack
. This turns on simplex power to the loopback
jack and waits about 20 seconds for any active DS1 facility alarms to clear. A “PASS” or “FAIL”
displays on the terminal. This is the first of the two results. A “FAIL” indicates a fault is present
in the wiring between the ICSU and the loopback jack. The loopback jack may also be faulty. A
“PASS” only indicates that the loopback jack looped successfully, and not that the test data
contains no errors. If a “PASS” is obtained, continue with the following steps.
NOTE:
The loss of signal (LOS) alarm (demand test #138) is not processed during this test while
the 3-in-24 pattern is active.
5
Enter
clear meas ds1 loop
location
to clear the bit error count.
6
Enter
clear meas ds1 log
location
to clear the performance measurement counts.
Summary of Contents for CMC1
Page 1: ...Maintenance Procedures 555 245 103 Issue 1 1 December 2003 ...
Page 14: ...Contents 14 Maintenance Procedures December 2003 ...
Page 416: ...Additional maintenance procedures IP Telephones 416 Maintenance Procedures December 2003 ...
Page 426: ...Index X 426 Maintenance Procedures December 2003 ...


