Installing an IG550 Integrated Gateway with the J-Web Quick Configuration interface
54 Installing and Configuring the IG550 Integrated Gateway
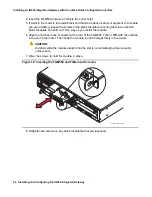
4. Insert the TGM550 and each TIM into the correct slot.
5. If a slot in the router is to remain blank and that slot is above, below, or adjacent to a module
you are installing, loosen the screws of the blank faceplate covering that slot so that the
blank faceplate can shift out of the way as you install the module.
6. Align the notches in the connector at the rear of the TGM550, TIM, or PIM with the notches
in the slot in the router. Then slide the module in until it lodges firmly in the router.
!
CAUTION:
CAUTION:
Carefully slide the module straight into the slot to avoid damaging the connector
components.
7. Drive the screws to hold the module in place.
Figure 18: Inserting the TGM550 and TIMs into the router
8. Retighten the screws on any blank faceplates that you loosened.
h
LAO 100306
3macrdr
An
alo
g
AL
M
AC
T
TIM
51
4
Lin
e
5
6
7
8
Lin
e
1
2
3
4
E1
/T
1
AL
M
AC
T
TIM
51
0
TS
T
SIG
SO
EI
SM
EM
SI
EO
BR
I
AL
M
AC
T
TIM
52
1
4
3
2
1
CO
NS
OL
E
AU
X
US
B
0
1
1
2
3
4
5
6
J4350
POWER
PO
W
ER
RE
SE
T
CO
NF
IG
STATUS
ALARM
HA
10
/1
00
/1
00
0
0/0
0/1
0/2
0/3
LINK
TX/RX
LINK
TX/RX
LINK
TX/RX
TX/RX
LINK
Juniper
NETW
ORKS
Ga
te
wa
y
AL
M
AC
T
TG
M
55
0
Co
nso
le
AS
B
ET
R
RS
T
Lin
e
Tru
nk
1
2
3
4
Line
3
4
Summary of Contents for IG550
Page 1: ...Installing and Configuring the Avaya IG550 Integrated Gateway 03 601554 Issue 2 January 2008 ...
Page 10: ...What procedure you should use 10 Installing and Configuring the IG550 Integrated Gateway ...
Page 176: ...Recovering passwords 176 Installing and Configuring the IG550 Integrated Gateway ...
Page 196: ...196 Installing and Configuring the IG550 Integrated Gateway Index ...


