background image


Installing packages 


Issue 1.0  September 2003  43 

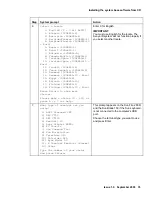
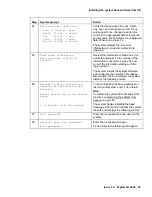
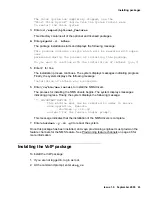
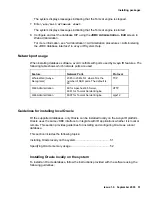
The Voice System has completely stopped, use the 

"Start Voice System" choice from the System Control menu 
to restart the Voice System


3. Enter 

cd /export/optional_features


This directory contains all of the optional and licensed packages. 

4. 

Enter 

pkgadd -d . AVnms


The package installation starts and displays the following message:


This package contains scripts which will be executed with super-
user 

permission during the process of installing this package. 

Do you want to continue with the installation of <AVnms> [y,n,?]


5. Enter 

for Yes.  

The installation process continues. The system displays messages indicating progress. 
Finally, the system displays the following message: 

Installation of <AVnms> was successful.


6. Enter 

/vs/bin/nms.install


to install the NMS drivers. 

The process for installing the NMS drivers begins. The system displays messages 
indicating progress. Finally, the system displays the following message: 

*** IMPORTANT NOTICE *** 
        This machine must now be rebooted in order to ensure 

        sane operation.  Execute 
               shutdown -y -i6 -g0 
        and wait for the Console Login: prompt. 

This message indicates that the installation of the NMS drivers is complete.


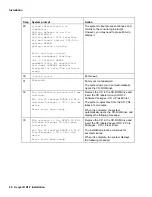
7. Enter 

shutdown -y -i6 -g0


to reboot the system. 

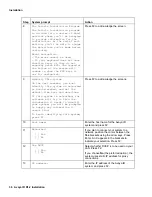
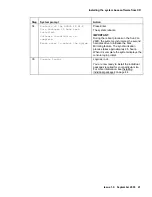
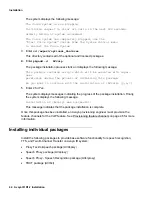
Once this package has been installed, an Avaya provisioning engineer must provision the 
feature channels for the NMS feature. See Provisioning feature channels on page 46 for 
more information. 


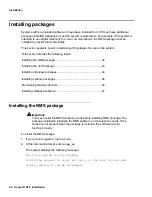
Installing the VoIP package 

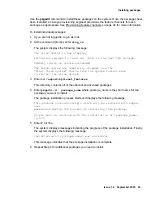
To install the VoIP package: 

1.  If you are not logged in, log in as root. 

2.  At the command prompt, enter 

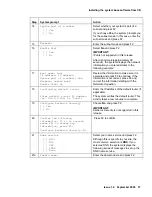
stop_vs


Summary of Contents for Interactive Response

Page 1: ...Avaya Interactive Response Release 1 2 Installation Issue 0 11 Publication Date July 2003 ...

Page 2: ...a provided software applications as well as their underlying hardware software platforms and interfaces any other equipment networked to your Avaya products Federal Communications Commission Statements Part 15 Class A Statement Note This equipment has been tested and found to comply with the limits for a Class A digital device pursuant to Part 15 of the FCC Rules These limits are designed to provi...

Page 3: ...e numbers for escalation within the United States For escalation telephone numbers outside the United States click International Services Contacts Warranty Avaya Inc provides a limited warranty on this product Refer to your sales agreement to establish the terms of the limited warranty In addition Avaya s standard warranty language as well as information regarding support for this product while un...

Page 4: ......

Page 5: ...ges 22 Configuring the pre installed software 23 Installing the system base software from CD 31 Preparing for software installation 31 Software packages installed from CD 32 Installing system software 33 Installing packages 42 Installing the NMS package 42 Installing the VoIP package 43 Installing individual packages 44 Installing optional packages 46 Provisioning feature channels 46 Installing da...

Page 6: ... 6 Avaya IR R1 2 Installation Backing up the system for the first time 62 Restoring the system 63 Preparing for system restoration 63 Restoring the system from full backup 63 Obtaining release notes 66 Index 67 ...

Page 7: ... components must be purchased separately This section describes how to install both the complete Avaya IR system and the software only Avaya IR system This section includes the following topics Overview of installation process 8 Hardware installation 10 Setting up pre installed software 21 Installing the system base software from CD 31 Installing packages 42 Working with service packs 53 Setting u...

Page 8: ...chased the hardware platform from Avaya IR system software is pre installed For this type of system configure the pre installed software See Setting up pre installed software on page 21 If you have purchased the hardware platform from another vendor IR system software is not pre installed For this type of system install the base system software from CD See Installing system base software from CD o...

Page 9: ...f installation process Issue 1 0 September 2003 9 12 Set up features See Configuring system features on page 61 13 Create a full backup of the entire system See Backing up the system for the first time on page 62 ...

Page 10: ...ou purchased an Avaya IR system that includes hardware and software the hardware components are usually installed by an Avaya service technician or third party service provider as part of the product maintenance agreement If you purchased a software only system you are responsible for obtaining the hardware components and either installing the hardware platform or arranging for installation by an ...

Page 11: ...for maintenance purposes If you do not have a maintenance agreement with Avaya or a third party service provider the modem is not required For more information see Installing the modem on page 18 Required documents for hardware installation The following documents are required to install the hardware platform For installation of the Sun Blade 150 platform Sun Blade 150 Getting Started Sun Blade 15...

Page 12: ...d and mouse Country Kit with power cord keyboard and mouse Solaris 8 Hardware 1 01 operating environment Two 1 2 GHz UltraSPARC III processors each with 8 MB of Ecache 2 GB memory 4 x 512 MB Two 72 8 GB FC AL hard drives DVD ROM drive Four PCI slots connected to two high performance PCI I O buses ATI Rage XL on board graphics 8 Mbyte RAM Two serial ports One parallel port Gigabit Ethernet network ...

Page 13: ...the AT command set to be compatible with the default configuration of the Avaya IR system Installing the hardware platform The hardware platforms for Avaya IR are standard commercially available systems To install these systems on site see Sun Blade 150 Getting Started or Sun Fire 280R Server Owner s Guide for complete installation instructions These documents are available in Avaya IR System Help...

Page 14: ...munications com PCI slotting rules Each platform provides two PCI slots for use with the NMS telephony cards You must install the telephony cards according the specific rules for each Avaya IR platform Sun Blade 150 slotting rules The Sun Blade 150 has three PCI slots PCI 1 PCI 2 and PCI 3 The following rules govern the number and placement of the telephony cards for systems using this platform Sy...

Page 15: ...e connected to a local area network LAN for use with a backup repository server and to communicate with other optional servers that provide speech services ASAI or CTI functionality and VoIP connectivity The Avaya IR platform contains a network interface card NIC to communicate with the LAN This section includes the following topics Connecting a Sun Blade 150 platform to the LAN 15 Connecting a Su...

Page 16: ...t signals at the TPE connector see the Twisted Pair Ethernet Connector section in the Signal Descriptions chapter of the Sun Blade 150 Service Manual This document is available in Avaya IR System Help under Print documents or from the Sun Web site http www sun com ...

Page 17: ...ire 280R Server Service Manual This document is available in Avaya IR System Help under Print documents or from the Sun Web site http www sun com Setting up the LAN to auto detect The hardware platform is set to auto detect network speed and duplex Avaya recommends setting the LAN switch or hub to auto detect for optimal performance If the LAN switch or hub is set to a specific speed administer th...

Page 18: ...veloper s Manual for more information on connecting trunks to the telephony cards This document is available in Avaya IR System Help under Print documents or from the NMS Web site http www nmscommunications com See the appropriate MultiVantage or manufacturer s documentation for information on connecting trunks to a MultiVantage system or non Avaya switch Installing the modem US customers who purc...

Page 19: ...otics Web site http www usr com support s main menu asp For international customers see the documentation from the manufacturer of the modem you are using Configuring the modem The system is pre configured to automatically setup the modem for dial in for remote maintenance and dial out for alarming If you have trouble with dialing in or out reset the modem To reset the modem 1 Log in as root 2 At ...

Page 20: ...Installation 20 Avaya IR R1 2 Installation ...

Page 21: ...guring the pre installed software 21 Pre installed software packages 22 Configuring the pre installed software 23 Preparing for configuring the pre installed software You must have a console connection to the platform on which you configuring the pre installed software Each platform as the following minimum console requirements Sun Blade 150 must have one of the following ASCII terminal connected ...

Page 22: ...d Pre installed software packages The following packages are pre installed by Avaya for systems that include both IR software and the hardware platform Sun operating system Solaris 8 Update 7 Solaris tools packages and patches including for the Sun Fire 280R only Remote System Console 2 2 and DiskSuite 4 2 Netscape 7 0 Adobe Acrobat Reader 5 0 Avaya IR packages Interactive Response Base System AVi...

Page 23: ...ris 8 operating system and all the Avaya IR software All of the IR base packages are pre installed However additional packages are required to make the system operational When you complete this procedure see Installing individual packages on page 44 for information on how to install additional packages required by your system Note Many of the system prompts in this procedure require the use of fun...

Page 24: ...press h or for help Enter 0 for English IMPORTANT You must use English for the locale The Avaya IR system will not function properly if you select another locale 3 What type of terminal are you using 1 ANSI Standard CRT 2 DEC VT52 3 DEC VT100 4 Heathkit 19 5 Lear Siegler ADM31 6 PC Console 7 Sun Command Tool 8 Sun Workstation 9 Televideo 910 10 Televideo 925 11 Wyse Model 50 12 X Terminal Emulator...

Page 25: ...w the ESC keys to use for navigation Press F2 to acknowledge the screen 5 Identify This System On the next screens you must identify this system as networked or non networked and set the default time zone and date time If this system is networked the software will try to find the information it needs to identify your system you will be prompted to supply any information it cannot find To begin ide...

Page 26: ...ormation you entered similar to the following example 13 Host name host IP address IP address System part of a subnet Yes Netmask subnet mask Enable IPv6 No Review the information to make sure it is accurate and press F2 to continue If the information is not correct press F4 and correct the information starting with the Networked question 14 Configure Kerberos Security Yes No Choose No and press F...

Page 27: ...search domain and press Enter to move to the next field When done press F2 The system displays the information your entered similar to the following 19d Name service DNS Domain name domain com Server address es 127 0 0 1 Search domain s search domain com Review the information to make sure it is accurate and Press F2 to continue If the list is not correct press F4 and correct the information start...

Page 28: ...milar to the following 23 Time zone US Mountain Date and time 2002 07 03 10 38 00 Review the information to make sure it is accurate and press F2 to continue If the information is not correct press F4 and correct the information starting with the region prompt 24 Root password Enter the root password to be used on the system 25 Re enter your root password Root password Enter the root password agai...

Page 29: ...Issue 1 0 September 2003 29 Step System prompt Action 27 Console login Log in as root You are now ready to install individual packages required for your particular site See Installing individual packages on page 44 for more information ...

Page 30: ......

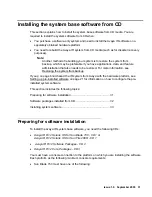
Page 31: ...ing the system from backup If you p on page 63urchased the IR system from Avaya with the hardware platform see Setting up pre installed software on page 21 for information on how to configure the pre installed system software This section includes the following topics Preparing for software installation 31 Software packages installed from CD 32 Installing system software 33 Preparing for software ...

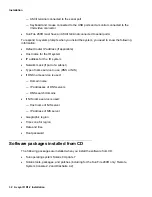
Page 32: ...e IR system IP address for the IR system Network mask if part of a subnet Type of name service to use DNS or NIS If DNS name service is used Domain name IP addresses of DNS servers DNS search domains If NIS name service is used Host name of NIS server IP address of NIS server Geographic region Time zone for region Date and time Root password Software packages installed from CD The following packag...

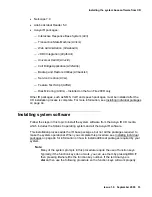
Page 33: ...g individual packages on page 44 Installing system software Follow the steps in this topic to install the system software from the Avaya IR CD media which includes the Solaris 8 operating system and all the Avaya IR software This installation process adds the IR base packages but not all the packages required to make the system operational When you complete this procedure see Installing individual...

Page 34: ...boot ok prompt by either Pressing Stop A from the Sun console Pressing Ctrl Break from a serial port console 3 ok Open the CD ROM drive bay Depending on the hardware platform insert the CD labeled Avaya IR R1 2 Solaris OS for SunBlade 150 CD 1 or Avaya IR R1 2 Solaris OS for Sun Fire 280R CD 1 Close the CD ROM drive bay 4 ok Enter boot cdrom install The system displays messages indicating that it ...

Page 35: ...859 1 18 Finland ISO8859 15 Euro Press Return to show more choices Please make a choice 0 50 or press h or for help Enter 0 for English IMPORTANT You must use English for the locale The Avaya IR system will not function properly if you select another locale 7 What type of terminal are you using 1 ANSI Standard CRT 2 DEC VT52 3 DEC VT100 4 Heathkit 19 5 Lear Siegler ADM31 6 PC Console 7 Sun Command...

Page 36: ...fy this system as networked or non networked and set the default time zone and date time If this system is networked the software will try to find the information it needs to identify your system you will be prompted to supply any information it cannot find To begin identifying this system press F2 Press F2 to acknowledge the screens 10 Host name Enter the host name for the Avaya IR system and pre...

Page 37: ...d press F2 to continue If the information is not correct press F4 and correct the information starting with the Networked question 18 Configuring default router Enter default router IP address ex 192 1 7 254 or none Enter the IP address of the default router if applicable The system verifies the default router This activity takes a few minutes to complete 19 Configure Kerberos Security Yes No Choo...

Page 38: ...h domain s search domain com Review the information to make sure it is accurate and Press F2 to continue If the list is not correct press F4 and correct the information starting with the domain name prompt After the system accepts your name service information it displays a series of messages requesting information about the time zone for the system 22 Regions Asia Western Australia New Zealand Ca...

Page 39: ...rmation is not correct press F4 and correct the information starting with the region prompt The system installs the system software and configures the network This takes a few minutes When completed the system displays the following prompt 26 Welcome To Avaya Interactive Response R1 Installation and Recovery Please select one of the choices below I to Install or R for Restore To begin installing t...

Page 40: ...atically opens the CD ROM drive 32 The installation process will now continue Put the CD labeled AVAYA IR R1 2 Software Packages CD 2 into the drive Press enter when ready Remove the CD in the CD ROM drive and insert the CD labeled Avaya IR R1 2 Software Packages CD 2 Press Enter The system copies files from the CD This takes a few minutes When it is complete the system automatically opens the CD ...

Page 41: ...boots IMPORTANT During the reboot process on the Sun Fire 280R the system synchronizes the second hard disk drive to initialize the Disk Mirroring feature The synchronization process takes approximately 2 5 hours When it is complete the system displays the console login prompt 35 Console login Login as root You are now ready to install the individual packages required for your particular site For ...

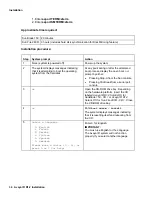
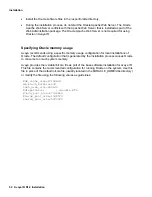
Page 42: ...lling the VoIP package 43 Installing individual packages 44 Installing optional packages 46 Provisioning feature channels 46 Installing database software 47 Installing the NMS package Important You must install the NMS telephony cards before installing NMS package The package installation initializes the NMS software on the telephony cards If the cards are not present when the package is installed...

Page 43: ...ystem displays the following message Installation of AVnms was successful 6 Enter vs bin nms install to install the NMS drivers The process for installing the NMS drivers begins The system displays messages indicating progress Finally the system displays the following message IMPORTANT NOTICE This machine must now be rebooted in order to ensure sane operation Execute shutdown y i6 g0 and wait for ...

Page 44: ...ss of installing this package Do you want to continue with the installation of AVvoip y n 5 Enter Y for Yes The system displays messages indicating the progress of the package installation Finally the system displays the following message Installation of AVvoip was successful This message indicates that the package installation is complete Once this package has been installed an Avaya provisioning...

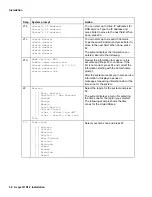
Page 45: ...tem choice from the System Control menu to restart the Voice System 3 Enter cd export optional_features This directory contains all of the optional and licensed packages 4 Enter pkgadd d package_name where package_name is the short name for the package you want to install The package installation process starts and displays the following message This package contains scripts which will be executed...

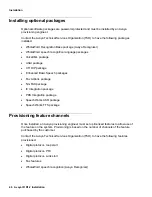
Page 46: ...ced Basic Speech packages Fax Actions package NG FAX package IC Integration package PDS Integration package SpeechWorks ASR package SpeechWorks TTS package Provisioning feature channels Once installed an Avaya provisioning engineer must set up licensed features to allow use of the feature on the system Provisioning is based on the number of channels of the feature purchased by the customer Contact...

Page 47: ...low the instructions provided with your database software for installing the software This section provides information to consider as part of the database installation process including information on how to download and install certain JDBC drivers This section includes the following topics Supported database software 47 Installing JDBC drivers 48 Network port usage 51 Guidelines for installing ...

Page 48: ...ownload the JDBC driver for Sybase 1 From a Web browser go to the Sybase JDBC download page http www sybase com detail 1 6904 1009796 00 html The browser displays the Web page titled jConnect 4 5 and 5 5 for JDBC Download 2 Select Download Now The browser displays the license agreement 3 Select Agree at the end of the page The browser displays the customer information form 4 Enter the required inf...

Page 49: ...base interface in Avaya IR System Help Installing the Informix JDBC driver To download the JDBC driver for Informix 1 From a Web browser go to the Informix JDBC download page http www14 software ibm com webapp download preconfig jsp id 2003 07 10 15 3A59 3A39 007148C S_TACT S_CMP s The browser displays the Web page titled IBM Informix JDBC Driver Downloads 2 From the Language drop down menu select...

Page 50: ...System Help Installing the DB2 JDBC driver The JDBC driver for DB2 is included as part of the DB2 software installed on your database server To install the driver you must transfer the driver file from the database server to the Avaya IR system and then decompress the files To install the DB2 JDBC driver 1 Locate the driver file db2java zip on server on which DB2 is installed For Microsoft Windows...

Page 51: ...orts Protocol WholeWord Avaya Recognizer 2345 to 2345 N 1 where N is the number of ASR ports The default is 60 TCP Web Administration 80 for Apache Web Server 8081 for Tomcat Servlet Engine HTTP Web Administration 8007 for Tomcat Servlet Engine ajpv12 Guidelines for installing local Oracle Of the supported databases only Oracle can be installed locally on the Avaya IR platform Oracle uses the same...

Page 52: ...iguration for local installations of Oracle The default configuration that is generated by the installation process causes Oracle to consume too much system memory Avaya provides the vs data init ora file as part of the base software installation for Avaya IR This file contains the recommended configuration for running Oracle on the system Use this file in place of the default init ora file usuall...

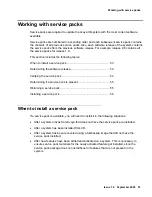
Page 53: ...ining the software release 54 Verifying the service pack 54 Determining if a service pack is present 55 Obtaining a service pack 55 Installing a service pack 56 When to install a service pack If a service pack is available you will need to install it in the following situations After a system arrives from Avaya that does not have the service pack pre installed After a system has been installed fro...

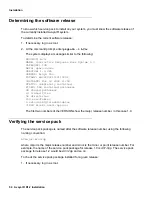
Page 54: ...2 11 59 STATUS completely installed FILES 568 installed pathnames 28 shared pathnames 13 linked files 58 directories 150 executables 4 setuid setgid executables 71869 blocks used approx The first two numbers of the VERSION show the major release number in this case 1 0 Verifying the service pack The service pack package is named after the software release number using the following naming conventi...

Page 55: ...o install the correct service pack package you may need to download it from the Avaya Support Centre Web site See Obtaining service packs on page 55 for more information Determining if a service pack is present Systems shipped after certain service pack releases may already have the service pack package loaded on the system To determine if the service pack is already on your system 1 If necessary ...

Page 56: ...tory containing the current service pack package in compressed form 3 Enter stop_vs to stop the voice system 4 Enter uncompress sp_package ds Z where sp_package ds Z is the name of the compressed service pack file in the export patch directory The service pack uncompresses in the current directory 5 Enter pkgadd d sp_package ds sp_package where sp_package ds is the name of the uncompressed service...
Page 57: ...for Yes Note Do not be alarmed by statement regarding super user permission The message means that the script will use highest level of permission on the system to install the various portions of the service pack The system continues installing the service pack After a short time it displays a message indicating that the installation is complete You must reboot your system for the changes to take ...

Page 58: ...riate administrative privileges This section includes the following topics Establishing platform user accounts 58 Assigning Web Administration privileges 60 Establishing platform user accounts Platform user accounts are required to log into the Avaya IR system To establish user accounts use Admintool a graphical user interface for managing users and groups on the system Note To use Admintool you n...

Page 59: ...bout the new user User ID numbers must be a whole number less than or equal to 2147483647 They are required for both regular user accounts and special system accounts Although User ID numbers 0 through 99 are reserved you can add a user with one of these numbers However do not use them for regular user accounts By definition root always has User ID 0 daemon has User ID 1 and pseudo user bin has Us...

Page 60: ...onfirm Y N 2 Enter Y The system displays login username has been assigned VIS permissions level Administration You can now access the Web Administration interface using the new user name See Starting the Web Administration interface on page 60 for more information Starting the Web Administration interface To set up the features on Avaya IR you can use the Web Administration interface or the comman...

Page 61: ...e Setting up features Once packages have been installed Avaya IR features must be configured to provide the required functionality Use the Web Administration interface or the command line interface to administer features on the Avaya IR system The initial features to set up include Switch interfaces such as T1 E1 or Voice over IP JDBC interface for database access Call Data Handling CDH settings U...

Page 62: ...ve completed administering the features for the first time By doing so you will preserve your setup and minimize the amount of work you will need to do if the system becomes disabled and has to be restored For complete information on how create a backup see Backing up and restoring data in the Administration Administrative procedures section of Avaya IR System Help ...

Page 63: ...essible to the Avaya IR system that you plan to restore Avaya IR R1 2 Solaris OS for SunBlade 150 CD 1 or Avaya IR R1 2 Solaris OS for Sun Fire 280R CD 1 Restoring the system from full backup To restore the system from full backup Step System prompt Action 1 None system is powered off Perform Steps 1 through 25 of Install system software on page 33 After Step 25 the system displays the following p...

Page 64: ...yThhmmss full and systemname DmmddyyThhmmss diski nfo Enter the nfs pathname to the backup image now Enter the NFS pathname to the backup file CAUTION You must use the IP address of the system where the backup is located backuphostip If you use a host name instead the restore operation may fail depending on your network configuration The system extracts the data from the backup file install the da...

Page 65: ...urity the password will not be displayed on the screen as you type it If you do not want a root password press RETURN twice Root password Enter the root password 9 Press Return to continue Press Enter 10 Re enter your root password Enter the root password again 11 Press Return to continue Press Enter 12 System identification is completed The system boots and displays the console login prompt Log i...

Page 66: ... Technical Database select Call Center CRM 3 Select Interactive Voice Response 4 Select Interactive Response The browser displays a list of items available for Avaya IR in the main browser frame 5 From the list select Release Notes under the R 1 2 subheading The browser displays a table listing the current Release Notes 6 In the Release Notes table select Avaya IR R1 2 Release Notes The browser di...

Page 67: ...nstalling the DB2 JDBC driver 50 Installing the hardware platform 8 13 Installing the Informix JDBC driver 49 Installing the modem 8 11 18 Installing the NMS package 8 42 Installing the Sybase JDBC driver 48 Installing the system base software from CD 8 21 31 Installing the VoIP package 8 43 N Network port usage 51 O Obtaining a service pack 55 Obtaining release notes 66 Overview of installation p...

Reviews: