Routing incoming calls to an auto attendant
Transferring calls to an auto attendant
Using an auto attendant to access voicemail
on page 53
on page 54
on page 55
Using pre-recorded names, greetings and announcements
on page 29
Creating an auto attendant
About this task
This task is an example to setup an auto attendant for Embedded Voicemail. In this context, the
auto-attendant must provide callers the option to press
0
for reception that is hunt group 200 or
1
for sales that is hunt group 301.
Procedure
1. Open IP Office Manager and receive the IP Office configuration.
2. In the left navigation pane, right-click
Auto Attendant
and select
New
.
3. In the
Auto Attendant
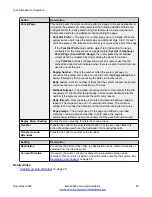
tab, complete the fields as appropriate. See
on page 46 for more information.
4. Click the
Actions
tab to define the actions available to callers depending on which DTMF
key they press. Then do the following:
a. To define the auto attendant action when the
0
key is pressed, click the row that
begins with
0
.
b. Click
Edit
.
c. In the
Action
drop-down box, select the appropriate action.
d. In the
Destination
drop-down box, select the appropriate destination.
e. Click
OK
.
f. Repeat the steps above for each key that requires a definition for this auto attendant.
5. Click
OK
to save the auto attendant. Note the short codes shown in the
Auto Attendant
tab.
6. Select
File > Save Configuration
to save the changes back to the system.
7. To record prompts for the auto attendant using the short codes created, see
on page 49.
Related links
on page 44
Auto Attendant General Settings
on page 46
Creating an auto attendant
September 2020
Embedded Voicemail Installation
45

