Upgrade Firmware on Programmable Circuit Packs
Self and C-LAN-distributed download Procedure
726
SI Installation and Upgrades
June 2004
2
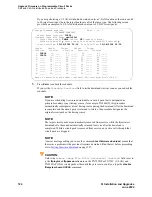
Check the
St
(status) field immediately to the right of the
Target Location
field to view the
progress of the firmware update:
—
(P)
ending
— (
C
)ompleted
— (
F
)ailed
— (
A
)borted
3
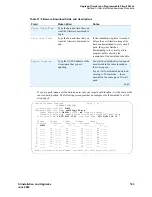
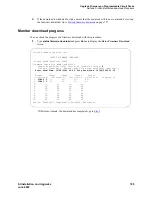
Type
status firmware download
last
and press Enter to view the progress of the last completed
firmware update or the entire schedule if it is completed. Notice in the previous screen that the
Start
and
Stop
times now reflect the actual start and stop times of the download schedule and
that the
Firmware Vintage
now reflects the vintage that was downloaded.
4
If one or more downloads fail, go to
Testing firmware download
on page 727.
5
If previously you set the
Remove Image File After Successful Download?
field
on the Firmware Download screen to y, then the download procedure is now complete.
If you previously set it to n, then proceed to the next section,
Disable file system
on page 727, to
manually remove the firmware image and disable the file system on the source circuit pack.
Reseat VAL circuit pack
For TN2501AP (VAL) circuit packs only, reseat the TN2501AP to reset the board after the download is
complete.
CAUTION:
If you do not reseat the TN2501AP, then the pack runs using old firmware.
!
WARNING:
To prevent electrostatic discharge (ESD), be sure to wear a grounding strap while handling
the circuit pack.
CAUTION:
Ensure that the top green and top amber LEDs on the TN2501AP are out.
1
Release the latch handle to free the TN2501AP from the carrier.
2
Pull the circuit pack out about 1 – 2 inches (3 – 5 cm).
3
Re-insert the circuit pack into the media gateway or carrier.
4
Close the latch securely.
5
Wait until all three of the top LEDs (red, green, and amber) are out.


