Avaya Wireless PCI Adapter
Avaya Wireless PCI Adapter
Avaya Wireless PCI Adapter
The PCI Adapter, is a standard “PC Card to PCI bus” adapter that you can
use to install Avaya Wireless PC Cards into computer devices that do not
have a factory-installed PC Card slot.
The PCI Adapter was designed for:
1.
Avaya Wireless PC Cards. Although the adapter will support most
standard Type II PC Cards as well, using this adapter in combination
with other PC Cards is not supported.
2.
PC99 compliant PCs
3.
PCs that only have PCI slots.
4.
The PCs that are listed on the Avaya Wireless web site at:
http://www.avaya.com
/support.
5.
Installation of the adapter under operating systems other than
described in this flyer is not supported.
For Technical Specifications, please consult the opposite page of this
flyer.
!
DANGER:
Do not attempt to install the adapter without switching off the
power and unplugging the power cords. Ignoring this instruction
may lead to receiving an electric shock and/or causing damage to
your computer and adapter.
Installing the Adapter Hardware
To insert the PCI Adapter into your computer, carefully follow the steps
described in this flyer
1.
Shut down your computer.
2.
Switch off the power of:
■
Your computer,
■
All external devices connected to your computer.
3.
Disconnect the power cords from your computer and its external
devices from the mains sockets.
4.
Remove the top cover of your computer, according to the instructions
in the user’s guide that came with your computer.
5.
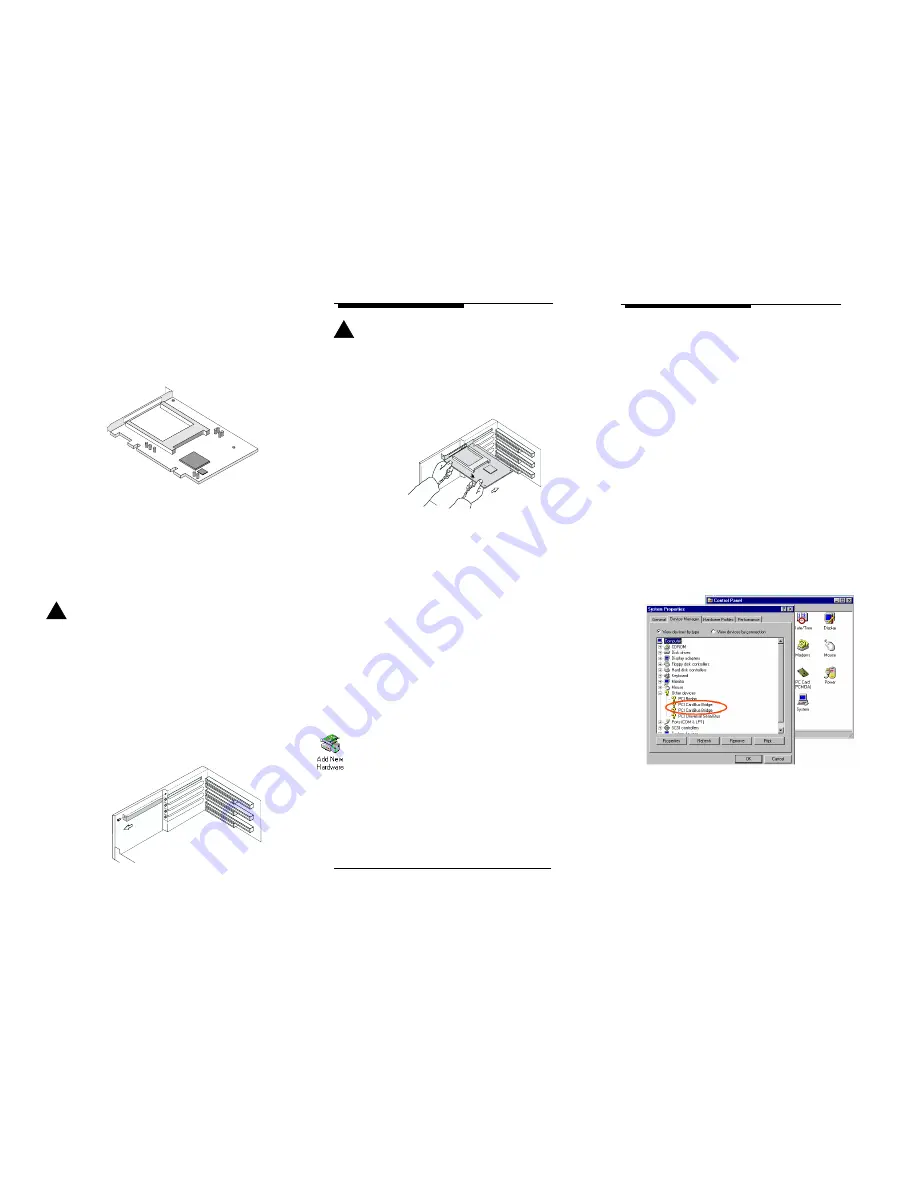
Select an available slot for your adapter and remove the metal filler
strip (as pictured above). Keep the screw for fixing the adapter later.
!
CAUTION:
Electrostatic discharge may cause damage to your computer and/
or PCI Adapter. To avoid damage, first touch the metal chassis of
your computer before you:
a. Remove the PCI Adapter from its anti-static bag.
b. Insert the PCI Adapter into the computer.
6.
Gently insert the connector of the PCI Adapter into the slot until the
card is properly seated.
7.
Secure the card into place with the screw that you removed in step 5.
8.
Put the computer cover back into place according to the instructions
in the user’s guide that came with your computer.
9.
Reconnect all the external devices to your computer.
10.
Re-insert the power cords and connect them to the mains sockets.
11.
Switch on the power of your computer to complete the hardware
installation.
Introducing the Card to your Computer
Most of today’s Microsoft operating systems will automatically detect and
configure the PCI adapter hardware. Some of these operating systems
however, may require you to install an additional driver (the PCI Enabler),
to allow you to use the PCI Adapter in combination with Avaya Wireless
PC Cards.
Therefore, prior to inserting a Avaya Wireless PC Card into the PC Card
slot of your PCI Adapter, follow the installation instructions as described for
your operating system to complete the installation of the PCI Adapter.
Installation for MS-Windows 2000
1.
(Optional) Update your Windows 2000 operating system using
Microsoft’s Windows 2000 Service Pack 1 or higher
1
.
2.
From the Windows taskbar, click the Start button, select Settings
and then select the item Control Panel.
3.
On the Control Panel, double-click on the Add New Hardware icon.
Your operating system will start the “New Hardware Wizard
4.
Select Yes to allow the Windows operating system to detect any new
hardware and
5.
Click the Next button.
6.
The hardware detection process may take several minutes. When
finished, your Windows operating system will typically display a
screen as shown in the next column.
7.
Select the item PCIC Compatible Controller and click Finish.
8.
This will launch the PC Card Wizard.
9.
Follow the instructions of the PC Card Wizard.
10.
Proceed with inserting the Avaya Wireless PC Card, as described in
the Quick Installation Guide that came with your PC Card.
Installation for MS-Windows 98
Upon (re)starting your computer, Windows 98 will automatically detect the
adapter, and start the installation.
1.
Follow the instructions on your screen, confirming the settings
proposed by the operating system.
2.
When prompted to restart your computer select Yes to complete the
installation procedure.
3.
To verify if the installation was completed successfully, proceed as
described under Verifying Proper Installation in this flyer.
Installation for MS-Windows 95
1.
Insert the floppy disk that came with your adapter into your computer.
2.
On the windows task bar, click on the Start button and select the
item “Run”.
3.
In the dialog window click the Browse button to navigate to the disk
drive that contains your floppy diskette.
4.
Double-click the file setup.exe file, and click OK to install PCI
Enabler software.
5.
Follow the instructions as they appear on your screen.
When the installation of the PCI Enabler software has completed, proceed
as follows:
1.
On the Windows task bar click the Start button, point to Settings
and then click Control Panel.
2.
In the Control panel, double-click the System icon to display the
System Properties
window.
3.
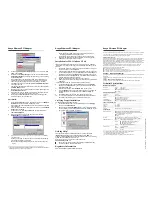
In the System Properties, select tab Device Manager to display the
window as pictured below.
4.
Set the display to View devices by type, and double-click the item
Other devices.
5.
Now check the contents of the item Other devices:
■
If your computer displays two PCI CardBus Bridge items (as
pictured above) you will need to remove these items as described
below in Procedure A.
■
For all other cases proceed as described in Procedure B.
Procedure A:
1.
To remove the PCI CardBus Bridge, move from the tab Device
Manager to the tab Hardware Profiles.
This tab displays the start-up profiles on your computer, of which the
active profile appears in highlight (for most computers this value will
read “original configuration“).
2.
Prior to making any changes to your profiles, create a copy of the
current profile, by clicking the Copy button.
This will display the window as pictured on the following page.
1. Although the PCI Adapter will work fine in most computers running Windows 2000,
some computer systems require the Microsoft Service Pack 1 update to allow
“Interrupt Sharing” on the PCI Adapter.


