background image

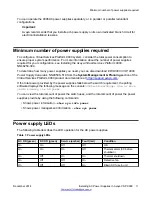
You can operate the 9006AC power supplies separately, or in parallel, or parallel redundant

configurations.

Important:

Avaya recommends that you install each power supply on its own dedicated branch circuit for

electrical installation reasons.

Minimum number of power supplies required

To configure a Virtual Services Platform 9000 system, consider the total power consumption to
ensure proper system performance. For more information about the number of power supplies
required for your configuration, see 

Installing the Avaya Virtual Services Platform 9000,

NN46250-304.

To determine how many power supplies you need, you can also download 

ERS 8000 / VSP 9000

Power Supply Calculator

, NN48500–519 from the 

System Management & Planning

 section of the

Virtual Services Platform 9000 product documentation at 

https://support.avaya.com

.

If the total power provided by the power supplies falls below the switch requirement, the polling
software displays the following message on the console: 

chCheckPowerUsage: One or more

cards running low on power.

You can view the total amount of power the switch uses, and the total amount of power the power
supplies provide by using the following commands:

• Shows power information – 

show sys-info power

• Shows power management information – 

show sys power

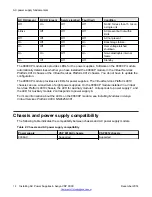
Power supply LEDs

The following table describes the LED operation for the AC power supplies.

Table 1: Power supply LEDs

AC OK (green)

DC OK (green)

Service (amber) Fault (red)

Condition

On

On

Off

Off

OK

On

On

On

Off

Thermal alarm (5C before
shutdown)

On

Off

On

On

Thermal shutdown

On

Off

Off

On

Defective fan

On

Off

Off

On

Blown AC fuse in unit

Minimum number of power supplies required

December 2014

Installing AC Power Supplies in Avaya VSP 9000     

11

Comments? infodev@avaya.com

Summary of Contents for Virtual Services Platform 9000 Series

Page 1: ...Installing AC Power Supplies in Avaya Virtual Services Platform 9000 Release 4 0 NN46250 303 Issue 05 01 December 2014...

Page 2: ...ty is specified in the documentation or other materials available to You Software means computer programs in object code provided by Avaya or an Avaya Channel Partner whether as stand alone products p...

Page 3: ...problem with your Avaya product or Hosted Service For a list of support telephone numbers and contact addresses go to the Avaya Support website http support avaya com or such successor site as design...

Page 4: ...AC chassis 13 Removing the air inlet cover 14 Installing the power supply 15 Removing the power supply 18 Chapter 5 AC power supply installation for the VSP 9012 chassis 20 Removing the logo plate 21...

Page 5: ...lable For more information or to register you can access the website at http avaya learning com Course code Course title 4D00010E Knowledge Access ACIS Avaya ERS 8000 and VSP 9000 Implementation 5D000...

Page 6: ...s to issues Use the online service request system to create a service request Chat with live agents to get answers to questions or request an agent to connect you to a support team if an issue require...

Page 7: ...h Whole Words Only Case Sensitive Include Bookmarks Include Comments 6 Click Search The search results show the number of documents and instances found You can sort the search results by Relevance Ran...

Page 8: ...e In Release 4 0 the title of this document changed from Avaya Virtual Services Platform 9000 Installation AC Power Supply NN46250 303 to Installing AC Power Supplies in Avaya Virtual Services Platfor...

Page 9: ...uits with the same voltage source and that you use power supplies of the same model This power supply is hot swappable you can remove the power supply from the Virtual Services Platform 9000 without p...

Page 10: ...ation is nonredundant With a minimum configuration and a power supply failure the software powers down lower priority interface modules until it establishes the positive power margin For more informat...

Page 11: ...00 product documentation at https support avaya com If the total power provided by the power supplies falls below the switch requirement the polling software displays the following message on the cons...

Page 12: ...9080CP module provides six LEDs for power supplies The Virtual Services Platform 9010 chassis can use a maximum of eight power supplies On the 9080CP module installed in a Virtual Services Platform 9...

Page 13: ...to support the hardware see Release Notes for Avaya Virtual Services Platform 9000 NN46250 401 Important Avaya recommends that you install each power supply on its own dedicated branch circuit for ele...

Page 14: ...cover on page 14 Installing the power supply on page 15 Removing the power supply on page 18 Removing the air inlet cover Before you can install or remove a power supply or cooling module you must rem...

Page 15: ...ly Install the power supply to provide a power source to the system and components Before you begin Remove the air inlet cover Remove the existing power supply or power supply filler panel Installing...

Page 16: ...ning the power supply is discharged and ready to be reinserted About this task You can only install the power supply one way The power supplies are blocked to prevent accidental upsidedown installatio...

Page 17: ...e back of the chassis connect an AC power cord from the AC power inlet to a power outlet Installing the power supply December 2014 Installing AC Power Supplies in Avaya VSP 9000 17 Comments infodev av...

Page 18: ...t with a new power supply After you remove a power supply the LED on the power supply turns off and the chassis automatically redistributes the load to the remaining power supplies Before you begin Re...

Page 19: ...you must install a filler panel in the empty power supply slot If you do not have a replacement power supply or filler panel leave the original supply in place Do not operate the Virtual Services Pla...

Page 20: ...you install each power supply on its own dedicated branch circuit for electrical installation reasons The following table lists the estimated time to install an AC power supply for the Virtual Service...

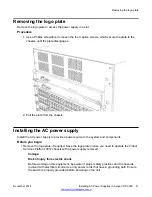
Page 21: ...nts Before you begin Remove the logo plate if required Save the logo plate in case you need to operate the Virtual Services Platform 9012 chassis with a power supply removed Voltage Risk of injury fro...

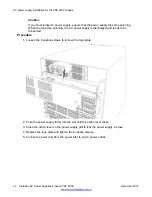
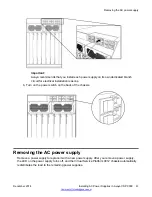
Page 22: ...go plate 2 Push the power supply firmly into the slot until the action lever clicks 3 Close the action lever on the power supply grill to lock the power supply in place 4 Replace the logo plate and ti...

Page 23: ...oving the AC power supply Remove a power supply to replace it with a new power supply After you remove a power supply the LED on the power supply turns off and the Virtual Service Platform 9012 chassi...

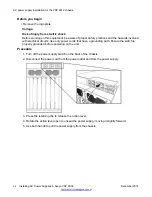
Page 24: ...on the unit Procedure 1 Turn off the power supply switch on the back of the chassis 2 Disconnect the power cord from the power outlet and from the power supply 3 Press the retaining clip to release th...

Page 25: ...Removing the AC power supply December 2014 Installing AC Power Supplies in Avaya VSP 9000 25 Comments infodev avaya com...

Page 26: ...current 13 3 A 100 VAC 11 2 A 120 VAC 11 8 A 200 VAC 9 9 A 240 VAC Operating frequency range 47 63 Hz 47 63 Hz Input volt ampere VA 1445 VA 2325 VA Efficiency 85 minimum 90 typical 88 minimum 93 typic...

Page 27: ...Maximum main output current 22 A 37 A Auxiliary output voltage power 5 VDC 3 75 W 5 VDC 3 75 W Output voltage set point 54 VDC 54 VDC Mean time between failures See note 1 400 000 hours 400 000 hours...

Page 28: ...AC power supplies Avaya order number Country Plug Receptacle description Specifications Typical plug AA0020076 E6 North America NEMA5 20 male plug 125 VAC 20 A 12 AWG length 2 5 m AA0020077 E6 North...

Page 29: ...el SI 32 male plug 250 VAC 16 A 1 5 mm2 length 2 5 m AA0020081 E6 India South Africa BS 546 male plug 250 VAC 15 A 1 5 mm2 length 2 5 m AA0020084 E6 Australia AS NZ5 3112 male plug 250 VAC 15 A 1 5 mm...

Page 30: ...ent de cet quipement dans une zone r sidentielle risque de causer des interf rences nuisibles auquel cas l utilisateur devra y rem dier ses propres frais Warning WARNUNG Dies ist ein Ger t der Klasse...

Page 31: ...device Electrostatic alert ELEKTROSTATIKWARNUNG Elektronische Schaltkreise k nnen durch elektrostatische Entladung besch digt werden Ber hren Sie elektronische Hardware nur wenn Sie ein Erdungsarmban...

Page 32: ...rly grounded before powering on the unit Voltage DANGER Risques de blessure par choc lectrique Avant de manipuler cet quipement vous devez prendre connaissance des pratiques de s curit appropri es et...

Page 33: ...os el tricos Use apenas cabos de alimenta o que tenham liga o terra Certifique se de que o switch esteja devidamente aterrado antes de ligar o aparelho Voltage PERICOLO Rischio di scosse elettriche Pr...

Page 34: ...f stored static electricity that can damage electronic equipment and impair electrical circuitry that results in complete or intermittent failures I O cooling module 9012FC The I O cooling module is a...

Reviews: