background image


  Connecting to a TV 


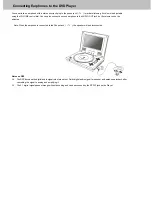
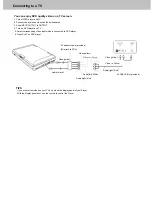
You can enjoy DVD quality video on a TV screen. 

1. Turn off DVD player and TV. 
2. Connect the audio and video cables as illustrated. 
3. Slide INPUT/OUTPUT to OUTPUT. 
4. Turn on DVD player and TV. 

      5. Select corresponding Video input which is connected to DVD player. 

  6. Press PLAY on DVD player. 


Video out: Green 

Video(yellow) 

Video in: Yellow 

Audio(left):White 

Audio(right):Red 

AV CABLE (Not provided) 

Audio(right):Red 

Video(yellow) 

Audio (black) 

Video(yellow) 

AV adaptor cable (provided) 

(Mini-jack to RCA)


TIPS 

      If you wish to view video on your TV only, close the display panel of your Player. 
      With the display panel shut, use the remote to control the Player. 
 

Summary of Contents for DXP-7P

Page 1: ...ENGLISH PORTABLE DivX MPEG 4 DVD PLAYER Model DXP 7P OWNER S MANUAL Please read this manual before operating COMPACT DIGITAL AUDIO...

Page 2: ...sing Battery Pack 14 Installing Carrying Bag Car Harness Kit Optional Accessory 15 Playing a Disc 16 21 Playing an Mp3 or Regular Audio CD 22 Playing Picture CD 23 Setting Screen and Audio 24 Setting...

Page 3: ...ASER PRODUCT KLASSE 1 LASER PRODUKT LUOKAN 1 LASER LAITE KLASS 1 LASER APPARAT PRODUCTO LASER CLASE INVISIBLE LASER RADIATION WHEN OPEN AND INTERLOCKS DEFEATED AVOID EXPOSURE TO BEAM WARNING To preven...

Page 4: ...ertified by DivXNetworks the creators of DivX video technology and are capable of playing all versions of DivX video content DivX Certified ensures that the DivX content you attain and create can be p...

Page 5: ...utton Use to skip to previous title chapter or track 12 ZOOM Button 13 GOTO Button Use to enter the specific chapter track or time to playback 14 STANDBY Button Toggles between putting the Player on s...

Page 6: ...P 11 PAUSE STEP 12 PLAYBACK BUTTONS PLAY FAST REVERSE FAST FORWARD SKIP FORWARD SKIP PREVIOUS 1 OPEN 2 EARPHONE SPEAKER VOLUME 3 EARPHONE JACK 4 DC IN 12V 5 POWER ON OFF 6 INPUT OUTPUT 7 VIDEO 8 AUDIO...

Page 7: ...on 2 Pull out the battery tray 3 Insert a 3V lithium battery into the tray with the polarity facing up as marked 4 Replace the battery tray by pushing it until it clicks into place Using the remote co...

Page 8: ...e AUDIO OUT jack but its volume cannot be adjusted Note When the earphone is connected to the Phone Jack the speaker will be disconnected Notes on DSP The DSP decodes the digital audio signal into ste...

Page 9: ...and video cables as illustrated below 3 Slide INPUT OUTPUT to INPUT 4 Turn on power VCR or other component equipped with external output connectors Video out Green AV CABLE Not provided Audio left Whi...

Page 10: ...ding Video input which is connected to DVD player 6 Press PLAY on DVD player Video out Green Video yellow Video in Yellow Audio left White Audio right Red AV CABLE Not provided Audio right Red Video y...

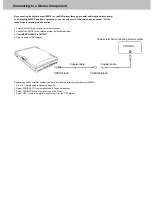
Page 11: ...the SPDIF to your stereo system as illustrated below 3 Slide INPUT OUTPUT to OUTPUT Coaxial terminal connecting stereo system 4 Turn on power of DVD player COAXIAL Coaxial cable COAXIAL black Coaxial...

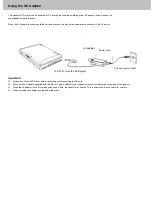
Page 12: ...er To home power outlet Power cord AC adaptor To DC12V IN on the DVD player Important Always turn off the DVD Player before connecting or disconnecting the AC cord Only use the AC adaptor supplied wit...

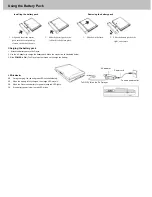
Page 13: ...ery pack 1 Attach the battery pack to the Player 2 Use the AC adapter to charge the battery pack Make the connection as illustrated below 3 Slide POWER to ON The Player must be turned on to charge the...

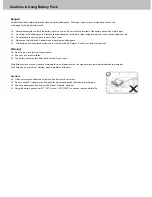
Page 14: ...ack This battery pack is designed exclusively for your portable DVD player Do not use it with other devices Warning Do not drop or subject to strong vibration Keep out of reach of children The battery...

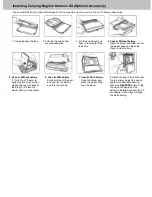
Page 15: ...g Press the REVERSE button to flip the video 180 degrees If no battery is installed connect the DV car adapter to the Player through the side opening 7 Case B With battery Open the Player and place th...

Page 16: ...he power either from the battery pack or the AC adaptor 2 Loading a disc following these steps Open the top cover by pushing the latch to the right and lift the top cover Press the OPEN button to open...

Page 17: ...play in the forward direction 1 During playback press on the Player to pause 2 Repeatedly press to play one fame at a time 3 To resume normal playback press on the Player or on the remote control Repe...

Page 18: ...nderscore 3 When you reach the scene you want to mark press ENTER to confirm and the underscore changes to a number 1 2 3 4 or 5 4 Repeat the above procedure for a new scene You can have up to 5 bookm...

Page 19: ...red number 2 Press ENTER to confirm and start play To play from a specific point of time 1 Press GOTO repeatedly press to move to the time display and it changes 00 00 00 2 Fill in the time hour minut...

Page 20: ...een Repeatedly press LANGUAGE to select other language if the disc has multiple languages You can also switch the voice language in disc menu screen by pressing MENU SUBTITLE Repeatedly press SUBTITLE...

Page 21: ...ostly used for karaoke sing along discs by repeatedly pressing L R you can select STEREO MONO Left MONO Right P N This is used when you connect the Player to a TV and watch video on the TV Repeatedly...

Page 22: ...liet format Use mp3 as the file extension Play In most cases when a MP3 or CD is placed into the player the first song file of the first folder plays In other cases the file manger appears Use directi...

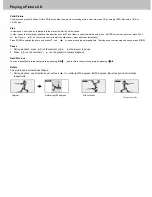
Page 23: ...the slide show plays photos automatically Press ZOOM to enlarge the photo and use and to move around the enlarged photo The slide show function stops when you press ZOOM Pause 1 During playback press...

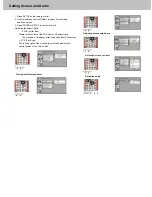
Page 24: ...sting the Aspect Ratio 4 3 LB Letter Box Adjusting screen brightness Displays the content of the DVD title in 16 9 aspect ratio The black bars will appear at the top and bottom of the screen 4 3 PS Pa...

Page 25: ...rk on the screen if the disc has multi angle shot Returning to default setting All settings will revert to the original factory settings when Read is selected 3 Press ENTER or SETUP to confirm and exi...

Page 26: ...k bars will appear at the top and bottom of the screen 4 3 PS Pan Scan TV type 4 3 or 16 9 and its sub menu 3 Press ENTER to confirm your selection 4 Press SETUP to exit or select EXIT SETUP to exit S...

Page 27: ...exit Adjusting rating 1 Go to PASSWORD and enter the password to open the lock for Rating the shows 2 Go to RATING and select the rating 3 Go back to PASSWORD and enter the password again to lock the...

Page 28: ...uage s built in in order to effect the multi language function of this Player 1 Press SETUP on the remote control 2 Use the direction keys to select LANGUAGE SETUP and its sub menu 3 Press ENTER to co...

Page 29: ...to confirm and exit Changing AUDIO output Note SPDIF OFF select this when you do not want to have digital audio signal output SPDIF RAW select this when the digital audio output is connected to an ext...

Page 30: ...st Hue Saturation 1 Press SETUP on the remote control 2 Use the direction keys to select Video Setup and its sub menu 3 Press ENTER or SETUP to confirm and exit Adjusting brightness Adjusting hue Adju...

Page 31: ...arameters listed in the menu You can change BRIGHTNESS CONTRAST SHARPNESS COLOR and TINT 2 Repeatedly press or hold down UP and DOWN to change the setting of the parameter selected 3 To reset the sett...

Page 32: ...w batteries Check that the signal transmission is directed at the remote control sensor on the DVD player Disc does not play Check that the disc is a DVD DVD RW VIDEO CD or AUDIO CD Do not use a disc...

Page 33: ...fficiently cooled down Charging LED indicator does not light Check with another fully charged pack if the LED lights Check that the AC adaptor is securely plugged in If DVD or battery pack is overheat...

Page 34: ...utput Composite Video 1 channel 1 0 Vp p 75 load Audio Output 2 Channel L 1 L R 2 R Frequency Response 20Hz 20kHz 2 5dB S N Ratio 85 dB Dynamic Range 85 dB Battery Specifications Operating environment...

Page 35: ...Player using new or refurbished parts or replace the entire Player with a new or refurbished Player TO ENSURE WARRANTY SERVICE KEEP THE DATED SALES RECEIPT AS EVIDENCE OF THE PURCHASE DATE Also be sur...

Page 36: ...YON is not responsible for the de installation or re installation of the player WHAT IS NOT COVERED BY THIS ONE YEAR LIMITED WARRANTY This warranty does not cover defects malfunctions or failures resu...

Reviews: