background image

89

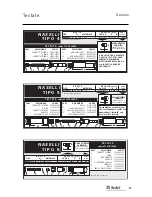
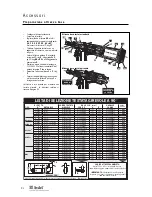
Testate

N A S E L L I

T I P O   5

CODICE ATTREZZO 

COMPLETO:

porre 71221-00 a 

sinistra delle tre cifre 

1

 in pollici, quindi in millimetri.

T E S T A T A  

codice 71220-15500

PART. 

DESCRIZIONE 

CODICE

  07498-00501

  07003-00067

  07498-00801

  07220-02302

10 

  07498-00803 

PART. 

DESCRIZIONE 

CODICE

  07500-02005

11 

  07498-00503

  07340-00327

12 

  07498-00900 

R I V E T T O

MATERIALE

Ø

1

N A S E L L O   ( m m )

vedi 

sotto

CODICE

'A'

'B'

TIPO

Acciaio 

3/8

4,1

19,1

07498-00802

9,6

AVTAINER

®

…243

98.5

20

.6

90

12

11

7

10 4

2

9

8

A

B

28

.6

MOLLA

GUIDA MOLLA POST.

ANELLO DI BLOCCAGGIO

ADATTATORE PER 

ESPULSIONE LATERALE

CANNOTTO ESTERNO

“O” RING

CANNOTTO INTERNO

GANASCE

GUIDA MOLLA ANT.

È DISPONIBILE UN SOLO NASELLO DI 
TIPO 5 SPECIFICAMENTE CREATO PER 
RIBADIRE RIVETTI AVTAINER

®

 CON 

QUESTA TESTATA SPECIALE.

A

B

8

7

6 5

4

2

3

1

61

22.9

... 201

... 261

In inches then in millimetres

Ø

1

'A'

'B'

1/4

1/4

MONOBOLT

®

INTERLOCK

®

Qualsiasi
Qualsiasi

4.1

3.6

14.3

14.3

71220-16021

07612-02001

6.4

6.4

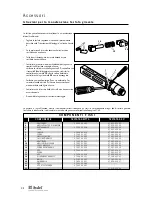
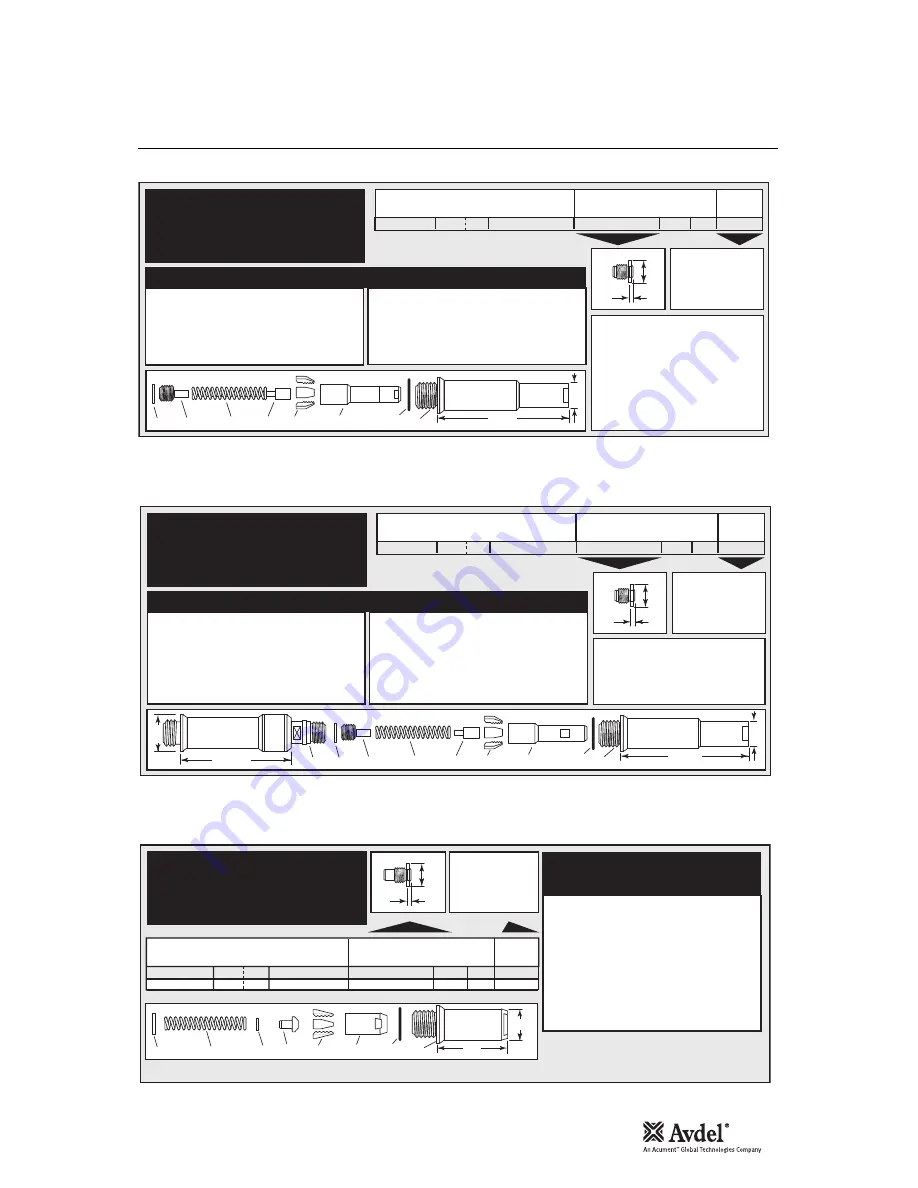
T E S T A T A

codice 71210-15300

PART. 

DESCRIZIONE 

CODICE


07344-02001


07003-00067


07340-00304


71210-15001


07498-04502


71210-05001


07500-00418


07340-00327

CANNOTTO ESTERNO

O RING

SEDE GANASCE

GANASCE

ALLARGATORE GANASCE

PARACOLPI

MOLLA

ANELLO DI BLOCCAGGIO

N A S E L L I

T I P O   6

CODICE ATTREZZO 

COMPLETO:

porre 71221-00 a 

sinistra delle tre cifre 

R I V E T T O

MATERIALE

N A S E L L O   ( m m )

vedi 

sotto

CODICE

TIPO

N A S E L L I

T I P O   4

CODICE ATTREZZO 

COMPLETO:

porre 71221-00 a 

sinistra delle tre cifre 

1

 in pollici, quindi in millimetri.

T E S T A T A  

codice 71220-15400

PART. 

DESCRIZIONE 

CODICE

  07498-00501

  07003-00067

  07498-00502

  07497-03002 

PART. 

DESCRIZIONE 

CODICE

10 

  07498-00507

  07500-02005

11 

  07498-00503

  07340-00327 

R I V E T T O

MATERIALE

Ø

1

N A S E L L O   ( m m )

vedi 

sotto

CODICE

'A'

'B'

TIPO

Acciaio 

1/4

4,1

14,3

71220-16021

6,4

MONOBOLT

®

…202

11

7 10

4

2

9

8

A

B

20

.6

98.5

CANNOTTO ESTERNO

“O” RING

CANNOTTO INTERNO

GANASCE

GUIDA MOLLA ANT.

MOLLA

GUIDA MOLLA POST.

ANELLO DI BLOCCAGGIO

IL NASELLO TIPO 4 MONTATO 
A QUESTA TESTATA LUNGA 
PERMETTE DI RIBADIRE 
RIVETTI MONOBOLT

®

 DA 6,4 

mm IN PUNTI A GRANDE 
PROFONDITÀ.

Italiano

Summary of Contents for Genesis G3 HD

Page 1: ...r t Genesis G3 HD Attrezzo oleopneumatico Genesis G3 HD Hydro Pneumatic Power Tool Genesis G3 HD Outil ol o pneumatique Genesis G3 HD Instruction Manual Manuel d instructions Betriebsanleitung Manuale...

Page 2: ......

Page 3: ...ly to repair or replace faulty components Contents English Safety Rules 4 Specifications Tool Specifications 5 Tool Dimensions 5 Intent of Use Range of Fasteners 6 Part Numbering 6 Putting into Servic...

Page 4: ...y 8 Do not operate a tool machine that is directed towards any person s or the operator 9 Always adopt a firm footing or a stable position before operating the tool machine 10 Ensure that vent holes d...

Page 5: ...4 3 litres 0 15 cuft Stroke Minimum 26 mm 1 02 in Pull Force 5 5 bar 12 9 kN 2900 lbf Cycle time Approximately 1 2 second Noise Level 75 dB A Weight Without nose equipment 2 35 kg 5 17 lb Vibration Le...

Page 6: ...10 1 8 5 32 3 16 1 4 3 8 COMPLETE TOOL 71221 00 BASE TOOL 1 1 2 3 1 NOSE ASSEMBLY NOSE TIP 2 71221 02000 71210 15000 see note 3 2 3 3 3 3 The part number of the base tool remains the same whichever no...

Page 7: ...correct nose assembly or swivel head suitable for the fastener is fitted see pages 8 11 and 13 15 Connect the tool to the air supply Insert the fastener stem into the nose of the tool If using a nose...

Page 8: ...omponents of the nose assembly and nose tips as they will need regular replacement Remove the nose equipment using the reverse procedure to the Fitting instructions Any worn or damaged part should be...

Page 9: ...1 71210 16020 71210 16070 07381 04701 71210 16001 71210 160063 71210 16002 71210 160073 71210 16003 71210 160083 71210 16004 71210 160093 71210 16005 71210 160103 71220 16006 71220 160113 71220 16007...

Page 10: ...ARE EXTENDED TO ALLOW ACCESS INTO APPLICATIONS WHERE TYPE 1 NOSE TIPS WILL NOT REACH T Y P E 2 N O S E T I P S 8 7 6 5 4 2 3 1 58 3 22 9 T Y P E 3 N O S E T I P S COMPLETE TOOL PART NUMBER precede wi...

Page 11: ...PART N A B NAME 1 4 1 4 MONOBOLT INTERLOCK T Y P E 6 N O S E T I P S ITEM DESCRIPTION PART N 1 NOSE CASING 07340 00306 2 O RING 07003 00067 3 CHUCK COLLET 07612 02003 4 JAWS 07612 02002 5 JAW SPREADE...

Page 12: ...tool and the nose assembly the extension gives an extra reach of 76mm ideal for use in deep narrow applications To fit the extension remove any nose assembly components Screw the inner extension to ja...

Page 13: ...2 5 32 3 16 3 81 3 81 3 81 3 81 3 81 3 81 3 81 3 81 3 81 1 95 4 11 2 00 4 11 1 17 1 17 3 81 0 84 0 84 0 25 0 25 1 9 2 36 2 46 2 03 2 03 2 03 2 03 7 87 7 87 7 87 7 87 7 87 7 87 7 87 7 87 7 87 6 35 6 35...

Page 14: ...7345 03700 07345 03700 07345 03800 07345 03800 07345 03700 07345 03800 07345 03700 07345 03800 07494 06001 07494 066012 07494 06101 07494 067012 07345 03301 07494 03601 07494 03011 07345 03401 07494 0...

Page 15: ...eely rotate in the holes of adaptor 9 If necessary ream the holes G Position spring clip 7 over adaptor 9 past the holes for the rollers and rotate until the locating peg is aligned with the correspon...

Page 16: ...of head See table below For nose tips and jaws part numbers see pages 9 11 C O N S T A N T C O M P O N E N T S ITEM STRAIGHT SWIVEL RIGHT ANGLE SWIVEL 1 2 3 4 5 6 7 8 9 10 11 12 13 15 16 18 19 20 21...

Page 17: ...on to the jaws Lubricate with Moly Lithium grease before assembling Check for oil leaks and air leaks in the air supply hose and fittings Grease can be ordered as a single item the part number is show...

Page 18: ...insolubility of the product the bioavailability is negligible Handling General ventilation is recommended Avoid skin and eye contact Storage Do not store with oxidizing agents Keep container closed a...

Page 19: ...rst three steps of the Priming Procedure on page 23 Prior to dismantling the tool it is necessary to remove the nose equipment For instructions see the nose equipment section pages 8 11 or if a swivel...

Page 20: ...trigger valve extractor Assemble in reverse order to dismantling I M P O R T A N T Check the tool against daily and weekly servicing Priming is ALWAYS necessary after the too has been dismantled and...

Page 21: ...21 Notes English...

Page 22: ...0 33 34 36 35 27 29 30 A A 38 40 41 37 32 58 31 B B 1 2 3 4 80 9 10 5 6 8 26 27 28 42 44 43 46 66 65 23 25 37 24 13 14 15 16 63 11 12 7 A 62 22 45 18 19 21 20 76 77 78 79 74 75 70 57 64 57 59 64 54 53...

Page 23: ...1 1 1 4 1 2 1 1 1 1 1 1 1 2 1 2 1 1 1 1 1 1 2 1 1 1 1 42 43 44 45 46 47 48 49 50 51 52 53 54 55 56 57 58 59 60 61 62 63 64 65 66 67 68 69 70 71 72 73 74 75 76 77 78 79 80 81 07005 00088 71210 02008 71...

Page 24: ...several minutes Although NOT a primary irritant minor irritation may occur following contact Fire Flash point 232 C Not classified as flammable Suitable extinguishing media CO2 dry powder foam or wat...

Page 25: ...w spreader housing 1 Disconnect air supply to tool or switch ON OFF valve 55 to OFF position Fill the priming pump with oil Screw priming pump 07900 00700 into the bleed screw hole with seal 10 in pla...

Page 26: ...tem of Jaw housing nose tip or nose casing fastener not properly seated Tighten nose assembly 8 Weak or broken spring in nose assembly Fit new spring 8 11 Air or oil leak Tighten joints or replace com...

Page 27: ...standards EN292 part 1 and part 2 ISO 8662 part 1 EN 60742 0695 ISO 3744 EN 50081 1 ISO PREN792 part 14 EN 55014 following the provisions of the Machine Directive 89 392 EC as amended by Directive 91...

Page 28: ......

Page 29: ...iste de pi ces 48 49 Plein d huile Huile recommand e 50 Informations de s curit huile Hyspin VG 32 50 Kit de plein d huile 50 Proc dure de plein d huile 51 Diagnostic des pannes Sympt me cause possibl...

Page 30: ...e ou d montage d un quipement 8 Ne pas actionner un outil une machine orient s vers une des personne s ou l op rateur 9 L op rateur veillera adopter une position quilibr e et stable avant d utiliser l...

Page 31: ...saire 5 5 bars 4 3 litres Course Minimum 26 mm Force de traction 5 5 bars 12 9 kN Cycle de pose Approximativement 1 2 seconde Niveau sonore 75 dB A Poids Sans quipement de pose 2 35 kg Vibrations Inf...

Page 32: ...4 3 4 8 5 5 2 6 6 4 6 5 7 8 9 9 5 10 1 8 5 32 3 16 1 4 3 8 OUTIL COMPLET 71221 00 OUTIL DE BASE 1 1 2 3 1 QUIPEMENT NEZ 2 71221 02000 71210 15000 voir note 3 2 3 3 AJOUTER LES 3 CHIFFRES TROUVES DANS...

Page 33: ...NNEMENT Veiller bien installer l quipement ou la t te pivotante qui conviennent la fixation voir les pages 34 37 et 39 41 Raccorder l outil l alimentation pneumatique Introduire la tige de la fixation...

Page 34: ...e pose en proc dant l inverse des Instructions de montage Remplacer toute pi ce us e ou endommag e Nettoyer les m choires et v rifier leur usure V rifier que ni le porte m choires ni le guide de resso...

Page 35: ...8 8 9 9 10 10 4 8 6 4 3 2 4 0 4 8 4 3 4 8 3 2 4 0 4 8 6 3 2 4 0 4 8 4 8 6 4 4 8 3 2 4 0 4 8 4 8 4 8 3 2 4 0 4 8 3 2 4 0 4 8 6 4 4 8 6 4 4 8 6 4 4 8 4 8 4 8 4 8 6 4 6 4 6 4 6 4 001 004 003 001 004 010...

Page 36: ...IRES 07498 04502 6 BUTOIR 71210 05001 7 RESSORT 07500 00418 8 BAGUE DE SERRAGE 07340 00327 Q U I P E M E N T R f 71210 15200 N E Z D E T Y P E 3 REFERENCE DE L OUTIL COMPLET faire pr c der de 71221 00...

Page 37: ...ONOBOLT INTERLOCK N E Z D E T Y P E 6 REPERE DESCRIPTION REFERENCE 1 CARTER DE NEZ 07340 00306 2 JOINT TORIQUE 07003 00067 3 BOITIER DE MORS 07612 02003 4 MACHOIRES 07612 02002 5 PORTE MACHOIRES 07498...

Page 38: ...ieur 3 1 mm Mont e entre l outil et l quipement la rallonge prolonge l outil de 76 mm et en fait l accessoire id al pour les applications profondes et troites Pour monter la rallonge d monter tous les...

Page 39: ...lliage d aluminium Alliage d aluminium Alliage d aluminium Alliage d aluminium Alliage d aluminium O Alliage d aluminium 1 8 1 8 5 32 5 32 3 16 5 32 3 16 1 8 5 32 1 8 1 8 1 8 5 32 5 32 3 16 3 16 1 8 5...

Page 40: ...7346 04200 07346 04500 07346 04500 07346 04600 07346 04600 07340 00213 07340 00213 07340 00213 07490 04602 07490 04602 07340 00213 07490 04602 07340 00213 07490 04602 07340 00213 07340 00213 07340 002...

Page 41: ...ositionner l agrafe ressort 7 sur l adaptateur 9 au del des trous des galets et tourner jusqu ce que le t ton de positionnement soit en face du trou correspondant de l adaptateur 9 le plus petit trou...

Page 42: ...r chaque type de t te pivotante les autres composants restent les m mes Voir le tableau ci dessous Pour les r f rences des nez et des m choires voir les pages 35 37 C O M P O S A N T S C O N S T A N T...

Page 43: ...sulfure de molybd ne avant de remonter Rechercher les fuites d huile ou d air sur les flexibles et les raccords La graisse peut tre command e s par ment Sa r f rence figure dans le kit d entretien pag...

Page 44: ...le Manutention A ration g n rale recommand e Eviter tout contact avec la peau ou les yeux Stockage Ne pas stocker proximit d agents oxydants Maintenir le couvercle sur le produit et stocker l abri de...

Page 45: ...rou de blocage 3 avec les joints toriques 65 et 66 ainsi que le manchon d pression 46 Pousser le piston de t te 7 vers l arri re et le d gager de l ensemble t te 4 en veillant ne pas endommager l al s...

Page 46: ...chette 43 par le haut A l aide de l extracteur de valve pneumatique d visser la valve de g chette 42 Remonter dans l ordre inverse du d montage I M P O R T A N T Pratiquer sur l outil les v rificatio...

Page 47: ...47 Notes Fran ais...

Page 48: ...1 60 33 34 36 35 27 29 30 A A 38 40 41 37 32 58 31 B B 1 2 3 4 80 9 10 5 6 8 26 27 28 42 44 43 46 66 65 23 25 37 24 13 14 15 16 63 11 12 7 A 62 22 45 18 19 21 20 76 77 78 79 74 75 70 57 64 57 59 64 54...

Page 49: ...2 1 1 1 1 1 1 1 2 1 2 1 1 1 1 1 1 2 1 1 1 1 42 43 44 45 46 47 48 49 50 51 52 53 54 55 56 57 58 59 60 61 62 63 64 65 66 67 68 69 70 71 72 73 74 75 76 77 78 79 80 81 07005 00088 71210 02008 71210 02024...

Page 50: ...rs minutes Quoique cette huile NE SOIT PAS tr s irritante une l g re irritation peut appara tre suite au contact Incendie POINT ECLAIR 232 C Non class comme inflammable Conviennent pour l extinction C...

Page 51: ...10 Raccorder l alimentation pneumatique l outil et placer la valve MARCHE ARR T 55 sur MARCHE V rifier que la course de l outil est conforme au minimum sp cifi de 26 mm Il s agit de la diff rence de...

Page 52: ...ffisante Fixation d passant la capacit de l outil Niveau d huile insuffisant ou pr sence d air dans l huile Serrer les raccords ou remplacer les pi ces R gler la pression d air la valeur recommand e L...

Page 53: ...292 parties 1 et 2 ISO 8662 partie 1 EN 60742 0695 ISO 3744 EN 50081 1 ISO PREN792 partie 14 EN 55014 suivant les dispositions de la Directive sur les machines 89 392 EC modifi e par la Directive 91 3...

Page 54: ......

Page 55: ...ur fehlerhafte Teile nach eigenem Ermessen repariert oder ausgewechselt nhaltsangabe Deutsch Sicherheitsvorschriften 56 Spezifikationen Technische Daten 57 Ger teabmessungen 57 Arbeitsbereich Nietreih...

Page 56: ...tes der Maschine immer einen festen Stand oder eine standfeste Position einnehmen 10 Sicherstellen dass die Entl ftungsl cher nicht verstopft oder berdeckt werden 11 Der Betriebsdruck darf 7 bar nicht...

Page 57: ...r 4 3 Liter 0 15 ft3 Hub Minimum 26 mm 1 02 Zoll Zugkraft bei 5 5 bar 12 9 kN 2900 lbf Taktzeit ca 1 2 s Arbeitsger usch 75 dB A Gewicht ohne Ausr stung 2 35 kg 5 17 lb Schwingungen geringer als 2 5 m...

Page 58: ...3 KOMPLETTES GER T GRUNDGER T AUSR STUNG MUNDST CK siehe Hinweis 3 3 ZIFFERN AUS DER LETZTEN SPALTE AUS DER MUNDST CK TABELLE AUF SEITE 61 62 ODER 63 ZUGEBEN F R DAS KOMPLETTE GER T MIT DREHK PFEN DIE...

Page 59: ...neter Drehkopf montiert ist siehe Seiten 60 63 und 65 67 Das Ger t an die Druckluftversorgung anschlie en Den Dorn des Niets in das Mundst ck des Ger tes legen Wird eine komplette Ausr stung verwendet...

Page 60: ...den ausgetauscht werden m ssen F r das Entfernen des Mundst cks die Einbauanweisungen in umgekehrter Reihenfolge verwenden Alle verschlissenen oder besch digten Teile sind zu ersetzen Reinigen und Spa...

Page 61: ...71210 160103 71220 16006 71220 160113 71220 16007 71220 160123 71220 16008 71220 160133 07605 00220 71220 16080 71210 16070 07381 04701 07498 01401 07340 06201 07340 06201 71210 16070 07381 04701 0749...

Page 62: ...NSPREIZER 07498 04502 6 PUFFER 71210 05001 7 FEDER 07500 00418 8 KLEMMRING 07340 00327 A U S R S T U N G Art nr 71210 15200 MUNDST CK E TYP 3 KOMPLETTES GER T TEILNUMMER mit 71221 00 vorangehend 1 56...

Page 63: ...07612 02001 6 4 6 4 MUND ST CK E TY P 6 A U S R S T U N G Art nr 71210 15300 POS BENENNUNG ART NR 1 07344 02001 2 07003 00067 3 07340 00304 4 71210 15001 5 07498 04502 6 71210 05001 7 07500 00418 8 07...

Page 64: ...rt bietet die Verl ngerung extra 76 mm Reichweite was bei tiefen und engen Anwendungen vorteilhaft ist Um die Verl ngerung anzubringen alle Teile der Ausr stung entfernen Die Innenverl ngerung an die...

Page 65: ...ng O Alu Legierung 1 8 1 8 5 32 5 32 3 16 5 32 3 16 1 8 5 32 1 8 1 8 1 8 5 32 5 32 3 16 3 16 1 8 5 32 3 16 1 8 5 32 5 32 3 16 3 81 3 81 3 81 3 81 3 81 3 81 3 81 3 81 3 81 1 95 4 11 2 00 4 11 1 17 1 17...

Page 66: ...6 04600 07340 00213 07340 00213 07340 00213 07490 04602 07490 04602 07340 00213 07490 04602 07340 00213 07490 04602 07340 00213 07340 00213 07340 00213 07340 00213 07340 00229 07340 00229 07340 00213...

Page 67: ...gerades Drehen daf r sorgen da das kleine Schraubenbefestigungsloch nach oben liegt Mit einer Stange leicht anziehen N Die Baugruppe ber die Spindel 11 auf den Ger tehandgriff schrauben Lagerstift e...

Page 68: ...rden bleiben die anderen Bauteile f r jeden Kopftyp die gleichen siehe nachstehende Tabelle F r die Teilnummern von Mundst cken und Spannbacken siehe Seite 61 63 G L E I C H B L E I B E N D E B A U T...

Page 69: ...demontieren und reinigen dabei besonders die Spannbacken beachten Vor dem Zusammenbau mit Molylithiumfett einfetten Auf llecks und Luftundichtheiten im Druckluftf rderschlauch und in den Armaturen pr...

Page 70: ...Eine allgemeine Arbeitsplatzbel ftung wird empfohlen Haut und Augenkontakt vermeiden Lagerung Nicht zusammen mit oxidierenden Substanzen lagern Den Beh lter verschlossen halten und von Wasser oder Feu...

Page 71: ...dem Zerlegen des Ger tes ist es erforderlich das Mundst ck zu entfernen F r Anweisungen siehe Abschnitt Komplette Ausr stungen auf Seite 60 63 oder wenn ein Drehkopf eingebaut wurde Seite 65 67 Zweck...

Page 72: ...luftventilausziehers abschrauben Der Zusammenbau erfolgt in umgekehrter Reihenfolge des Zerlegens H I N W E I S berpr fen Sie das Ger t Auff llen ist IMMER nach jedem Zerlegen und vor Inbetriebnahme d...

Page 73: ...73 Anmerkungen Deutsch...

Page 74: ...1 60 33 34 36 35 27 29 30 A A 38 40 41 37 32 58 31 B B 1 2 3 4 80 9 10 5 6 8 26 27 28 42 44 43 46 66 65 23 25 37 24 13 14 15 16 63 11 12 7 A 62 22 45 18 19 21 20 76 77 78 79 74 75 70 57 64 57 59 64 54...

Page 75: ...1 1 1 1 4 1 2 1 1 1 1 1 1 1 2 1 2 1 1 1 1 1 1 2 1 1 1 1 42 43 44 45 46 47 48 49 50 51 52 53 54 55 56 57 58 59 60 61 62 63 64 65 66 67 68 69 70 71 72 73 74 75 76 77 78 79 80 81 07005 00088 71210 02008...

Page 76: ...iches Reizmittel k nnen geringe Reizerscheinungen nach einem Kontakt auftreten Brand FLAMMPUNKT 232 C Nicht als entflammbar klassifiziert Geeignete Feuerl schmedien CO2 Trockenpulver Schaum oder Wasse...

Page 77: ...T IST Haltemutter 07900 00698 auf F hrungsbuchse 1 aufschrauben Druckluftversorgung zum Ger t abtrennen oder Schieber EIN AUS 55 auf Position AUS legen Die lpresse mit l auff llen lpresse 07900 00700...

Page 78: ...Lufteinschl sse im l Gebrochene Dorne klemmen im Ger t Drehschieber falsch eingestellt Schmiermittelmangel Ungen gender Luftdruck Schmutzansammlung in der Ausr stung Kein Luftdruck Besch digtes Ausl...

Page 79: ...tspricht EN292 Teil 1 und Teil 2 ISO 8662 Teil 1 EN 60742 0695 ISO 3744 EN 50081 1 ISO PREN792 Teil 14 EN 55014 in Befolgung der Vorschriften der Maschinenrichtlinie 89 392 EG mit nderung durch Richtl...

Page 80: ......

Page 81: ...io Specifiche olio 102 Scheda di sicurezza olio Hyspin VG 32 102 Corredo per il rabbocco 102 Procedura di rabbocco 103 Diagnostica Malfunzionamenti cause possibili e soluzioni 104 Avdel UK Limited per...

Page 82: ...ingresso dell attrezzo macchina prima di regolare montare o smontare la testata 8 Non puntare l attrezzo macchina verso l operatore o altre persone che si trovino in vicinanza 9 Trovare una posizione...

Page 83: ...aria libera 5 5 bar 4 3 litri Corsa minima 26 mm Forza di trazione 5 5 bar 12 9 kN Tempo ciclo circa 1 2 secondi Rumorosit 75 dB A Peso senza testata 2 35 kg Vibrazione inferiore a 2 5 m s2 30 1 2 3...

Page 84: ...000 2 3 3 3 3 ATTREZZO COMPLETO ATTREZZO BASE TESTATA NASELLO vedere spiegazione 3 AGGIUNGERE TRE CIFRE PRESE DALL ULTIMA COLONNA DELLE TABELLE DEI NASELLI ALLE PAGINE 87 88 E 89 PER ATTREZZI COMPLETI...

Page 85: ...REGOLATORE DI PRESSIONE E FILTRO SPURGARE GIORNALMENTE 3 METRI MASSIMO Accertarsi di aver montato la testata standard o girevole adatta al bullone strutturale a strappo da ribadire vedi pagine 86 89...

Page 86: ...isogno di essere sostituiti regolarmente Togliere le testate eseguendo le Istruzioni per il Montaggio in ordine inverso Tutte le parti danneggiate o usurate devono essere sostituite Pulire le ganasce...

Page 87: ...00220 71220 16080 71210 16070 07381 04701 07498 01401 07340 06201 07340 06201 71210 16070 07381 04701 07498 01401 07612 02001 71210 05002 71210 16070 07348 07001 71210 16050 71220 60001 07381 04701 71...

Page 88: ...498 04502 6 PARACOLPI 71210 05001 7 MOLLA 07500 00418 8 ANELLO DI BLOCCAGGIO 07340 00327 T E S T A T A codice 71210 15200 N A S E L L I T I P O 3 CODICE ATTREZZO COMPLETO porre 71221 00 a sinistra del...

Page 89: ...T E S T A T A codice 71210 15300 PART DESCRIZIONE CODICE 1 07344 02001 2 07003 00067 3 07340 00304 4 71210 15001 5 07498 04502 6 71210 05001 7 07500 00418 8 07340 00327 CANNOTTO ESTERNO O RING SEDE GA...

Page 90: ...l attrezzo e la testata fornisce un estensione di 76 mm permettendo di raggiungere punti situati in profondit e in spazi ristretti Per montare la prolunga togliere i componenti della testa ta Avvitar...

Page 91: ...no testate girevoli sono completi di nasello rotazione 360 Lega Al Acciaio Lega Al Acciaio Lega Al Lega Al Lega Al Acciaio inossidabile Acciaio inossidabile Lega Al Lega Al Lega Al Lega Al Lega Al Leg...

Page 92: ...490 04602 07340 00213 07490 04602 07340 00213 07490 04602 07340 00213 07340 00213 07340 00213 07340 00213 07340 00229 07340 00229 07340 00213 07340 00229 07340 00229 07498 04401 07498 04401 07340 0022...

Page 93: ...stico 7 sull adattatore 9 oltre i fori per i cuscinetti a rullo e ruotarlo finch il dente di bloccaggio non allineato con il foro corrispondente dell adattatore 9 quello pi piccolo H Montare l adattat...

Page 94: ...onenti restanti rimangono gli stessi in corrispondenza di ogni tipo di testata girevole Consultare la tabella sotto I codici relativi ai naselli e alle ganasce sono riportati alle pagine 87 89 C O M P...

Page 95: ...e presenza di perdite d olio e di aria nel tubo flessibile dell aria e nei vari raccordi Il grasso pu essere ordinato a parte il codice si trova nella lista del corredo di manutenzione a pagina 97 Pro...

Page 96: ...le Maneggiamento Si raccomanda di ventilare l ambiente Evitare il contatto con la pelle e con gli occhi Immagazzinaggio Non immagazzinare insieme ad agenti ossidanti Mantenere chiusi i contenitori e t...

Page 97: ...loggiamento del divaricatore ganasce 1 e l O ring 2 Togliere il controdado 3 insieme agli O ring 65 e 66 e al manicotto depressione 46 Spingere il pistone idraulico 7 posteriormente facendolo uscire d...

Page 98: ...le operazioni di smontaggio in ordine inverso I M P O R T A N T E Controllare l attrezzo eseguendo la manutenzione giornaliera e settimanale SEMPRE necessario eseguire il rabbocco dell olio dell attr...

Page 99: ...99 Note Italiano...

Page 100: ...33 34 36 35 27 29 30 A A 38 40 41 37 32 58 31 B B 1 2 3 4 80 9 10 5 6 8 26 27 28 42 44 43 46 66 65 23 25 37 24 13 14 15 16 63 11 12 7 A 62 22 45 18 19 21 20 76 77 78 79 74 75 70 57 64 57 59 64 54 53...

Page 101: ...1 1 1 1 1 1 4 1 2 1 1 1 1 1 1 1 2 1 2 1 1 1 1 1 1 2 1 1 1 1 42 43 44 45 46 47 48 49 50 51 52 53 54 55 56 57 58 59 60 61 62 63 64 65 66 67 68 69 70 71 72 73 74 75 76 77 78 79 80 81 07005 00088 71210 02...

Page 102: ...e un irritazione minore dopo il contatto Incendio TEMPERATURA DI INFIAMMABILIT 232 C Non classificato come infiammabile Metodi di spegnimento d incendio adatti CO2 polvere asciutta schiuma o nebbiolin...

Page 103: ...E Avvitare il dado di bloccaggio 07900 00698 all attacco pistone 1 Scollegare l alimentazione dell aria complessa dall attrezzo o portare la valvola 55 su OFF Riempire la pompa di rabbocco di olio Avv...

Page 104: ...ori della portata dell attrezzo Livello olio basso o aria nell olio Occorre premere il grilletto pi di una volta per piazzare il rivetto L attrezzo non afferra il gambo del rivetto Le ganasce non rila...

Page 105: ...otto la propria esclusiva responsabilit che il prodotto Modello G3 HD N di serie oggetto della presente dichiarazione conforme alle seguenti normative tecniche EN292 parte 1 e parte 2 ISO 8662 parte 1...

Page 106: ......

Page 107: ...l AvdelDeutschland acument com ITALY Avdel Italia S r l Viale Lombardia 51 53 20047 Brugherio MI Tel 39 039 289911 Fax 39 039 2873079 Email vendite acument com JAPAN Acument Japan Kabushiki Kaisha Cen...

Page 108: ......

Reviews: