6
Programming the TIME/DATE
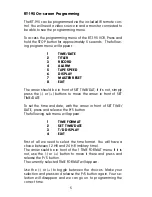
Use the (-) button to move the arrow in front of: 2 SET TIME/DATE
and press and release the P/S button.
The hour position will be flashing. Use the (-) and (+) buttons to
set the correct hour (Make sure the A (am) or P (pm) corresponds
to the hour in 12 hour mode). When the correct hour is displayed,
press and release the P/S button. This will advance the cursor to
the minutes position. Follow the same procedure to set the min-
utes.
Pressing P/S after you have the minutes programmed will ad-
vance you to the Day/Month/Year position, followed by the day
of the week (abbreviated). Use the (-) or (+) buttons to select the
correct date. When you're changing the month, you will notice
that the day of the week changes at the same time. The correct
day of the week will be displayed after you program the correct
date.
Follow the same procedure to set the correct year.
After the correct Time/Date is set, press and release the STOP but-
ton. This will take you back to the sub-menu.
T/D Display
The RT-195 has the option of turning its display on or off. There
may be applications where the time and date are being gener-
ated from a different source, but you still need the Event Record-
ing capabilities.
To turn off the RT-195 display, place the arrow in front of :
3 T/D DISPLAY and press and release the P/S button. The current
choice will appear (the default is ON). To turn the display off, use
the (-) or (+) buttons to toggle between the choices. When you
have made your selection, press and release the P/S button and
your selection will dissapear.
Use the (-) button to place the arrow in front of EXIT and press and
release the P/S button. This will take you back to the main pro-
gramming menu. Now press (-) again to drop down to: 2 Titler.
Then press and release P/S and the Title Display will appear.
Programming a Title
The RT-195 provides you with the option of displaying a 1 line by 20
character title. This will appear as one line of 20 solid blocks, with
the first block flashing. Use the (-) or (+) buttons to select the first
character of your TITLE. After your selection is displayed, press and
release the P/S button to advance to the next character position.
Follow this procedure to complete the programming of your TITLE.


