9
8
RF1-21-US(V1)
RF1-21-US(V1)
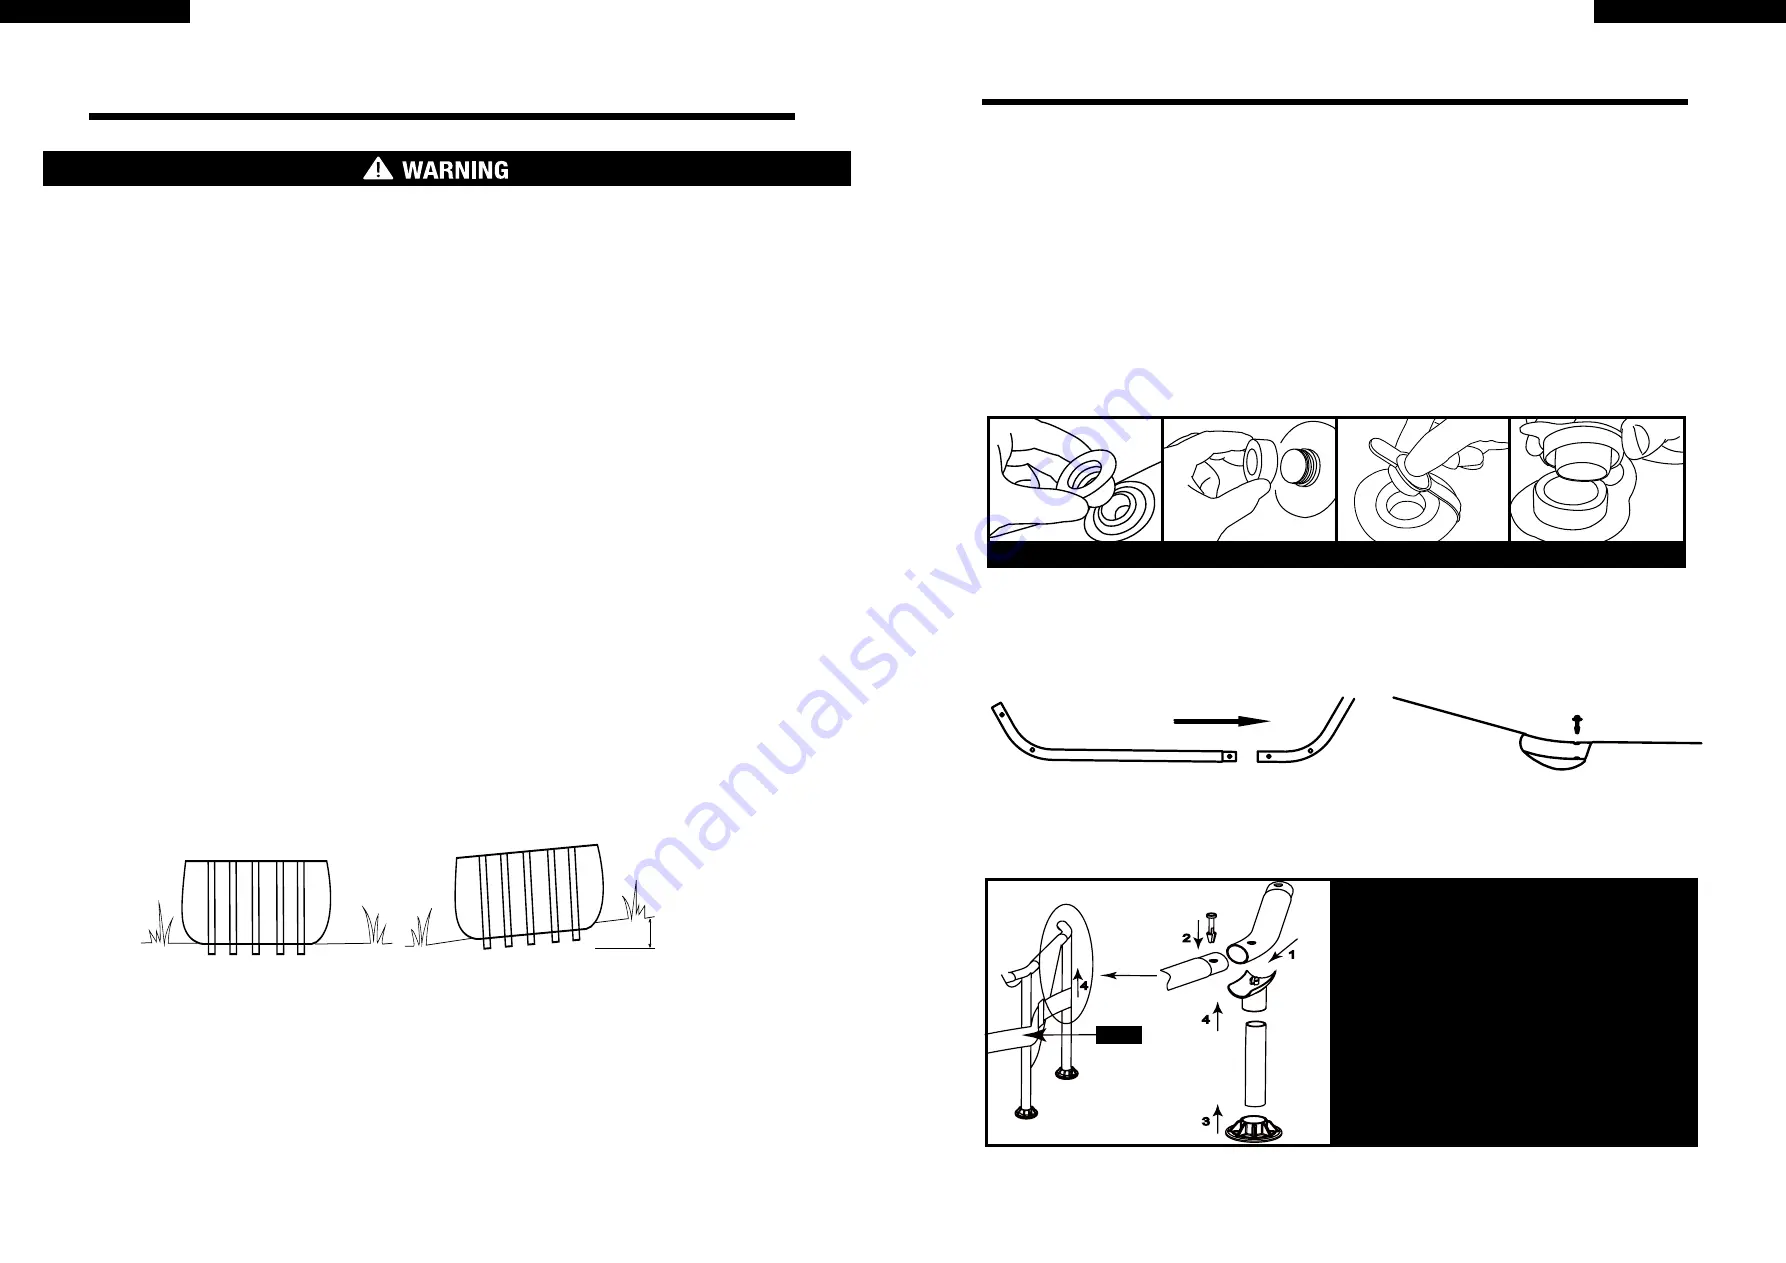
Select an outdoor location for the pool in accordance with the following requirements:
1.The area where the pool is set up must be completely flat and level.Do not set up the pool on a slope or
inclined surface.
2.The ground surface must be compacted and firm enough to withstand the pressure and weight of a fully
set up pool. Do not set up the pool on mud, sand, soft, or loose soil.
3.Do not set up the pool on a deck, balcony, or platform.
4.Be sure that the pool is set up in an area that is free and clear of stones, branches, or other sharp objects
that may puncture the pool liner or cause injury.
+3°
Bumpy,Sloping Ground-INCORRECT
Flat,Level Ground-CORRECT
SETUP INSTRUCTIONS
•Portable pools must be set up in compliance with local safety and building codes.
•The pool location must allow you to secure all doors, windows, and safety barriers to prevent
unauthorized, unintentional, or unsupervised pool entry.
•Install a safety barrier that will eliminate access to the pool for young children and pets.
•Failure to set up the pool on flat, level, compact ground and in accord with the following instructions
could result in the pool’s collapse or the possibility that a person lounging in the pool could be swept
out, resulting in serious injury or property damage.
•Risk of electric shock: The pool must be accessible to a 110 or 230V AC outlet protected by a
Ground Fault Circuit Interrupter (GFCI). The pool should be set no closer than 10 ft. to the power
source, but no further than the length of the filter pump cord. Under no circumstances should an
extension cord be used to extend the range of the connection.
SETUP INSTRUCTIONS
Step1. ACCOUNT FOR ALL PARTS.
Remove all the parts from the carton(s) and place them on the ground in the location where they are to be assembled
Check each part according to “PART REFERENCE” .Make sure all the pieces to be assembled are accounted for.
IMPORTANT:
Do not start assembly if any pieces are missing. For replacement pieces call the Consumer Service
telephone number in your area.
The number of persons required for installation: 2 adult at least.
Total installation time except the time for site preparation and water filling :
30 minutes for size Ф10’×30”/Ф12’×30”
45 minutes for size Ф14’x33”
Step2. INSTALL DRAIN VALVES COVER AND STOPPER
Make sure that outer drain plug is inserted into the outer drain cap and drain valve cover is screwed on tightly.Plug the con-
nection holes with the stoppers. (The out drain plug changes according to different size of pool.)
STOPPER
Out Drain Plug A
Out Drain Plug B
Drain Vavle Cover
Step3.
INSTALL HORIZONTAL BEAM
Step4.
INSTALL T-JOINT
1. Use the connection end of the T-Joint to connect
the adjacent horizontal tubes.
2. Insert the Pin into the hole of connected horizon-
tal tube and T-Joint firmly.
3. Install the vertical leg cap onto the vertical leg.
4. Insert the vertical leg into the T-Joint through the
belt.
TIP: If you can’t find the hole on the horizontal
tube or vertical leg please rotate the tubes until the
pin meets the hole.
BELT
4
3
4
1
2


