background image

www.avenview.com 


1.8


Installation 


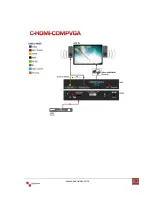
To setup Avenview C-HDMI-COMPVGA follow these steps for connecting to a device: 

1.


Power off display source such as DVD Player, Set-top box etc 

2.


Connect your HDMI and/or DVI source to HDMI input and/or DVI input 

3.


Connect S/PDIF or Stereo Audio source to RCA Jack or 3.5mm Jack 

4.


Connect VGA/Component Y cable to C-HDMI-COMPVGA 

5.


Connect other end of VGA/Component Y cable to VGA or Component input of display 

6.


Plug in 5V DC power cord to power jack of C-HDMI-COMPVGA 

7.


Power on C-HDMI-COMPVGA converter 

8.


Power on HDMI and/or DVI source and display with VGA or Component input. 


S/PDIF format is dependent on the embedded digital audio part in the HDMI stream. The S/PDIF 
receiver must be able to recognize the input S/PDIF format. C-HDMI-DVIA only separates the 
digital audio in HDMI stream and bypasses this decoded audio to the output. 

This version does NOT support 8 Channel analog audio applications 

S/PDIF audio input can support 2 out of 8 channel audio inputs. S/PDIF audio only supports 48 
KHz audio sample rate. 

Summary of Contents for C-HDM-COMPVGA

Page 1: ...riptions at any time without notice No license whether express implied or otherwise to any intellectual property rights is granted by this publication Except as set forth in Avenview Standard Terms an...

Page 2: ...Notices Federal Communications Commission FCC 4 1 4 Introduction 4 1 5 Package Contents 7 1 6 Before Installation 7 1 7 Panel Description 8 1 7 1 Front Panel 8 1 7 2 Rear Panel 8 1 7 3 DIP Switch 8 1...

Page 3: ...nstructions The C HDMI COMPVGA HDMI DVI to Component VGA with Audio Converter has been tested for conformance to safety regulations and requirements and has been certified for international use Howeve...

Page 4: ...instant approach for converting digital HDMI and or digital DVI video signal to Component or VGA with digital S PDIF or analog stereo audio With C HDMI COMPVGA converter HDMI and or DVI based devices...

Page 5: ...www avenview com 5...

Page 6: ...www avenview com 6...

Page 7: ...stallation Put the product in an even and stable location If the product falls down or drops it may cause an injury or malfunction Don t place the product in too high temperature over 50 C too low tem...

Page 8: ...6 Power Connector 1 7 2 Rear Panel 1 2 3 4 1 S PDIF OUT 2 STEREO OUT 3 COMPONENT VGA OUT 4 VGA COMPONENT Switch Button 1 7 3 DIP Switch PIN Mode 1 ON Learn EDID from VGA socket and save EDID to HDMI...

Page 9: ...t input of display 6 Plug in 5V DC power cord to power jack of C HDMI COMPVGA 7 Power on C HDMI COMPVGA converter 8 Power on HDMI and or DVI source and display with VGA or Component input S PDIF forma...

Page 10: ...put 1 x VGA 1 x RCA digital Audio 1 x 3 5mm analog Audio Component through VGA to Component Adapter HDMI Connector Type A 19 pin female DVI Connector DVI I 29 pin female digital only VGA Connector HD...

Page 11: ...5Hz VESA 800x600 85Hz VESA 1024x768 60Hz VESA 1024x768 75Hz VESA 1024x768 85Hz Supported Mode Resolution VESA 1152x864 60Hz VESA 1152x864 75Hz VESA 1152x864 55Hz VESA 1280x768 60Hz VESA 1280x768 75Hz...

Page 12: ...o input supports the main 2 channel audio input 4 S PDIF supports only 48kHz audio sample rate Other than this rate the input digital audio should be adjusted to 48kHz in order to get audio signal cor...

Page 13: ...atory profits or for punitive incidental or consequential damages in connection with the furnishing performance or use of the Avenview hardware software or other products and documentation provided he...

Reviews: